
On this page
Welcome to the VMIA portal help centre!
We've organised the content into categories on the menu to help you easily find what you need. Under each category, you'll find summarised instructions with step-by-step instructions to help you navigate the portal with ease.
If you can’t find the information you’re looking for or have any questions, please get in touch with us at contact@vmia.vic.gov.au or on (03) 9270 6900.
Important: For security reasons you will be automatically logged out of the VMIA Portal after 1 hour of inactivity. Please ensure you submit your data to avoid losing it.
Portal login(opens in a new window)
Not registered for portal? Please contact the portal administrator in your organisation to arrange access.
Getting started
Accessing portal
Important: For security reasons you will be automatically logged out of the VMIA Portal after 1 hour of inactivity. Please ensure you submit your data to avoid losing it.
PORTAL LOGIN(opens in a new window)
Not registered for portal? Please contact the portal administrator in your organisation to arrange access.
All users with portal access must use their own login details. To log in to the VMIA portal, use your personal organisation email address as your username and the password you have set for your account.
Note: If your email has changed and is not reflected in our current records, you can ask your Portal Administrator to change your email address on your behalf or alternatively, send VMIA written authorisation for your email to be changed on organisational letterhead and we will update your details.
Multi Factor Authentication
When you enter your login details, you will be asked to enter a verification code that has been sent to your email address (from noreply@vmia.vic.gov.au). This is called multi-factor authentication and has been introduced to enhance the security of the VMIA portal.
Note: If you do not receive an email containing the authentication code within 5 minutes, check your Spam/Junk folder for an email from noreply@vmia.vic.gov.au. Additionally, check if your IT team have a security policy in place that may have blocked the email. Provide them with the email address so they can include it in the allowed list (whitelist the email address).
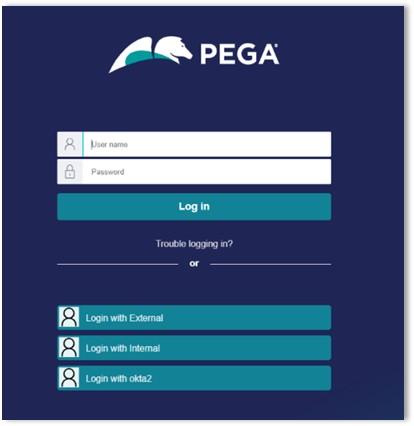
Step 1. From the homepage of the VMIA website, select the ‘Login’ button.
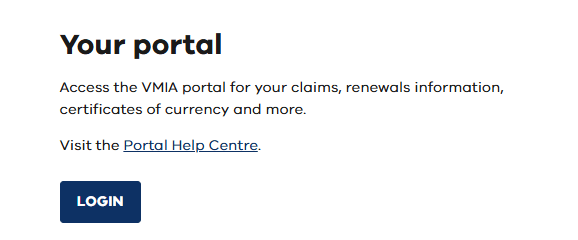
Note: Alternatively, copy and paste the following URL into your browser to access the VMIA portal login page: https://portal.vmia.vic.gov.au(opens in a new window).
Step 2. Enter your email and password and click ‘Login’.
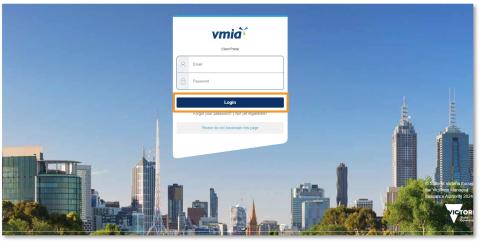
Note: Do not save a bookmark of the portal login page on your computer as this may cause issues when you attempt to access the site at a later stage.
Step 3. An authentication code will be sent to your email. Enter the code on the portal login page and click ‘Verify Code’. This step is called multi-factor authentication and has been introduced to enhance the security of the VMIA portal.
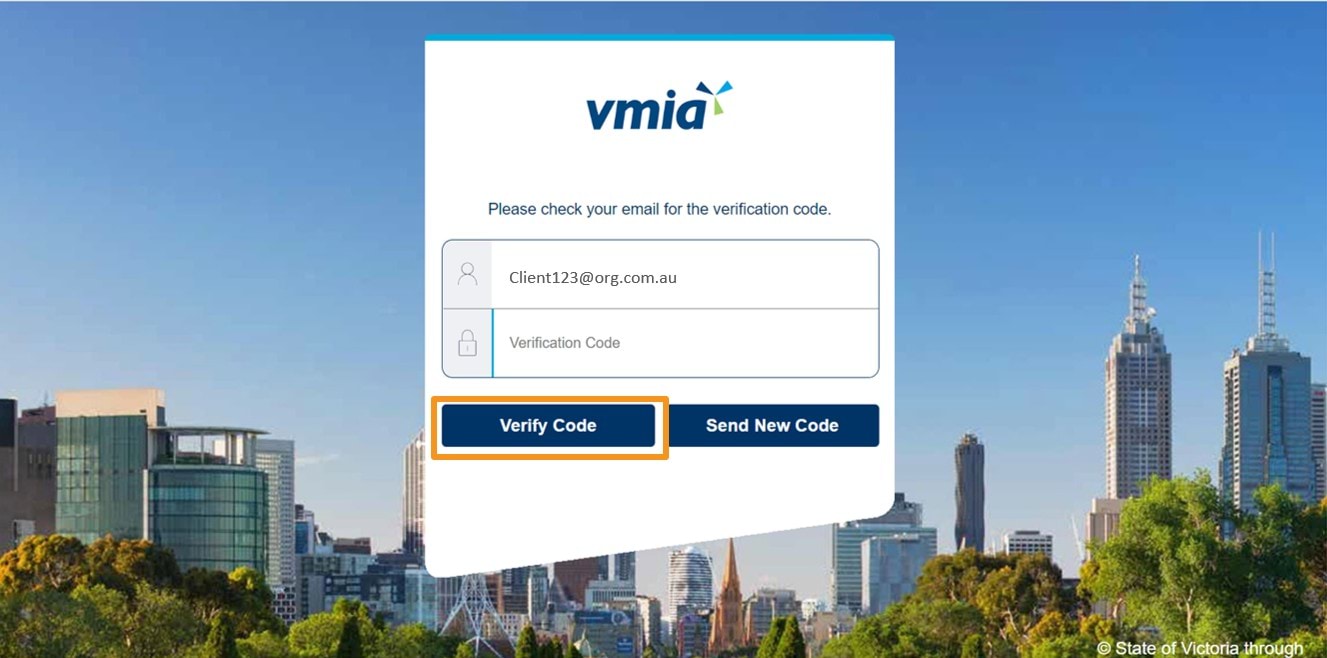
Note: If you do not receive an email containing the authentication code within 5 minutes, check your Spam/Junk folder for an email from
noreply@vmia.vic.gov.au. Additionally, check if your IT team have a security policy in place that may have blocked the email. Provide them with the email address above so they can include it in the allowed list.To log in to the VMIA portal, use your organisation email address as your username. If you forgot your password, follow the steps in the guide to log in and set a new password.
Note: If your email has changed and is not reflected in our current records, contact VMIA on (03) 9270 6990 or email contact@vmia.vic.gov.au and we’ll reset your access link.v
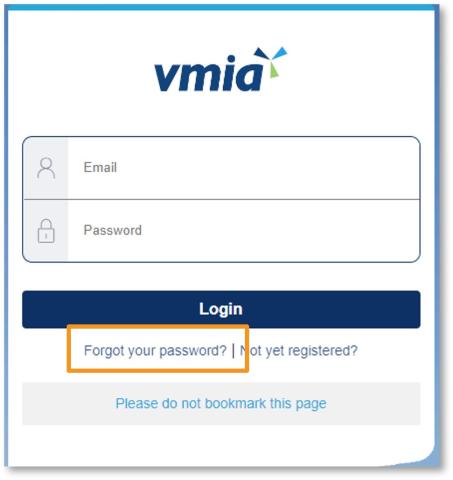
Step 1. On the VMIA portal login page, click ‘Forgot your password?'.
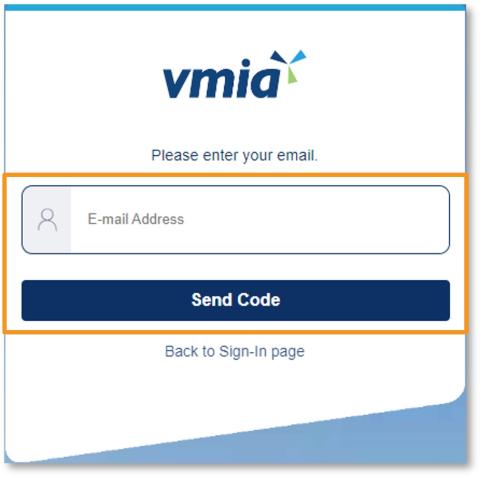
Step 2. Enter your email address and click ‘Send Code’.
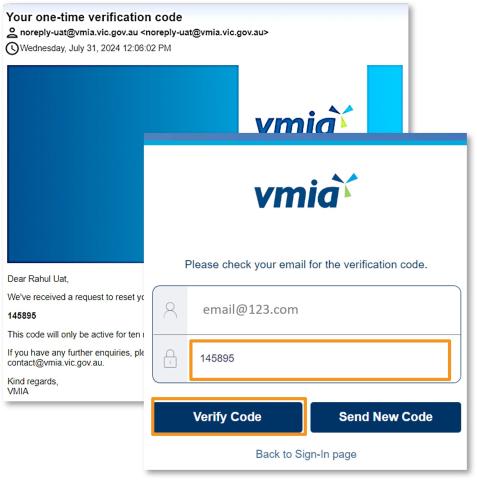
Step 3. Enter the authentication code you receive in the password reset email and click ‘Verify Code’.
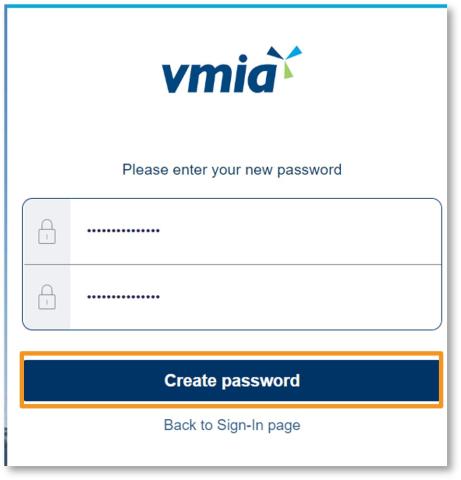
Step 4. Enter your new password and click ‘Create password’.
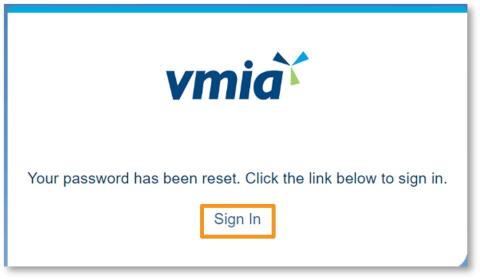
Step5. Once you have reset your password, click the link to return to the login page and log in using your new password.
You may receive a PEGA error if you are accessing the VMIA portal through a bookmark that you have created on your computer instead of accessing the portal via the VMIA website. We advise that you do not save a bookmark of the portal login page on your computer and that you access it via the VMIA website each time.
As a first step, close all your existing browser windows. Then, open a new browser window and enter the URL: portal.vmia.vic.gov.au. If you are still experiencing difficulty accessing the portal, you may need to clear your browser cache.
You may receive the following PEGA error message if you click on a link to the VMIA portal that you have bookmarked on your computer. You may need to clear your browser cache in order to access the VMIA portal. The below slides outline steps to clear the cache on your browser if you are using either Microsoft Edge or Google Chrome as your browser. Once you have done so, navigate to the VMIA portal login page via the VMIA website.
Follow the below steps to clear the cache on your browser if you are using Microsoft Edge. Once you have done so, navigate to the VMIA portal login page via the VMIA website.
Step 1. Select at the same time on your keyboard, Ctrl + Shift + Delete.
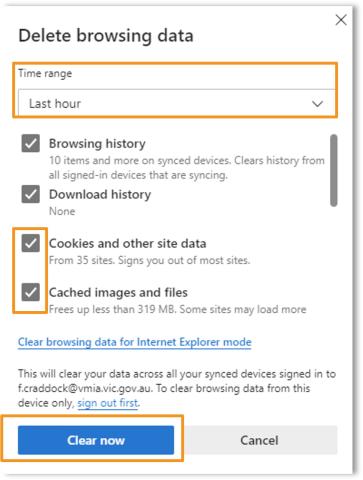
Step 2. Choose a time range. To clear your entire cache, select ‘All Time’.
Step 3. Check the boxes next to 'Cookies and other site data' and 'Cached images and files'.
Step 4. Click 'Clear now’ to clear your browser cache.
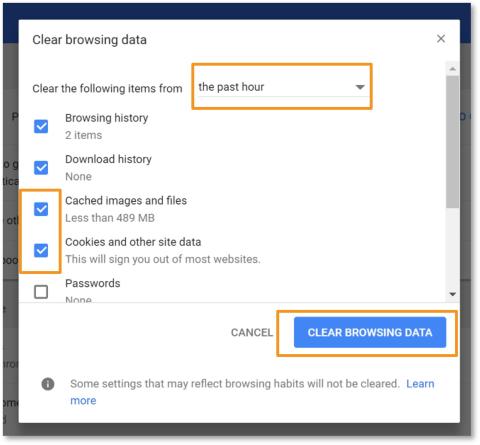
Follow the below steps to clear the cache on your browser if you are using Google Chrome. Once you have done so, navigate to the VMIA portal login page via the VMIA website.
Step 1. Select at the same time on your keyboard, Ctrl + Shift + Delete.
Step 2. Choose a time range. To delete everything, select ‘All time’.
Step 3. Check the boxes next to 'Cookies and other site data' and 'Cached images and files'.
Step 4. Click 'Clear Browsing Data’ to clear your browser cache.
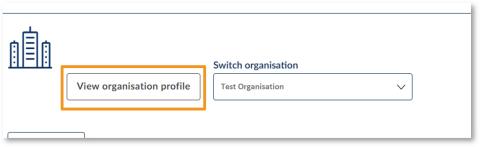
If you are the insurance contact for multiple organisations, you will be able to access the insurance details for all relevant organisations within the portal by selecting the ‘Switch organisation’ drop-down.
The VMIA portal is secure and is supported by Azure technology to authenticate users in the portal. Data is always encrypted in transit and stored in the cloud. Microsoft Azure infrastructure uses several mechanisms to ensure their customers’ networks remain segregated and secure.
VMIA portal account types
Understanding the different account types
PORTAL LOGIN(opens in a new window)
Not registered for portal? Please contact the portal administrator in your organisation to arrange access.
There are multiple different account types on the VMIA portal, with detailed descriptions outlined in the table below. Account types indicate to VMIA who we should contact regarding certain matters, e.g., who we should send communications to, or the type of information we can share. Account types can also serve to notify VMIA of the contact’s role in the organisation, e.g., Head of org. Contacts with the ‘Admin’ account type have additional permissions in the portal, allowing them to manage the profile settings for all contacts. We refer to these account types as the Portal Administrators. When adding a new contact to the portal, the Portal Administrator will select the account type(s) the new contact should be assigned and whether to give that contact portal access or not. Contacts can be assigned multiple account types.
Certain account types, (e.g., Insurance) must be assigned to at least one contact, while others only need a contact if you hold specific policy types with VMIA (e.g., Construction, Vicfleet). Some account types should only have one contact assigned (e.g., Head of Org, MI Contact, and Renewal Coordinator), but others can be assigned to multiple contacts, if necessary (e.g., Insurance, Claims).
Portal access is mandatory for certain account types, while for others, it’s optional. See the right-hand column in the table below for information about which account types require portal access. For certain account types (e.g., Insurance), it’s mandatory for at least one contact to have portal access, though not all contacts need access. When portal access is optional, you have the flexibility to decide whether or not to grant it. If granted, portal access provides access to all insurance and claims information (except for claims that have been marked ‘private’).
Note: when a new contact is added to the portal, they will automatically be granted portal access and will be able to view everything on the portal, including policies and claims (except for claims that have been marked ‘private’). If you wish to remove a contact’s portal access or make any other changes, the Portal Administrator can do so by updating the contact's profile in the portal. Further details are outlined in the section named, ‘Managing contacts on the portal’.
Note: in order to remove the 'Delegate Restricted Access' account type from a contact’s profile, an IT ticket must be raised. If you need to do this, please reach out to VMIA’s Client Advisory Team on (03) 9270 6990 or email contact@vmia.vic.gov.au. For a breakdown of the different account types, please see the table below.
Account type/contact Allocation Portal access Details Admin You must have at least two contacts of this type. Mandatory We refer to contacts with this account type as Portal Administrators.
Admins are responsible for managing the organisation’s list of contacts in the portal, and are the only account type that can add, update, or remove other contacts.
Note - this is not a reference to administrative staff within your organisation.
Head of org You can only have one contact of this type. Optional Typically your CEO. Insurance You must have at least one contact of this type. Mandatory (for at least one contact) VMIA risk advisers liaise with these contacts for all insurance and risk enquiries, including finance and general claims enquiries.
These contacts also receive communications throughout the year and at renewal time relating to your organisation's insurance program.
There must be at least one contact of this type, but you can have multiple Insurance contacts.
Renewal Coordinator You must have one contact of this type if your organisation completes an RRI. Mandatory Responsible for completion of the Renewal Risk Information (RRI) questionnaire for your annual insurance renewal.
Linked to the Delegated Restricted Access account type [last row in this table].
Construction You must have one contact of this type if your organisation has Construction insurance. Optional Receives communications for construction policy transactions, as well as renewals. VMIA liaises with this contact for construction-related queries as the subject matter expert. SRS You must have one contact of this type if your organisation has Property insurance AND may be subject to site risk surveys. Optional Our risk engineers work with SRS contacts to arrange site risk surveys (SRS) for your Property insurance. Cyber You must have one contact of this type if your organisation has Cyber insurance. Optional VMIA liaises with this account type for cyber-related queries as the subject matter expert. Vicfleet
For Vicfleet clients only
You must have one contact of this type for Vicfleet clients with Motor Insurance. Mandatory For Vicfleet clients, this contact is responsible for completing the Motor Insurance Renewal Risk Information (RRI) at renewal. Fleet Manager
For non-Vicfleet clients
You must have one contact of this type required for non-Vicfleet clients with Motor Insurance. Mandatory For non-Vicfleet clients, you need to assign this account type.
The person responsible for completing the Motor Insurance Renewal Risk Information (RRI) at renewal.
Claims Use only if you want a dedicated contact for the lodgement of claims. Optional Contacts do not need this account type to lodge a claim. Finance Contact for finance. Optional VMIA may liaise with this contact on finance-related matters as a subject matter expert. Risk Contact for risk-related enquiries. Optional VMIA liaises with this contact on risk-related enquiries as a subject matter expert. MI contact You must have one contact of this type if your organisation has Medical Indemnity (MI) Insurance. Optional Receives the Medical Indemnity Premium Notification letters. IBPS contact You must have at least one contact of this type if your organisation participates in Incentivising Better Patient Safety (IBPS). Mandatory Receives information on the Incentivising Better Patient Safety (IBPS) attestation. IBPS Signatory You must have only one contact of this type if your organisation participates in Incentivising Better Patient Safety (IBPS). Mandatory This contact completes the Incentivising Better Patient Safety (IBPS) questionnaire and sends the IBPS attestation to VMIA once it has been signed off by their CEO. Delegate restricted access (DRA) For contacts in your organisation who have been delegated a question in the Renewal Risk Information (RRI) questionnaire. Mandatory A Renewal Coordinator can assign/delegate a question from the Renewal Risk Information (RRI) questionnaire to any contact in the portal. The contact must be assigned DRA account type to be able to see the question.
- If the contact already has portal access, their view in the portal will not change after they are assigned DRA account type
- If the person is not in the portal, they will need to be added as a new contact and given portal access and the DRA account type
- If the contact is in the portal but does not have portal access, you must remove the other account types from their profile before giving them portal access and the DRA account type. If you don’t, they will be able to view everything in the portal. You can remove portal access and reinstate their account types afterwards.
A simpler way of delegating questions to others who are not in the portal or who are in the portal but do not have portal access is for the Renewal Coordinator to download a PDF of the RRI and email to the contact or division within the organisation advising which questions or sections to answer. The Renewal Coordinator can add the answers to the RRI on their behalf.
Assistance from a Portal Administrator is required to add a new contact or make changes to a contact’s profile.
Does everyone at my organisation use the same login?
No, all contacts with portal access will have their own unique logins, utilising their organisation email address as their username. There is no limit to the number of contacts that an organisation can set up to manage their insurance requirements. Note: it is possible for contacts who don’t necessarily work in the insurance area to be given access to the VMIA portal, if required.
Note: it is possible for contacts who don’t necessarily work in the insurance area to be given access to the VMIA portal, if required.
Who can view claims I submit via the VMIA portal?
Non-private claims can be viewed by members of your organisation with the relevant permissions in the portal. Private claims can only be viewed by members of your organisation who have been allocated access to the claim, along with VMIA claim handlers. For more information on private claims, please refer to the section called, 'How do I view and update privacy details on an existing claim online’ within the 'Managing existing claims' section.
How do I become or add a new portal contact (to make claims - non administrator)?
All new contacts must be added by a Portal Administrator. Follow the steps outlined in the section called ‘How do I add additional contacts?’.
What does a Portal Administrator do?
A Portal Administrator is responsible for managing portal access within their organisation (adding, updating, and removing contacts, as required). If you are unsure of who your organisation’s Portal Administrators are, please contact the VMIA Client Advisory Team on (03) 9270 6990 or email contact@vmia.vic.gov.au
How do I find out who our Portal Administrators are?
Only Portal Administrators can view which members within your organisation have admin access. If you are unsure of who your organisation’s Portal Administrators are, please contact the VMIA Client Advisory Team on (03) 9270 6990 or email contact@vmia.vic.gov.au
How do I become a Portal Administrator?
Only Portal Administrators can update other portal contacts and assign the Admin account type. Ask a Portal Administrator in your organisation to assign this account type by following the steps outlined in the section called, ‘How do I assign admin permissions to an existing contact?’. If you do not know who your organisation’s Portal Administrators are, please contact the VMIA Client Advisory Team on (03) 9270 6990 or email contact@vmia.vic.gov.au
Updating organisation and contact information
Keeping your details up to date
PORTAL LOGIN(opens in a new window)
Not registered for portal? Please contact the portal administrator in your organisation to arrange access.
You can update your organisation details, (e.g., organisation name), via the VMIA portal by clicking ‘View organisation details’ on the homepage, making the necessary changes, and clicking ‘Submit’ to save.
Depending on your user role on the portal, you may have to submit a reason for the change to your organisation details. Information regarding any changes made to the organisation details will be stored on the system for auditing purposes.
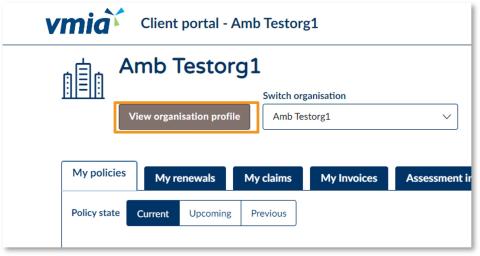
Step 1. To update organisation details, click on ‘View organisation profile’ from the portal homepage.

Step 2. Click ‘Edit organisation details’.
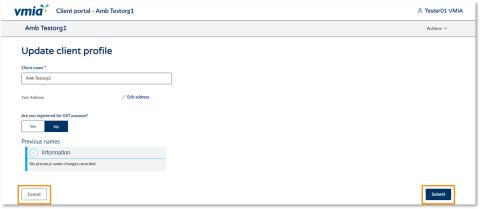
Step 3. Make any required changes and click ‘Submit’ to save the changes.
Note: if you no longer wish to make any changes to the organisation details, click ‘Cancel’ to return to the previous screen.
You can update your contact information, (e.g., job title or name), via the VMIA portal by clicking on your name in the top right-hand corner of the homepage and selecting ‘My profile’, making the necessary changes, and clicking ‘Submit’ to save.
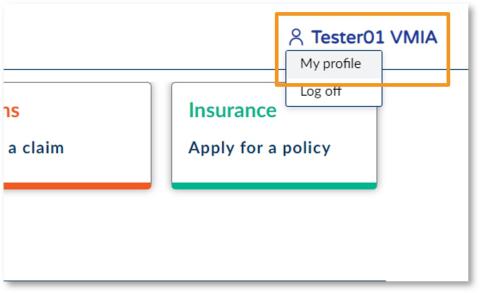
Step 1. To update your contact details, click on your name in the top right-hand corner of the homepage and select ‘My profile’.
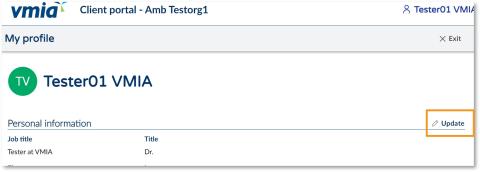
Step 2. Click the ‘Update’ button on the relevant field.
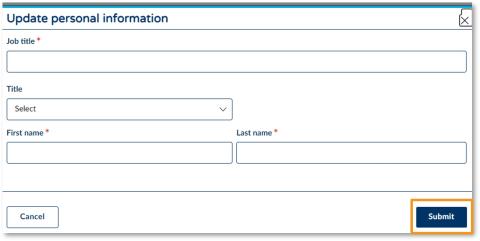
Step 3. Update your details as required and click ‘Submit’ to save.
Updating the asset register
Updating the asset register
PORTAL LOGIN(opens in a new window)
Not registered for portal? Please contact the portal administrator in your organisation to arrange access.
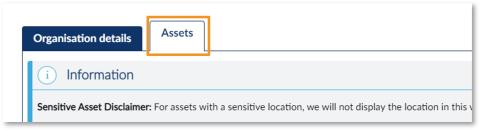
You can update your organisation’s assets on the VMIA portal by clicking ‘View organisation profile’ from the portal homepage and selecting the ‘Assets’ tab. From here, you can add, update, and dispose of assets. You can also export your organisation’s asset register, if required.
Note: this information is only of relevance for organisations that have a Property policy with VMIA. Organisations that do not have a Property policy will not have the ‘Assets’ tab on their organisation profile.
For organisations that have a Property policy with VMIA, updating your assets on the VMIA portal can be done at any time by clicking ‘View organisation profile’ from the homepage and selecting the ‘Assets’ tab. From here, you can add, update, and dispose of assets, or export the asset register.
Follow the steps outlined in the slides below to:
- Add an asset
- Update an asset
- Dispose of an asset
- Export an asset register
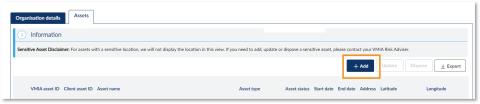
Step 1. From the ‘Assets’ tab, select ‘+Add’.
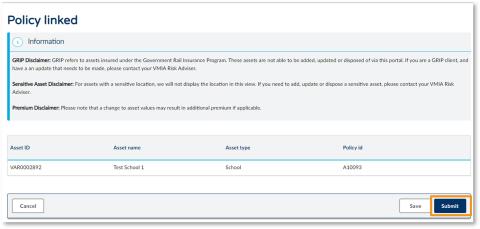
Note: GRIP (asset insured under Government Rail Insurance Program) or Sensitive Assets (location of asset is considered sensitive) will not display in the portal. If you need to make changes to these asset types, contact your Risk Adviser.
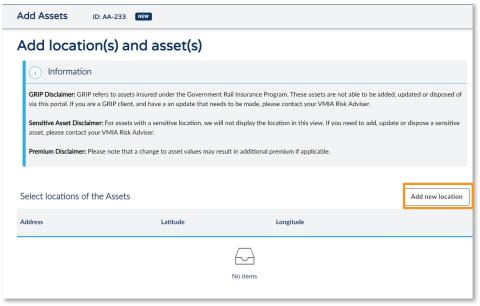
Step 2. Select ‘Add new location’.
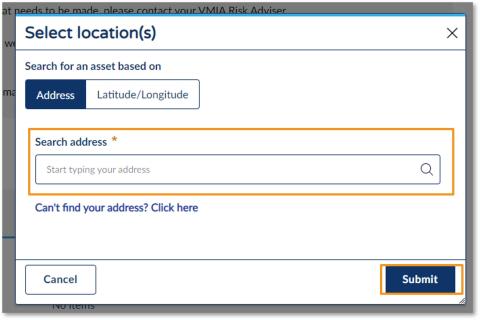
Step 3. Enter the address and select the correct option from the drop-down options.
Note: If you can't find the correct matching address or if the asset does not have a street address, please contact your Risk Adviser for assistance.
Step 4. Click ‘Submit’.
Note: Please contact your Risk Adviser for assistance if you have a significant number of assets which need to be added/updated at once, where it is not feasible to do so individually (e.g. 1,000 new acquired properties).
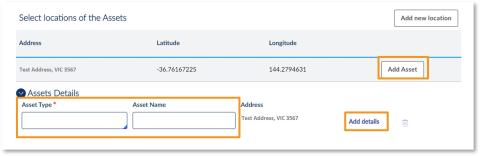
Step 4. Select ‘Add Asset’.
Step 5. Enter the Asset Type and Asset Name and select ‘Add details’.
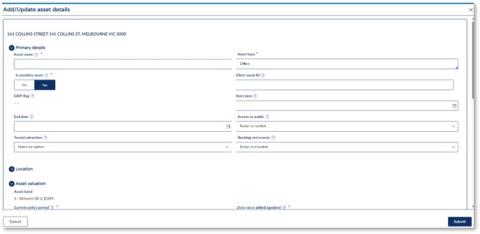
Step 6. Complete all relevant asset details fields.
Note: you will not be able to continue before you complete all mandatory fields (marked with an *). Select ‘Submit’.
Click here if you want more information about the Asset details fields.
Note: If your asset does not fall under any of the Asset types drop-down options, or you need it categorised in a specific way, please contact your Risk Adviser for assistance.
Note: An accurate replacement value must be included in at least one of the value type fields (e.g., Building/Contents/Other) before your asset can be approved.

Step 7. Click ‘Add new’ to add attachments.

Step 8. Click ‘Select file(s)’ OR drag and drop your file(s) directly from (for example) an email or a location on your computer.
Step 9. Click ‘Attach’ and then click ‘Continue’.

Note: If you need to make a change, select the ‘Back’ button.
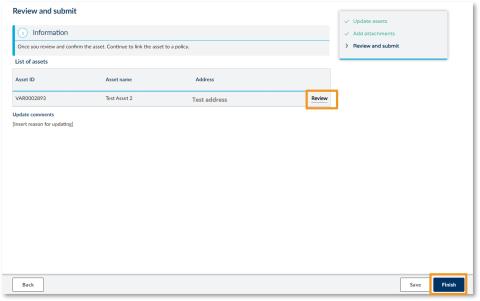
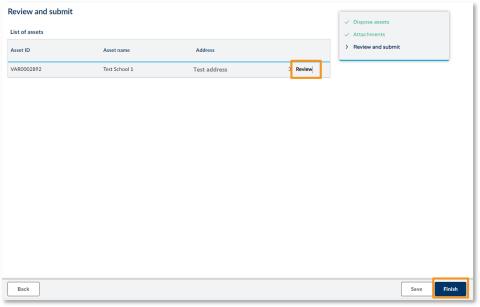
Step 10. Click ‘Review’ to review the asset details you have provided.
Step 11. Once you are happy, click ‘Finish’.
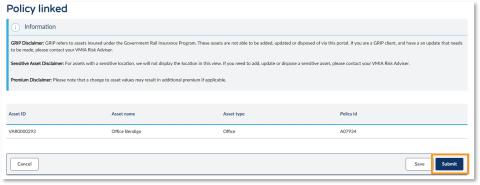
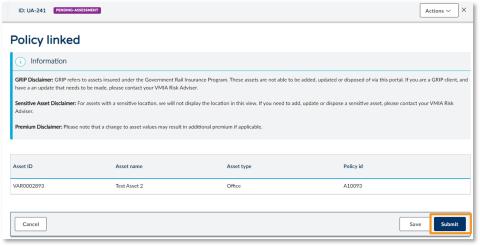
Step 12. Select ‘Submit’.
Note: The asset will only appear in your asset register on the portal once it has been reviewed and approved.
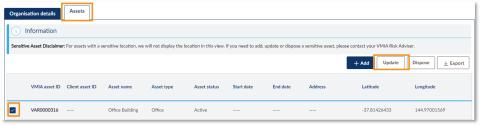
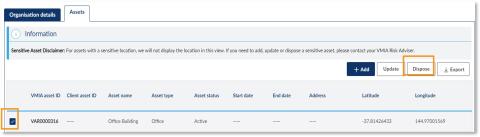
Step 1. From the ‘Assets’ tab, select the checkbox next to the asset(s) you want to update.
Step 2. Click ‘Update’.
Note: GRIP (asset insured under Government Rail Insurance Program) or Sensitive Assets (location of asset is considered sensitive) will not display in the portal. If you need to make changes to these asset types, contact your Risk Adviser.
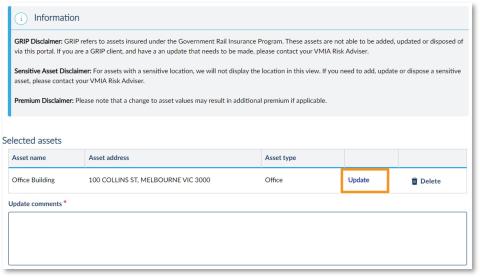
Step 3. Select ‘Update’ and enter the updated data into the relevant fields on the Add/Update asset details screen. Select ‘Submit’.
Step 5. Add a comment explaining the reason for updating in the ‘Update comments’ text box and select ‘Continue’.
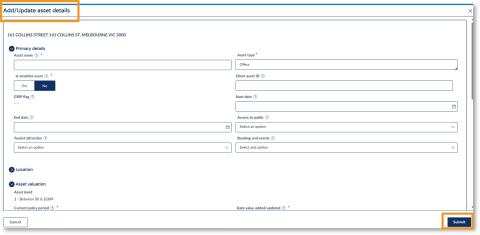
Step 4. Enter the updated data into the relevant fields on the Update asset details screen, ensuring all mandatory fields (marked with *) are completed. Select ‘Submit’.
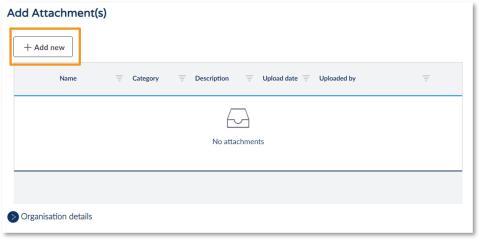
Step 6. Click ‘Add new’ to add attachments (if applicable).

Step 7. Click ‘Select file(s)’ OR drag and drop your file(s) directly from (for example) an email or a location on your computer.
Step 8. Click ‘Attach’ and then click ‘Continue’.
Step 9. Review the updated details.
Step 10. Select ‘Finish’.
Note: GRIP (asset insured under Government Rail Insurance Program) or Sensitive Assets (location of asset is considered sensitive) will not display in the portal. If you need to make changes to these asset types, contact your Risk Adviser.
Step 11. Select ’Submit’.
Step 1. In the ‘Assets’ tab, select the checkbox next to the asset(s) you want to dispose of.
Step 2. Click ‘Dispose’.
Note: GRIP (asset insured under Government Rail Insurance Program) or Sensitive Assets (location of asset is considered sensitive) will not display in the portal. If you need to make changes to these asset types, contact your Risk Adviser.
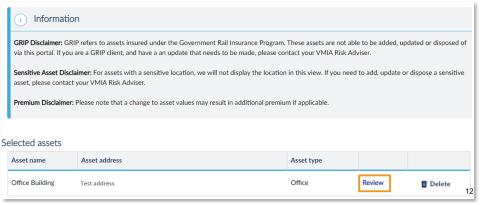
Step 3. Select ‘Review’ if you wish to preview the asset details. Select ‘Continue’.

Step 4. Click ‘Add new’ to add attachments (if applicable).

Step 5. Click ‘Select file(s)’ OR drag and drop your file(s) directly from (for example) an email or a location on your computer.
Step 6. Click ‘Attach’ and then click ‘Continue’.
Step 7. Review the updated details.
Step 8. Select ‘Finish’.
Note: GRIP (asset insured under Government Rail Insurance Program) or Sensitive Assets (location of asset is considered sensitive) will not display in the portal. If you need to make changes to these asset types, contact your Risk Adviser.
Step 9. Select ’Submit’.
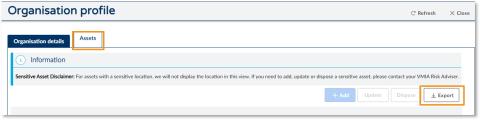
Step 1. In the ‘Assets’ tab, select the ‘Export’ button.
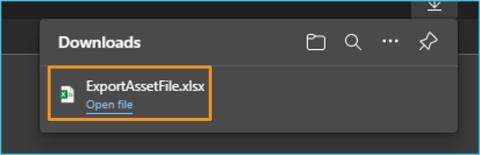
Step 2. An Excel file will download to your device.
Note: This export file is limited to 10,000 records. If you have more than 10,000 assets recorded, please request a full extract from your Risk Adviser
Appendix
The purpose of this appendix is to provide further information about the asset details fields, including their definitions and whether they are mandatory (row highlighted in grey). Click here to return to the section on ‘How to add an asset’.
Section – Primary Details:
Field name Mandatory (yes/no) What to use this for Asset Name Yes Please use this to record the name or description of the asset to assist in identifying what the asset is when reviewing the asset register. If the asset has no name, we can use the client name and location e.g. ‘CFA – Bendigo’ Asset Type Yes Drop-down list – select the most appropriate option. VMA Asset ID n/a VMIA use only – Auto-issued by system Client Asset ID No You can use this to note your own internal asset IDs to assist with matching records between VMIA’s system and your own internal asset register GRIP Flag No VMIA use only – this only relates to rail assets Related assets within site No VMIA use only – grouping of assets for reinsurance reporting Start Date No You can provide a start date of when the asset was acquired or is required to be insured from End Date No Not currently used. You will need submit a dispose asset case if they wish to remove an asset from their asset register/policy Access to Public No You or VMIA internal users can select these as information is available. These 3 options assist us when looking at all client data e.g. to book an event at your insured location Tourist Attraction No You or VMIA internal users can select these as information is available. These 3 options assist us when looking at all client data e.g. to book an event at your insured location Bookings and Events No You or VMIA internal users can select these as information is available. These 3 options assist us when looking at all client data e.g. to book an event at your insured location Section – Location:
Field name Mandatory (yes/no) What to use this for Address Line 1 No This will be filled out if the location was added by matching to a searched street address. Address Line 2 No This will be filled out if the location was added by matching to a searched street address. Unit / Level No If the location is part of a larger site and the asset has a street address – e.g. unit 1, level 9 Street Number No To record the street number if the asset has a street address Street Name No To record the street name if the asset has a street address City Yes To record the suburb/town the asset is in. This is mandatory and must be completed for all assets State Yes To record the state that the asset is in. This is mandatory and must be completed for all assets Country Yes To record the country that the asset is in. This is mandatory and must be completed for all assets Post Code Yes To record the postcode that the asset is within. This is mandatory and must be completed for all assets Cresta Zone Yes This will automatically populate based on the postcode within Victoria – if you are updating an asset outside of Victoria, please contact your risk adviser Latitude Yes This is essential and must be in the correct format – decimal degrees. We cannot use Degrees, Minutes, Seconds and cannot use Easting Northings. Do not enter text or ‘0’ Format example: -37.81492575846457 (DDD.DDDDD°). If you require assistance, please contact your RA. Section – Asset Valuation:
Field name Mandatory (yes/no) What to use this for Asset Band N/A VMIA use only – auto selected based on the total value of the asset Current Policy Period Yes This should automatically fill out for you. This needs to be the current policy period at the time you are submitting the change. Date value added / updated Yes This should automatically fill out for you. This needs to be the date you are submitting the change. Building Value No Record the replacement value of buildings to be insured Valuation Source – Building Yes - If building value added Please select Client declared value and the current policy period – all other options are used internally only Valuation Type - Building Yes - If building value added This should generally be replacement value. If you are selecting something else, please confirm with your risk adviser if appropriate. Contents Value No Record the replacement value of contents and fit-out to be insured Valuation Source – Contents Yes - If contents value added Please select Client declared value and the current policy period – all other options are used internally only Valuation Type - Contents Yes - If contents value added This should generally be replacement value. If you are selecting something else, please confirm with your risk adviser if appropriate. Other Value No Record the replacement value of items that aren’t building or contents, e.g. infrastructure like roads/rail, plant and equipment, vessels Valuation Source – Other Yes - If other value added Please select ‘Client declared value’ and the current policy period – all other options are used internally only Section – Asset Construction Information:
Field name Mandatory (yes/no) What to use this for Heritage Asset No To flag a heritage asset Victorian Heritage Number No To record the VHR number if applicable Floor Construction Material No To record the main material used in the floor construction of the building Roof Construction Material No To record the main material used in the roof construction of the building Wall Construction Material N No To record the main material used in the wall (external) construction of the building Construction Start Date No To record the start date of renovation construction if applicable Construction End Date No To record the end date of renovation construction if applicable Last Renovation Date No To record the date of the most recent renovation if applicable Predominant Construction Type No To record the predominant construction type Year Built No To record the year the building was built Age No To record the age of the building Maximum Stories Above Ground No To record the number of stories above ground level Maximum Height Above Ground (metres) No To record the height of the building in metres, above ground level Construction Condition No To record the construction condition of the building Asbestos Register In Place No To record whether there is an asbestos register in place for this building Asbestos Identified No To record whether asbestos has been identified on site Asbestos Comments No To record any additional commentary around asbestos on site Ground Floor Area (sqm) No To record the ground floor area of the building Number of Parking Spaces No To record the number of parking spaces as part of the site Cladding details No To record details of any potentially combustible cladding on site *All fields in this section are optional.
Managing existing claims
Managing existing claims in portal
PORTAL LOGIN(opens in a new window)
Not registered for portal? Please contact the portal administrator in your organisation to arrange access.
You can check the status of previously lodged claim request in the VMIA portal by scrolling down to the bottom of the portal homepage and clicking on the ‘My open cases’ tab. In this view, you can see your active and complete claims. Refer to the ‘Status’ column to check the status of a given claim.
Note: not all claims that have been lodged are captured in the portal. If you wish to see a full claims history, please contact your Risk Adviser.
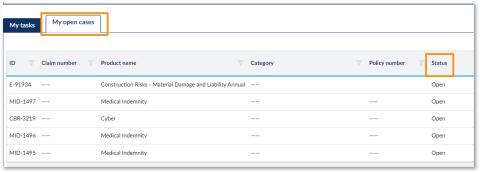
Step 1. On the homepage, scroll down and click on ‘My open cases’. In this view, you can see your active and complete claims. Refer to the ‘Status’ column to check the status of a given claim.
Tip: If you need to enquire about a claim, you can use the claim or policy number for easy reference.

Tip: You can apply filters to the list by clicking on the funnel icon beside the column title.
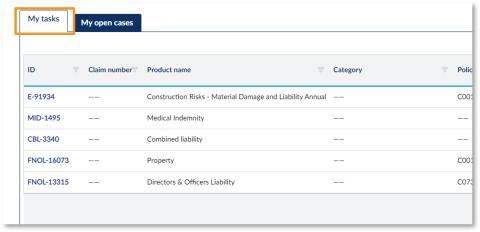
Tip: Click on the ‘My tasks’ tab to see actions you need to take e.g., your invoices, policy quote approval.
You can enable privacy on a claim both before and after the claim has been submitted, allowing you to restrict access to the claim to specific users in your organisation. To view and/or update privacy details on an existing claim (i.e., whether privacy is enabled and if yes, which users have access to the private claim), navigate to the ‘My claims’ tab on the portal homepage, locate the claim that you wish to view/update privacy details for, click on ‘Actions’, and select ‘Manage privacy’. A pop-up will appear which will allow you to view and/or edit the privacy details on the claim.
Step 1. On the homepage, scroll down and click on ‘My open cases’. In this view, you can see your active and complete claims. Refer to the ‘Status’ column to check the status of a given claim.
Tip: If you need to enquire about a claim, you can use the claim or policy number for easy reference.
Tip: You can apply filters to the list by clicking on the funnel icon beside the column title.
Tip: Click on the ‘My tasks’ tab to see actions you need to take e.g., your invoices, policy quote approval.
You can add additional attachments to open claims from the ‘My claims’ tab on the VMIA portal by locating the claim you wish to add an additional attachment(s) to and selecting ‘+ Add new’ from the ‘Attachments’ tab. You will then be able to upload a file(s) from your device and attach it to the claim.
Note: The claims handler will be notified that additional documents have been attached, so there's no need to email them separately.
Step 1. From the portal homepage, click on the ‘My claims’ tab.
Step 2. Click on the claim you wish to add an additional attachment(s) to.
Step 3. Click on the ‘Attachments’ tab.
Step 4. Under the ‘Attachments’ tab, click on ‘+ Add new’. Once you do so, a window will appear asking you to select the files you wish to attach to your claim.
Step 5. Click on ‘Select file(s)’ OR drag and drop your file(s) directly from (for example) an email or a location on your computer.
Step 6. Locate the file(s) on your computer that you would like to add to an open/existing claim.
Step 7. Once you have selected the relevant file(s), click ‘Open’ to upload the file(s).
Step 8. Input the ‘Author’ of the file (i.e., the name of the person who authored/wrote the file you are attaching).
Step 9. Input the 'Document date' (i.e., the date the file was authored/written).
Step 10. Input the 'Name' of the file (e.g., Statement of Claim).
Step 11. State the urgency of the file (Yes/No). *The urgency of the file will be depicted in the notification email sent to the relevant claim handler upon submission of a new attachment. Important: Please only select ‘Yes’ if the attachment is truly urgent/requires immediate action so it receives the appropriate priority.
Step 12. Click ‘Attach’.
You have now successfully added a new attachment to your claim! Note: When you click ‘Attach’ (Step 12) your artefact will be uploaded to the ‘Attachments’ tab, and the relevant claim handler will be notified.
You can filter the ‘My claims’ view on the VMIA portal to only show claims that meet certain criteria. For example, you might want to only see claims that were lodged after a certain date or only claims that relate to a specific type of loss/damage (e.g., property). It is possible to filter the ‘My claims’ view by:
- 1. Group
- 2. Field
- 3. Column
After you have filtered the ‘My claims’ view, you can save the view on the portal so that you can access it easily at a later stage.
The following guide will show you how to filter the view from the ‘My claims’ tab and how to save a filtered view. Outlined below are steps on how to filter the claims by:
- Group
- Field
- Column
Step 1. From the VMIA portal homepage, click on the ‘My claims’ tab.
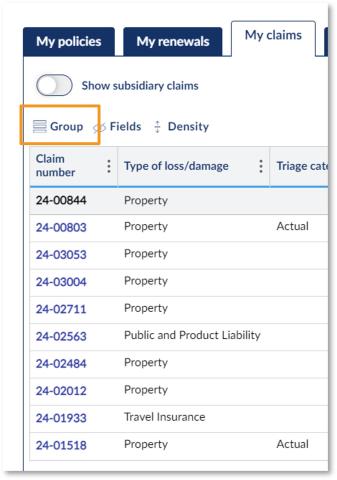
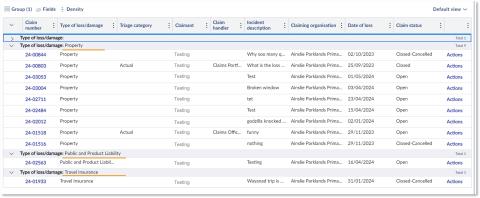
This section steps through how to filter claims by ‘Group’. When filtering by ‘Group’, your claims will be organised by the group filter you selected. For example, if you group by ‘Type of loss/damage’, your claims will be organised and grouped in alphabetical order by the type of loss/damage.
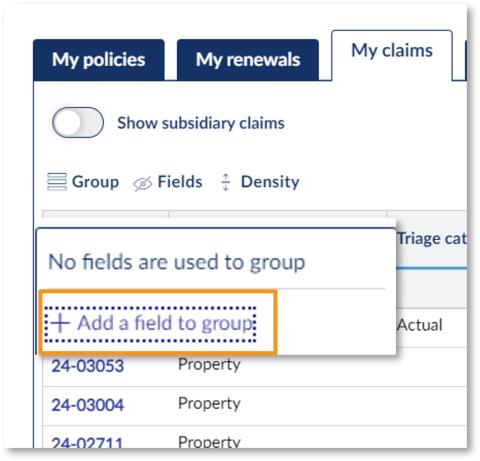
Step 1. Click on the symbol next to ‘Group’.
Step 2. Click on ‘+ Add a field to group’.
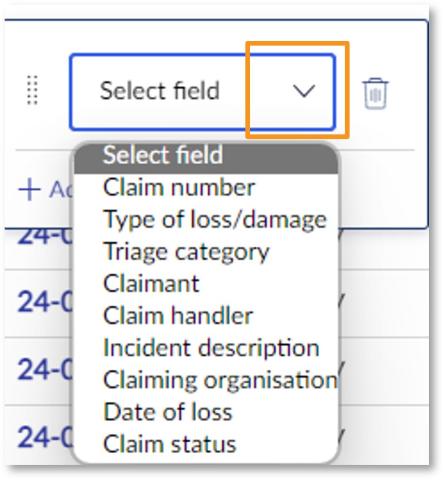
Step 3. Click on the drop-down arrow next to ‘Select field’ and choose the field you wish to group your claims by (e.g., ‘Claim handler’).
Example of your claims grouped by ‘Type of loss/damage
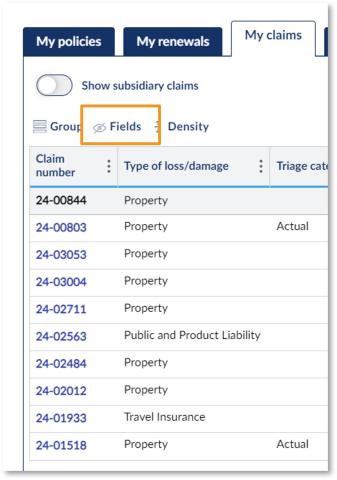
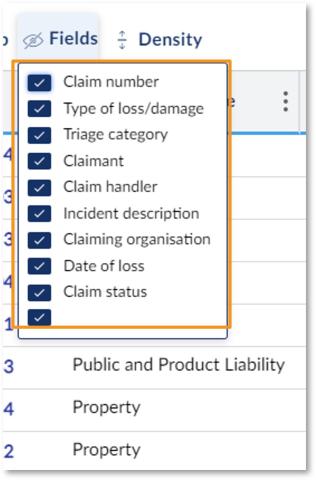
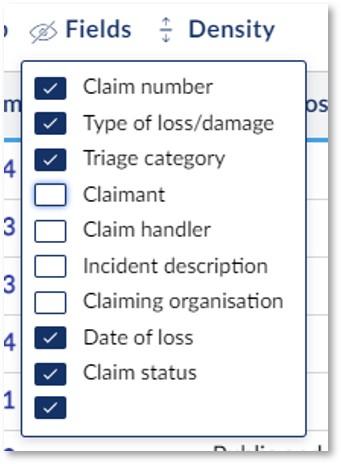
This section steps through how to filter claims by ‘Fields’. When filtering by ‘Fields’, you can select the columns you wish to show/hide on your ‘My claims’ view.
Step 1. Click on the symbol next to ‘Fields’.
Step 2. Deselect the fields you wish to hide and select the fields you wish to show on your ‘My claims’ view.
Example of deselecting four fields to remove them from ‘My claims’ view.
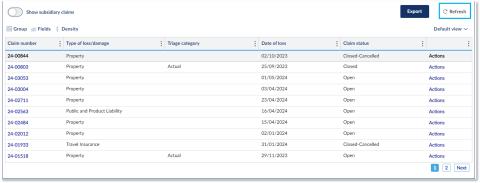
Step 4. To revert to the default view, click the ‘Refresh’ button in the top right corner.
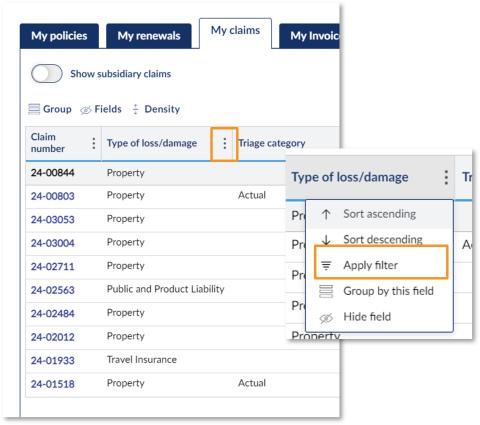
This section steps through how to filter claims by an individual column using the three dot next to the column heading.
Step 1. Click on the three dots next to the heading of the column that you wish to filter.
Step 2. Select ‘Apply filter’.
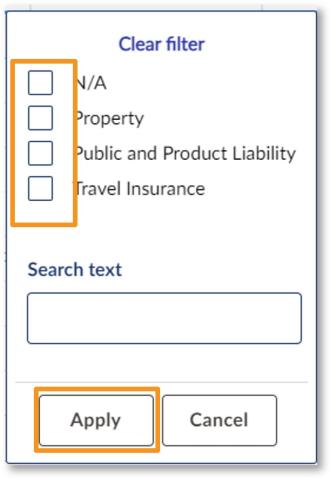
Step 3. Select the checkbox next to the value by which you wish to filter the column.
Step 4. Click ‘Apply’.
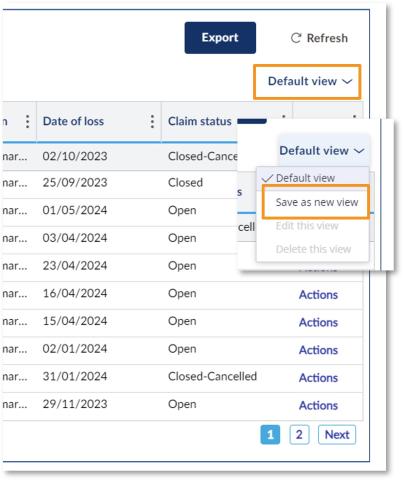
When saving a filtered view, you can switch between the default view and your saved views at any time. You can also save multiple different views, and switch between each view as required.
Step 1. Click on the drop-down arrow next to ‘Default view’.
Step 2. Click ‘Save as new view’.
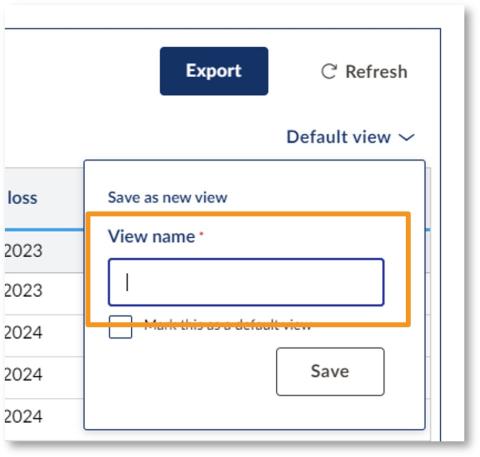
Step 3. Enter a name for your new view.
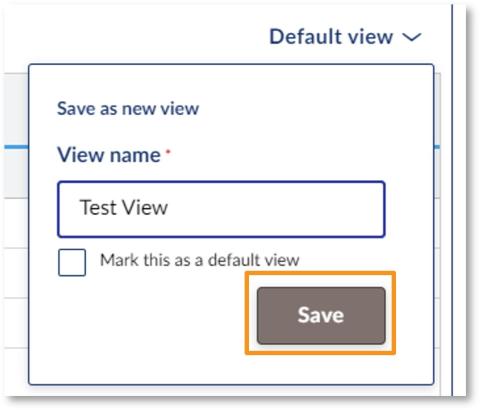
Step 4. Click ‘Save’.
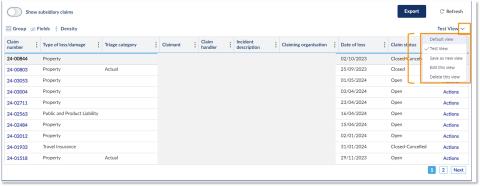
Step 5. You can switch between your views, edit your saved views, delete your views etc. by clicking the drop-down arrow beside the view name.
Making a claim in portal
How to process a claim
PORTAL LOGIN(opens in a new window)
Not registered for portal? Please contact the portal administrator in your organisation to arrange access.
You can make a claim on an existing or past policy via the VMIA portal by clicking on the ‘Make a claim’ tile on the portal homepage and providing all the relevant information regarding the claim. You will receive an automated email from VMIA once you submit the claim.
Note: You can enable privacy on a claim, allowing you to restrict access to the claim to specific users in your organisation.
Note: Only certain account types have permissions to lodge claims on the portal. For more information, see the section on VMIA Portal Account Types.

Step 1. Click the ‘Make a claim’ tile on the portal homepage.
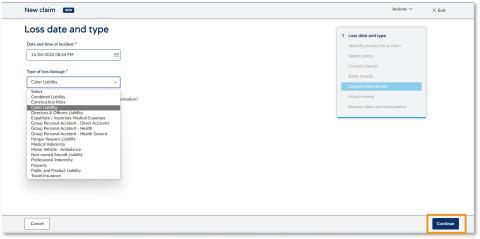
Step 2. Enter the date of loss from the date selector and select the claim type that you wish to make from the ‘Type of loss/damage’ drop-down.
Step 3. Select ‘Continue’.
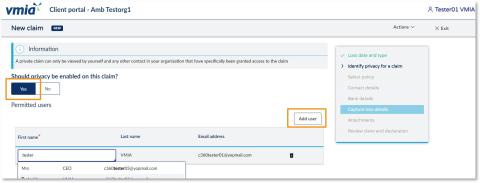
Step 4. Select ‘Yes’ if you wish to enable privacy on the claim. A ‘Permitted users’ section will appear where you can add other users to the private claim. Multiple users can be added or removed on a private claim.
*If you do not wish to enable privacy on the claim, ensure ‘No’ is selected and skip to Step 8.
Step 5. To allow other users to access the private claim, click ‘Add user’.
Note: A private claim allows you to restrict access to other users within your organisation. VMIA claim handlers can also view and edit privacy permissions on claims, if required.
Note: Only the initiator of the claim will receive any automated or manual emails sent from the VMIA portal.
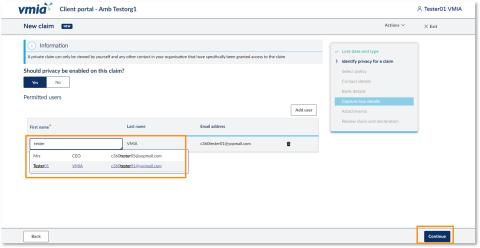
Step 6. Begin typing the user’s name in the textbox and select the correct user from the drop-down list.
Step 7. Click ‘Continue’.
Note: All permitted users (i.e., users who have been allocated access to the private claim) can add or remove other users.
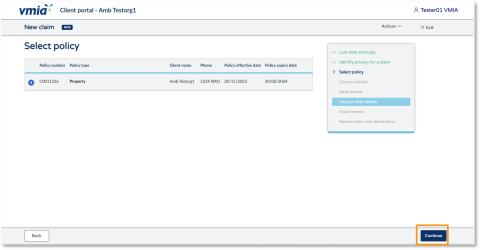
Step 8. Select the policy that you wish to claim on by clicking the checkbox on the left-hand side. Click ‘Continue’ on the bottom right.
Step 9. Click ‘Continue’.
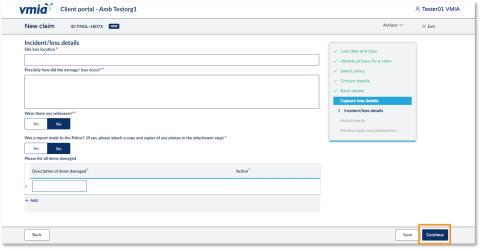
Step 10. Provide all the required information about the claim in the ‘Incident/loss details’ section.
Note: All fields marked with an * are mandatory and must be filled out before you can submit the claim. If you need to make a change, you can go back to previous pages using the right-hand side navigation or the ‘Back’ button in the bottom left corner.
Step 11. Select ‘Step 11. Select ‘Continue’.
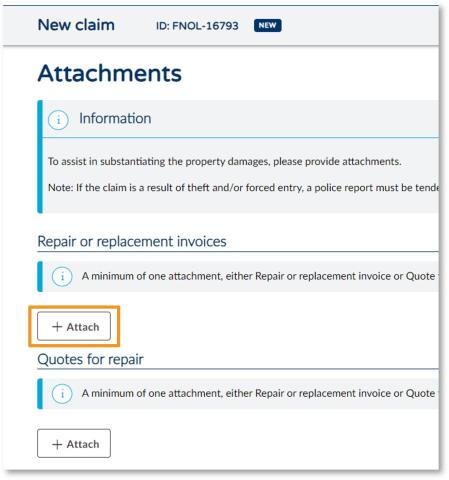
Step 12. To attach relevant documents to the claim, click ‘+ Attach’ under the relevant heading.
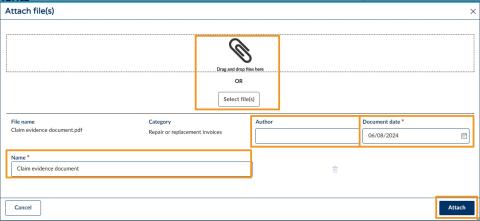
Step 13. Either drag-and-drop or click ‘Select file(s)’ to browse for files from your computer.
Tip: You can select multiple documents at a time by holding the Ctrl button while you select files.Step 14. Once you attach documents, you must enter the document date (the date the attachment was written, not the current date). You have the option to include the author (the person who authored the file), and to rename the file if you wish in the ‘Name’ field.
Step 15. Select ‘Attach’ and then ‘Continue’.
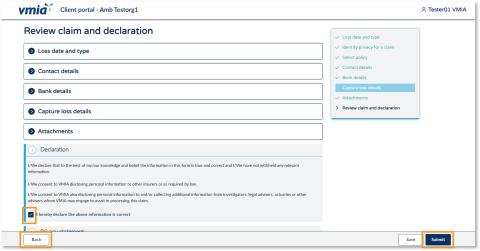
Step 16. To complete the claim, read the declaration and select the checkbox to declare you understand.
Tip: If you would like to review your claim details before you submit the claim, click the fields above the declaration to see your responses.
Step 17. Click ‘Submit’. You will receive an automated email from VMIA once you submit the claim.
Tip: You can return to previous sections and make changes by clicking the ‘Back’ button.

Tip: If you wish to save your claim without submitting it, click ‘Save’ and then ‘Exit’.
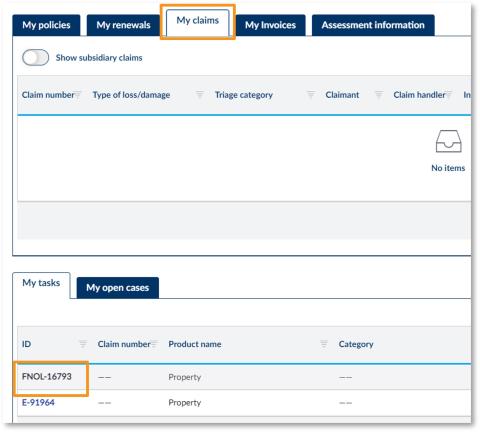
Note: To locate your saved claim, navigate to the ‘My claims’ tab on the homepage and look for the relevant claim reference ID in the ‘ID’ column.
See our short video that works through these steps.
Managing contacts in portal
Keeping your organisations contacts up to date
PORTAL LOGIN(opens in a new window)
Not registered for portal? Please contact the portal administrator in your organisation to arrange access.
Portal Administrators have the ability to add, update, and remove contacts on the VMIA portal. It is possible for an organisation to have multiple Portal Administrators.
Portal Administrators can assign admin permissions to another contact by clicking the ‘View organisation profile’ button and selecting ‘Update’ next to the contact’s name.
Note: Only Portal Administrators can assign admin permissions to other contacts.
If you are unsure of who the Portal Administrators in your organisation are, please contact the VMIA Client Advisory Team on (03) 9270 6990 or email contact@vmia.vic.gov.au

Step 1. Click on ‘View organisation profile’.
Note: If the contact has not yet been added to the portal, follow the steps outlined in the guide called, ‘How do I add additional portal contacts?’
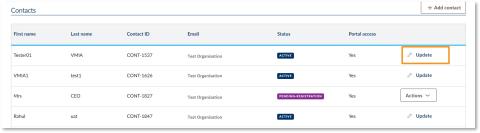
Step 2. Identify the contact you want to give admin access to from the list and select ‘Update’.
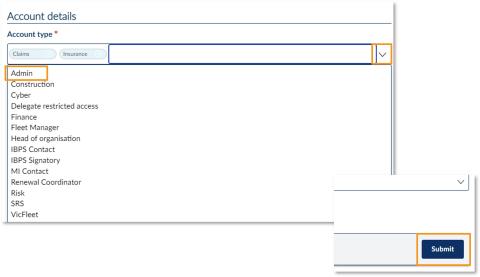
Step 3. Select the drop-down arrow next to the ‘Account type’ field.
Step 5. Click ‘Submit’. The request will be sent to VMIA for review and approval.
Note: Only portal administrators can assign admin permissions to other contacts.
Note: only Portal Administrators have the ability to add contacts to the VMIA portal.
New contacts can be added to the VMIA portal at any time by your Portal Administrators. If you are unsure of who the Portal Administrators in your organisation are, please contact the VMIA Client Advisory Team on (03) 9270 6990 or email contact@vmia.vic.gov.au
Portal Administrators can add a contact by clicking the ‘View organisation profile’ button and selecting ‘Add contact’. You can then select the specific type of access that the contact can have, e.g., Insurance, Claims, Admin, etc.
Note: if you are adding an additional portal contact to replace an existing contact, please ensure you create a new contact profile on the system rather than simply overwriting an existing contact with the new contact's information. Any contacts who no longer require portal access can be deactivated by the Portal Administrator.

Step 1. Click on ‘View organisation profile’.
Note: Only portal administrators can add another contact.
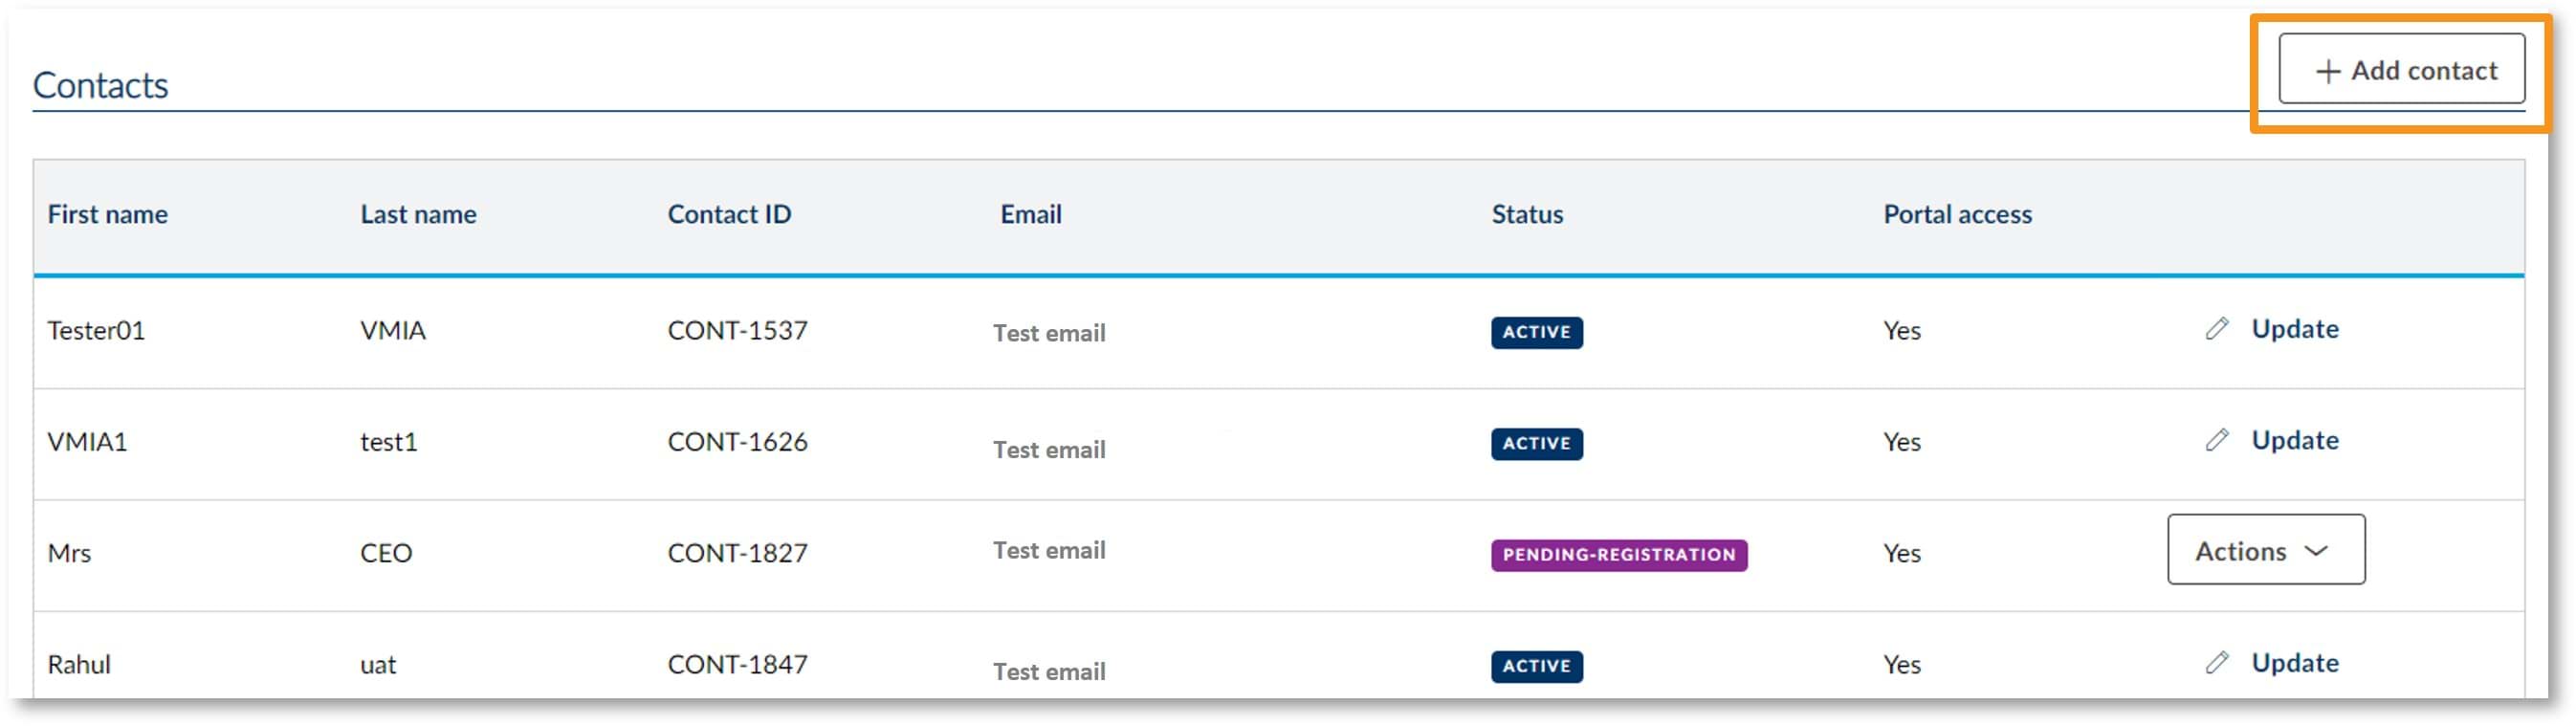
Step 2. Select ‘+ Add contact’.
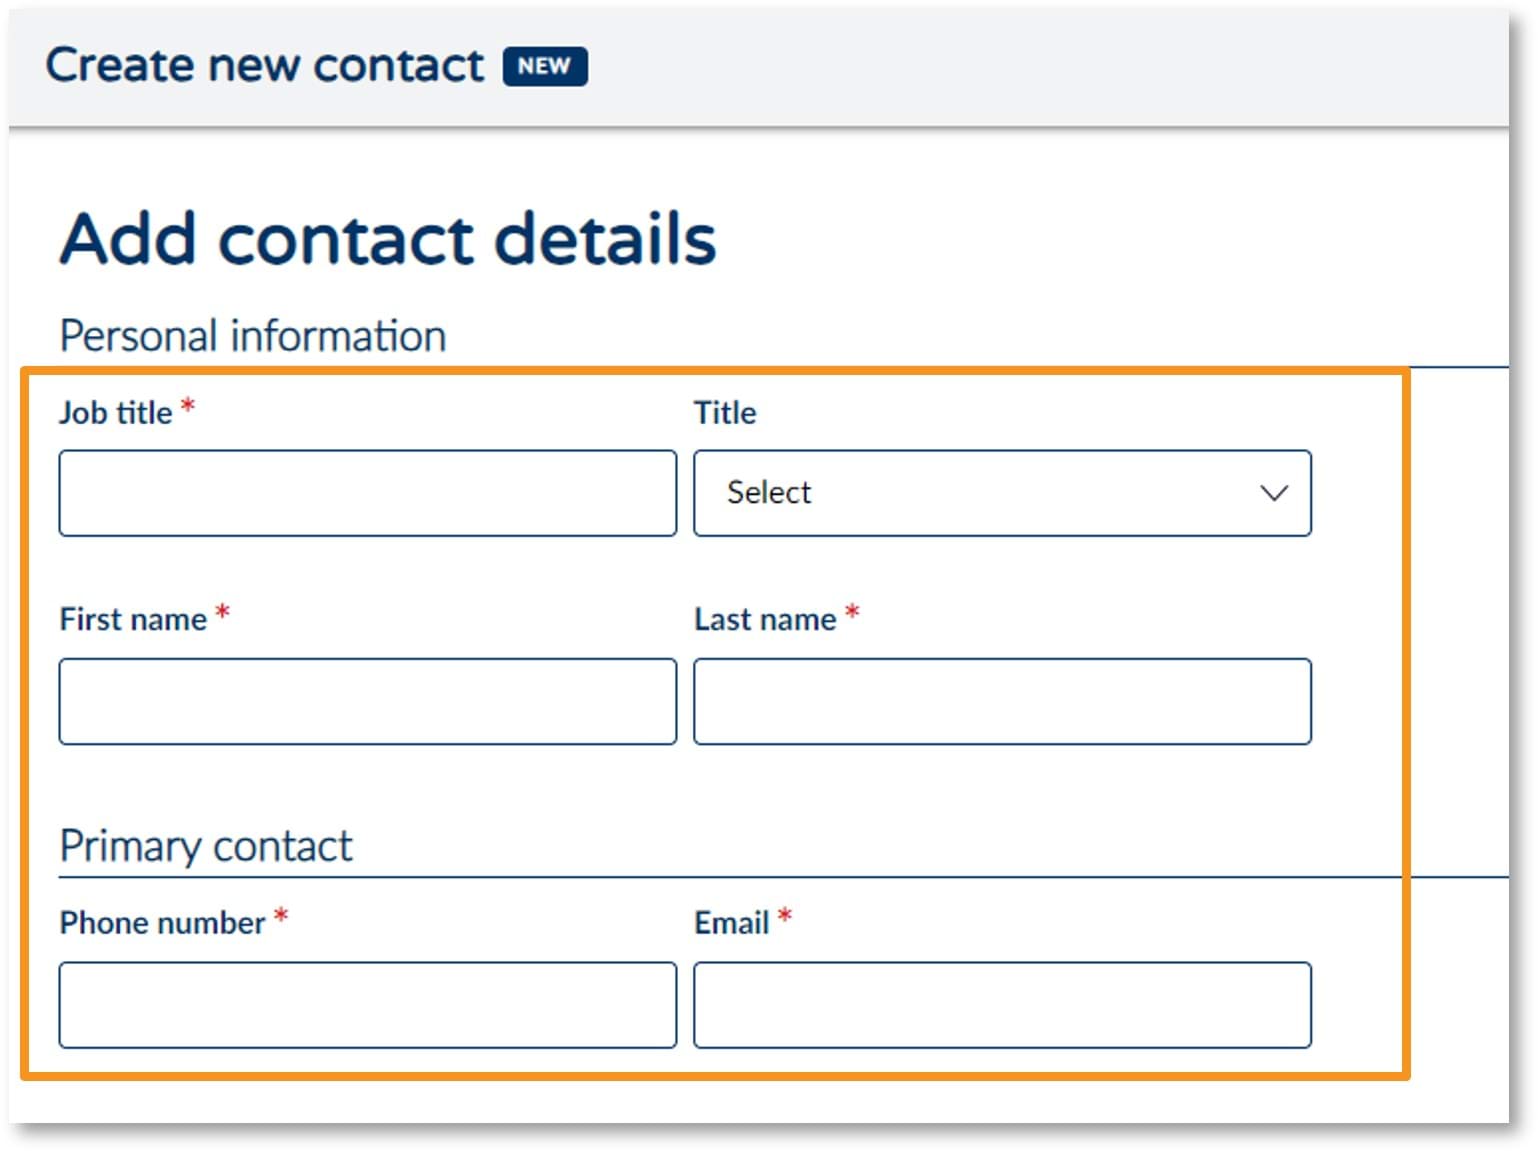
Step 3. Enter the individual’s contact details in the relevant fields.
Note: It is possible to select multiple different account types from the ‘Account type’ drop-down e.g., Admin, Claims, and Construction.

Step 4. Select the type(s) of user account from the ‘Account type’ drop-down (e.g., Admin, Insurance, Claims – see the section called, ‘VMIA Portal Account Types’ for further information regarding the different account types and the associated permissions.
Step 5. Click ‘Submit’.
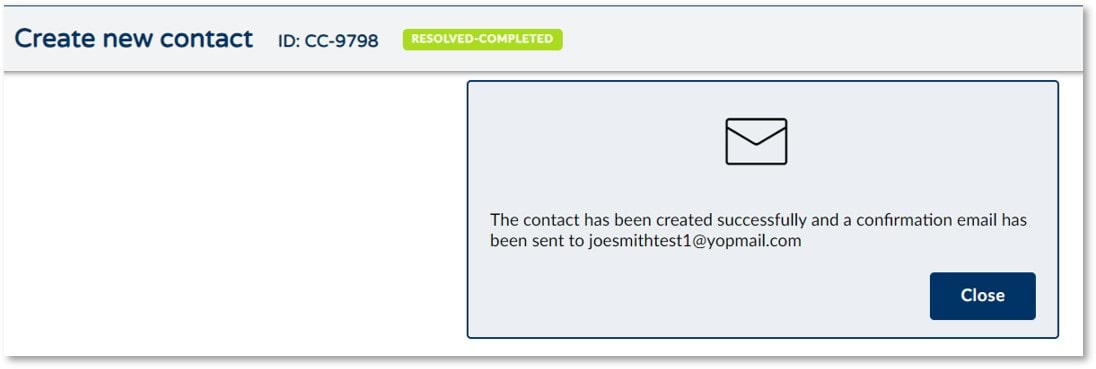
Step 6. A registration link will be sent to the new contact and they will have five days to register before this link expires.
Note: If the contact does not complete the registration process within five days, click ‘Actions’ and ‘Resend registration link’ to issue a new link.
Note: When you add a new portal contact, they will be granted portal access by default. Should you wish to remove portal access, you must do so manually after you add them to the portal. If you wish for the new contact to have portal access, no action is required. See the steps below to remove portal access after you add a contact to the portal.

Step 1. Select ‘Actions’ next to the contact’s record.

Step 2. Select ‘Update’.
Note: If you would like the new contact to have portal access, there is no need for you to manually update their profile. Once they are registered, they will appear on the authorised contacts list and will be able to access the VMIA portal.
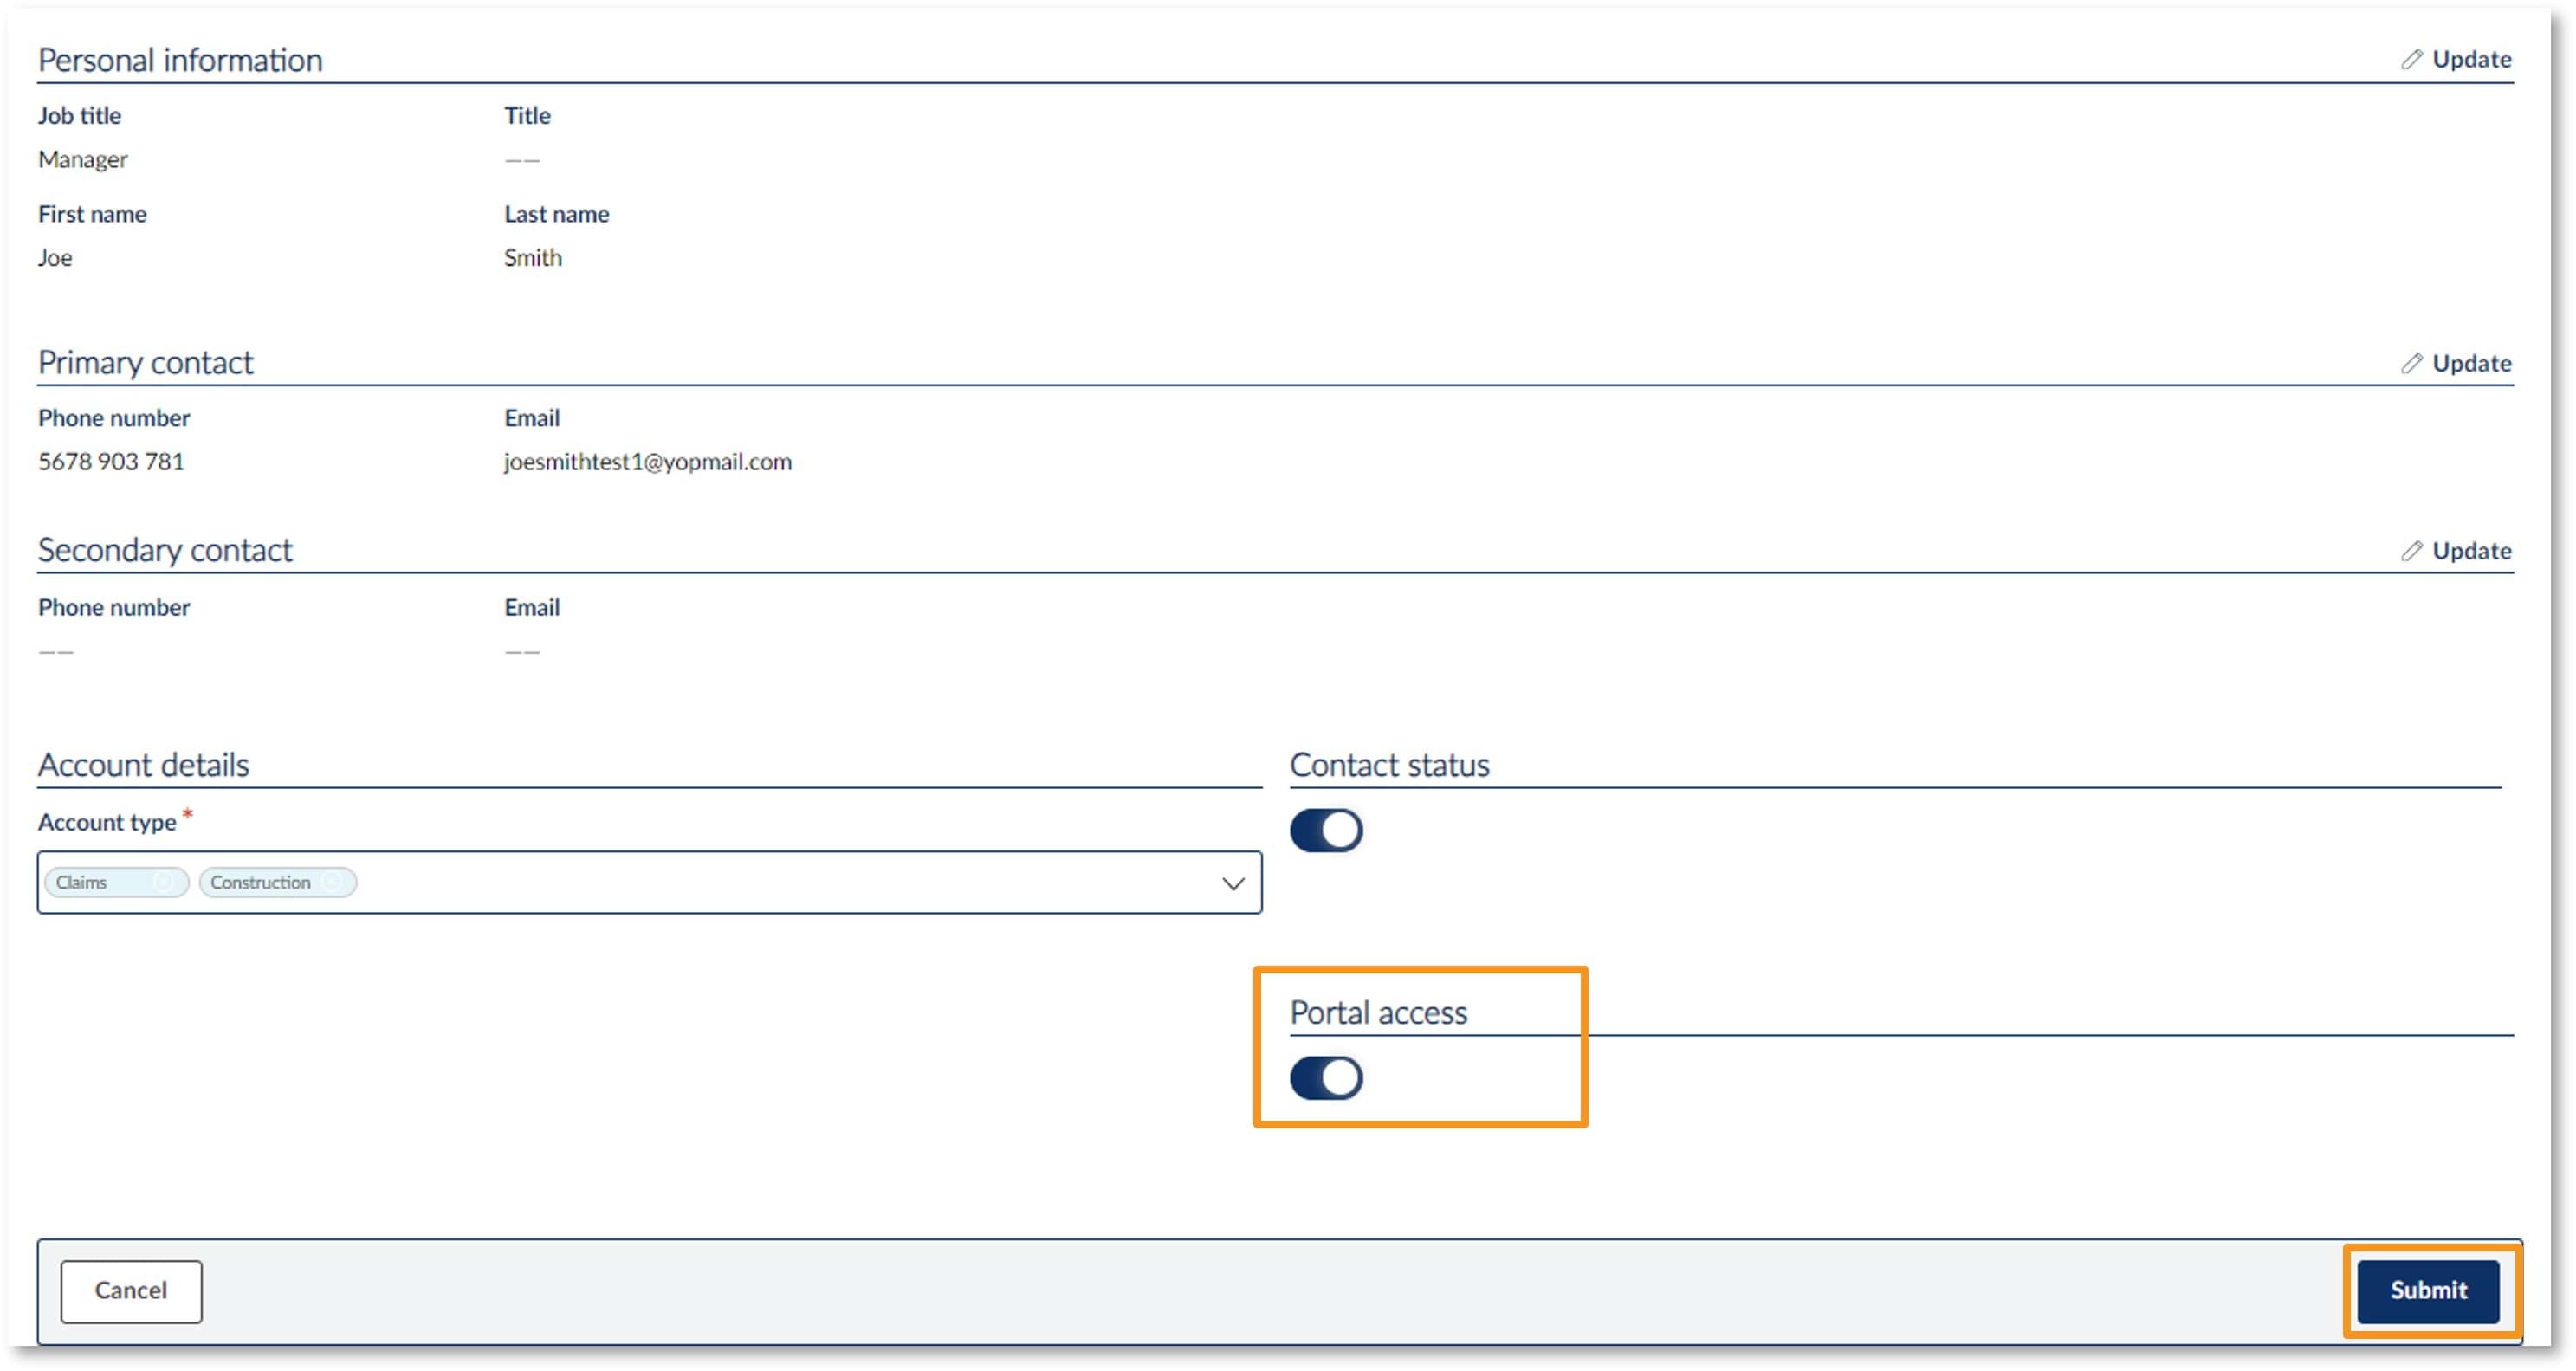
Step 3. Click on the ‘Portal access’ toggle to change the selection from on to off.
Step 4. Select ‘Submit’ to save these changes.
Note: only Portal Administrators have the ability to update contacts in the VMIA portal.
If you are unsure of who the Portal Administrators in your organisation are, please contact the VMIA Client Advisory Team on (03) 9270 6990 or email contact@vmia.vic.gov.au
Portal Administrators can update a contact by completing the following steps:
- Click on ‘View Organisation Profile’.
- Click the ‘Update’ button to the right of the contact's name (or if the contact is still pending registration, select the ‘Actions’ drop-down and then click ‘Update’).
- Edit the contact’s profile as required.
- Click ‘Submit’.
The prospect contact functionality enables you to manage unauthorised contacts, known as prospects, who are not listed as contacts in your organisation in the client portal.
The client portal administrator can convert a prospect to an active contact via the client portal. When converting them to active contact, they can choose whether or not to grant portal access.
Note: Once a prospect is converted to an active contact, they can't be converted back to a prospect. However, active contacts can be updated to "Inactive" if required.
Any contacts whose status remains as ‘Prospect’ one year after they were created will be automatically deleted from the client portal.
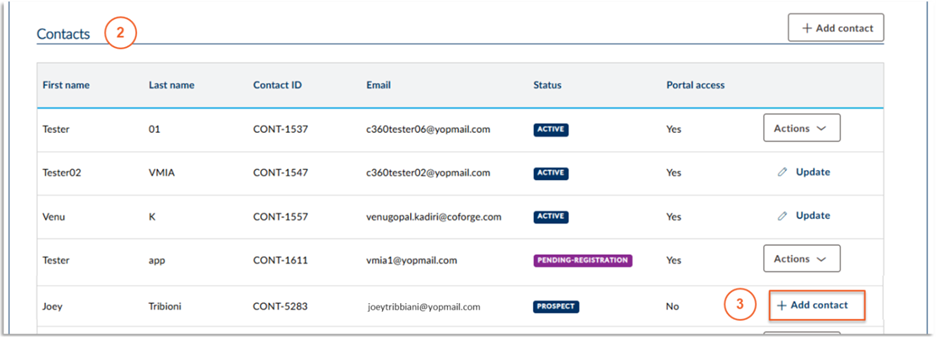
Step 1: Click ‘View organsiation profile’.

Step 2: Scroll down to the ‘Contacts’ table and identify the person you want to convert from a prospect to active.
Step 3: Click ‘Add contact’ next to their record.
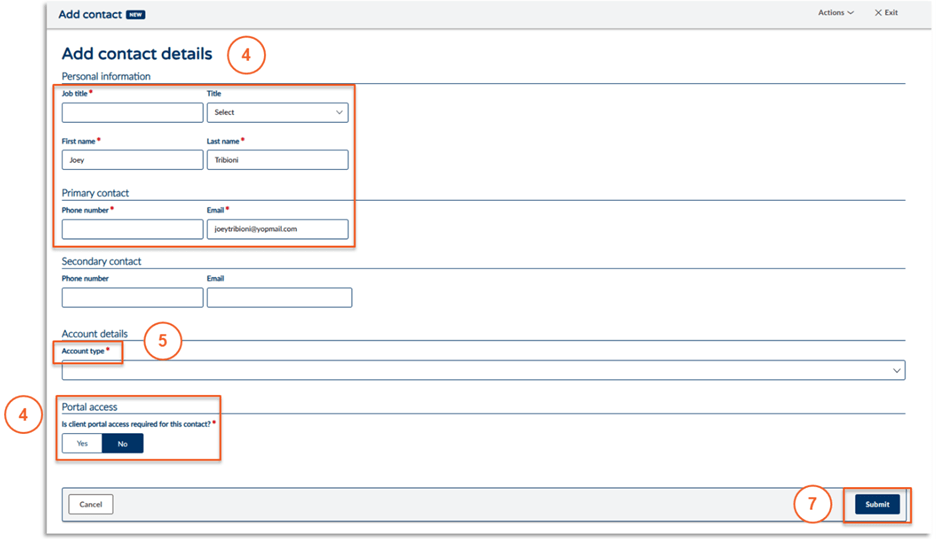
Step 4: Enter the mandatory details for the contact
Step 5: Select the relevant account types
Step 6: Select whether portal access is required - the default selection is ‘No’.
Step 7: Click ‘Submit’.
Note: only Portal Administrators have the ability to deactivate contacts in the VMIA portal.
If you are unsure of who the Portal Administrators in your organisation are, please contact the VMIA Client Advisory Team on (03) 9270 6990 or email contact@vmia.vic.gov.au
Portal Administrators can deactivate a contact by completing the following steps:
- Click on ‘View Organisation Profile’.
- Click the ‘Update’ button to the right of the contact's name (or if the contact is still pending registration, select the ‘Actions’ drop-down and then click ‘Update’).
- Click the ‘Contact status’ toggle to change the contact’s status from active to inactive.
- Click ‘Submit’.
Once these steps have been followed, the contact’s VMIA profile will be deactivated and their name will disappear from the authorised contact list.
Access your policies and documents on portal
View and manage your policies
PORTAL LOGIN(opens in a new window)
Not registered for portal? Please contact the portal administrator in your organisation to arrange access.
You can view policy details or download policy documents (e.g., Policy Schedule, Certificate of Currency, Invoice & Policy Wording) via the VMIA portal.
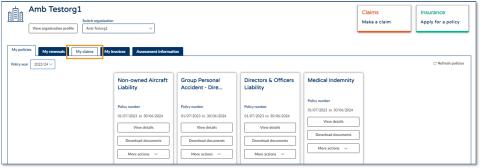
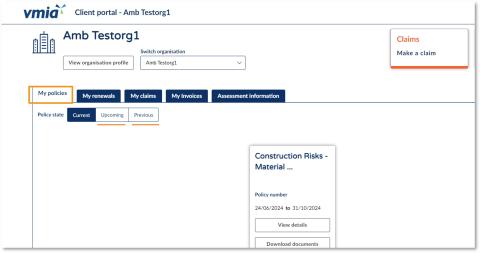
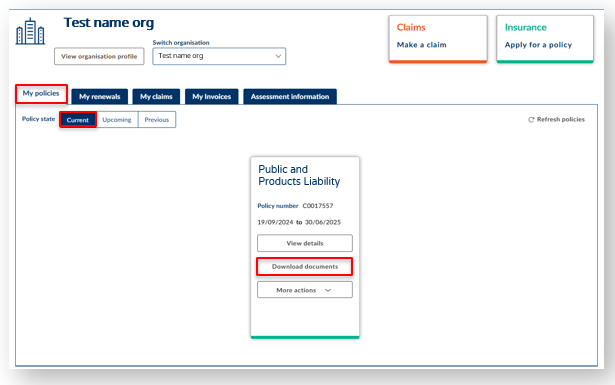
From the ‘My policies’ tab on the portal homepage, locate the tile of the policy for which you wish to view and/or download documents. Click ‘View policy’ to simply view details of your policy online without downloading any documentation. Alternatively, click ‘Download documents’ to download policy documents to your device or browser.
Note: the ‘My policies’ tab will automatically show policies for the current year. If you wish to view past or upcoming policies, ensure you select the ‘Upcoming’ or ‘Previous’ option for Policy state.
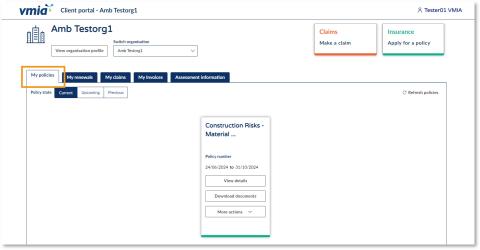
Step1. Under the ‘My policies’ tab on the portal homepage, locate the tile of the policy for which you wish to view and/or download documents.
Option 1: View policy details (without downloading)
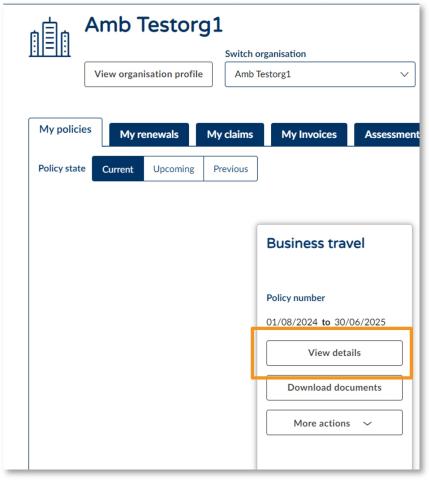
Step 1. Click ‘View details’.
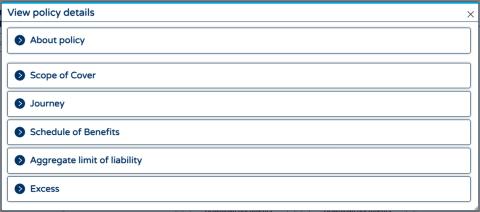
Step 2. Click on the section for which you want to view details. You will see all the policy information without having to download any documentation.
Option 2: Download policy documents
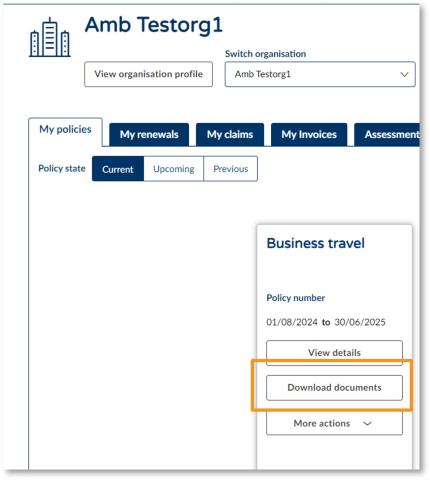
Step 1. Click ‘Download documents’.
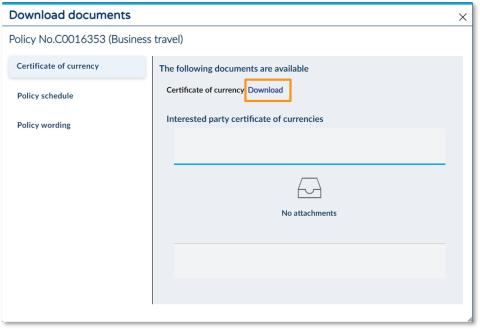
Step 2. Select the document you want to download from the left-hand side.
Step 3. Click ‘Download’. The document will download to your browser where you can then save or print.
How to view details of past or upcoming policies online
Step1. From the ‘My policies’ tab on the portal homepage, click ‘Upcoming’ or ‘Previous’ to show all upcoming or past policies (for the past 7 years).
Step 2. Locate the tile of the policy for which you wish to see details/download documentation and follow the steps outlined above regarding how to view your policy and/or download documents.
You can request a new policy online via the VMIA portal by clicking on the ‘Apply for a policy’ tile in the top right-hand corner of the portal homepage, completing all the required fields, and submitting your application.

Step 1. Click the ‘Apply for a policy’ tile in the top right-hand corner of the homepage.
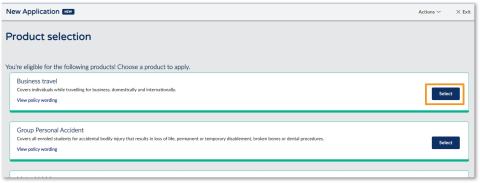
Step 2. Identify the type of policy you want to apply for from the list of eligible products and click 'Select' on the righthand side of this product.
Note: You must choose a start date for the policy. The expiry date will be the end of the current financial year.
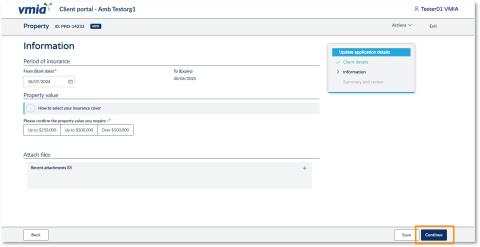
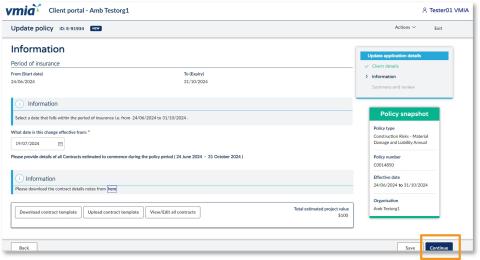
Step3. Complete the application by answering the questions related to the policy you’re applying for, clicking ‘Continue’ on each page to step through.
Note: You can click ‘Save’ to come back to the application later, if needed.
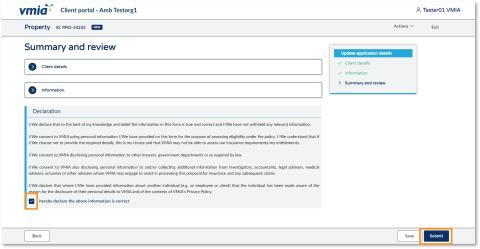
Step4. On the Summary and review page, click the ‘Client details’ and ‘Information’ headings to expand the drop-downs and review the information you have provided.
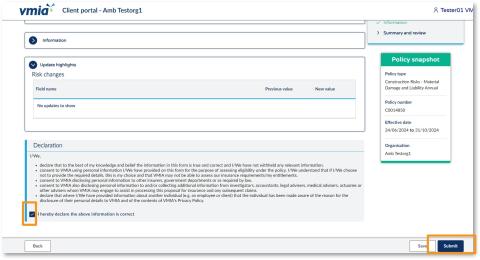
Step5. Once you have reviewed all the information, read the declaration and select the checkbox to declare you understand.
Step6. Click ‘Submit’ to complete your application. Your application will be reviewed and a quote will be provided, which you can choose to accept or reject.
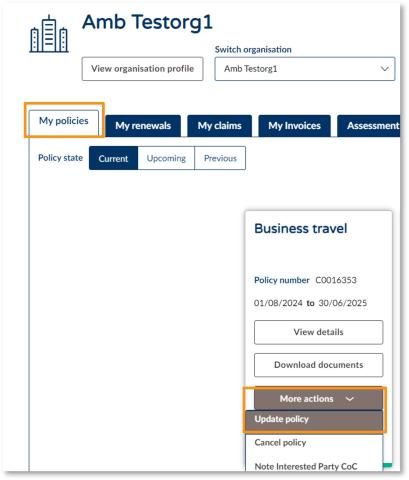
Schools can easily update their travel policy within the portal to apply for any upcoming trips. To ensure that the travel request is processed smoothly, simply log in to the VMIA portal and navigate under Business travel, where you can update policy and make any necessary adjustments.
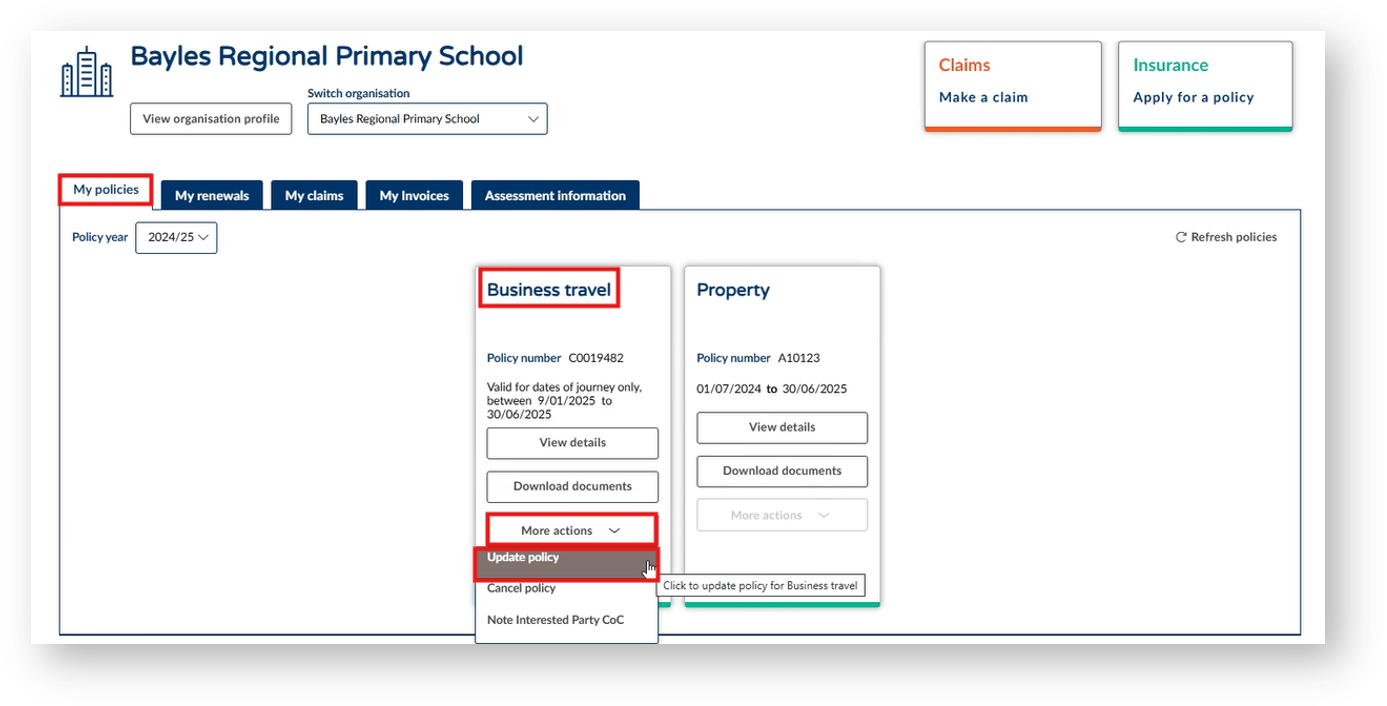
Step 1. Ensure you are in the ‘My policies’ tab.
Step 2. Under the ‘More actions’ tab select ‘Update policy’.
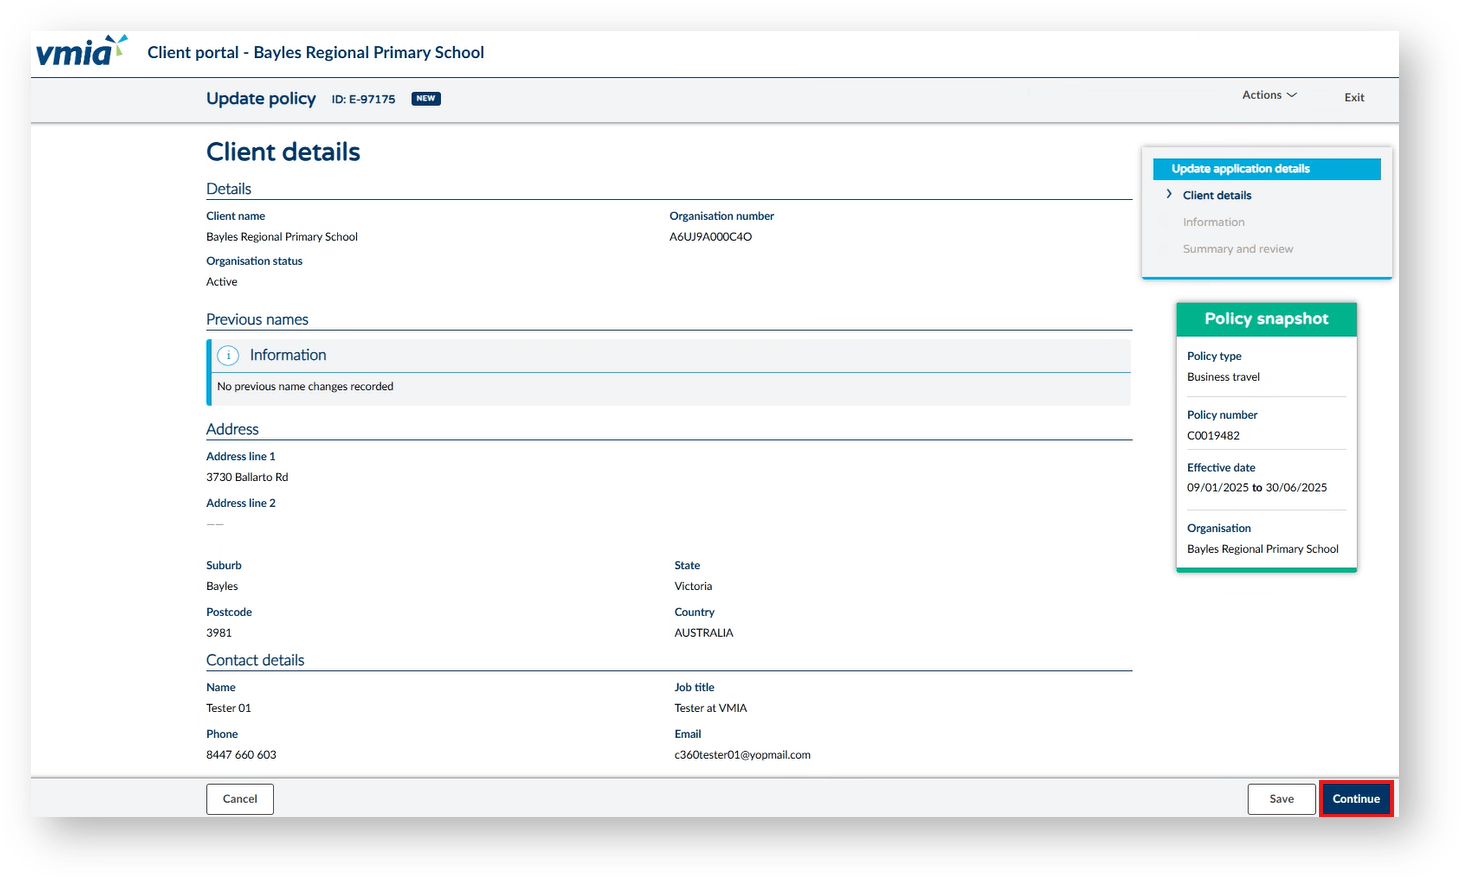
Step 3. If all details are current and correct, select ‘Continue’.
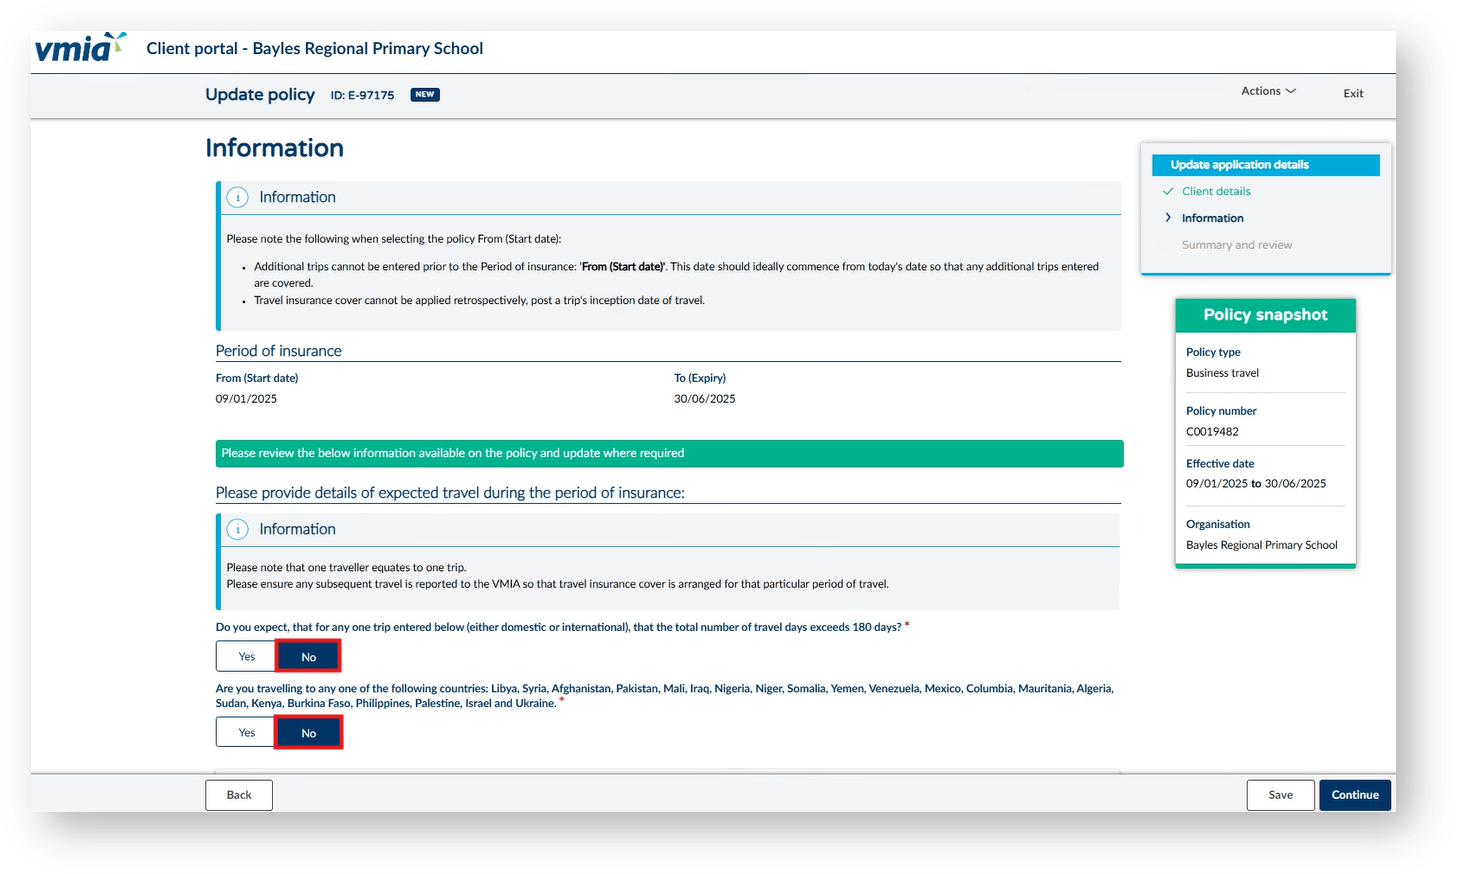
Step 4. Select ‘Yes’ or ‘No’ to Do you expect the travel days to exceed 180 days.
Step 5. Select ‘Yes’ or ‘No’ Are you traveling to any of these countries....
NOTE: If ‘Yes’ is selected for either question, this will send your quote to the underwriting team to review due to traveling to a high-risk location.
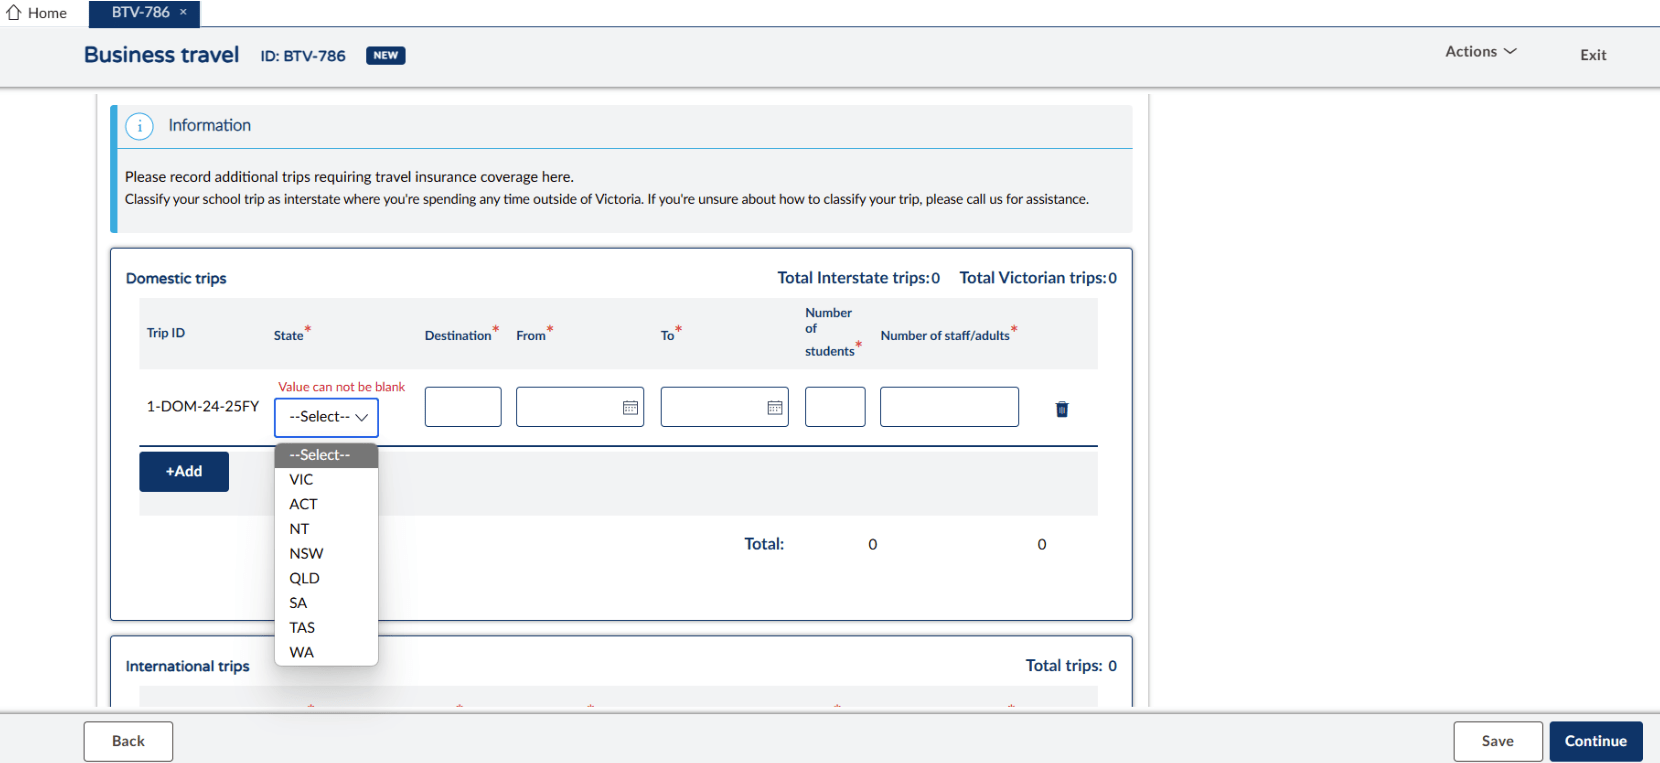
Step 6. Click ‘+Add’ and provide details for the trip destination, dates from and to, number of attending students and staff/adults.
NOTE: Intrastate trips are within Victoria. Interstate trips are NSW, TAS, QLD, WA, NT, SA and ACT. If an existing trip needs to be modified, this is where you can edit dates and number of staff and students. Any changes to an existing trip may require approval from underwriting. Should this be the case you will receive an email once approved to proceed with any necessary steps.
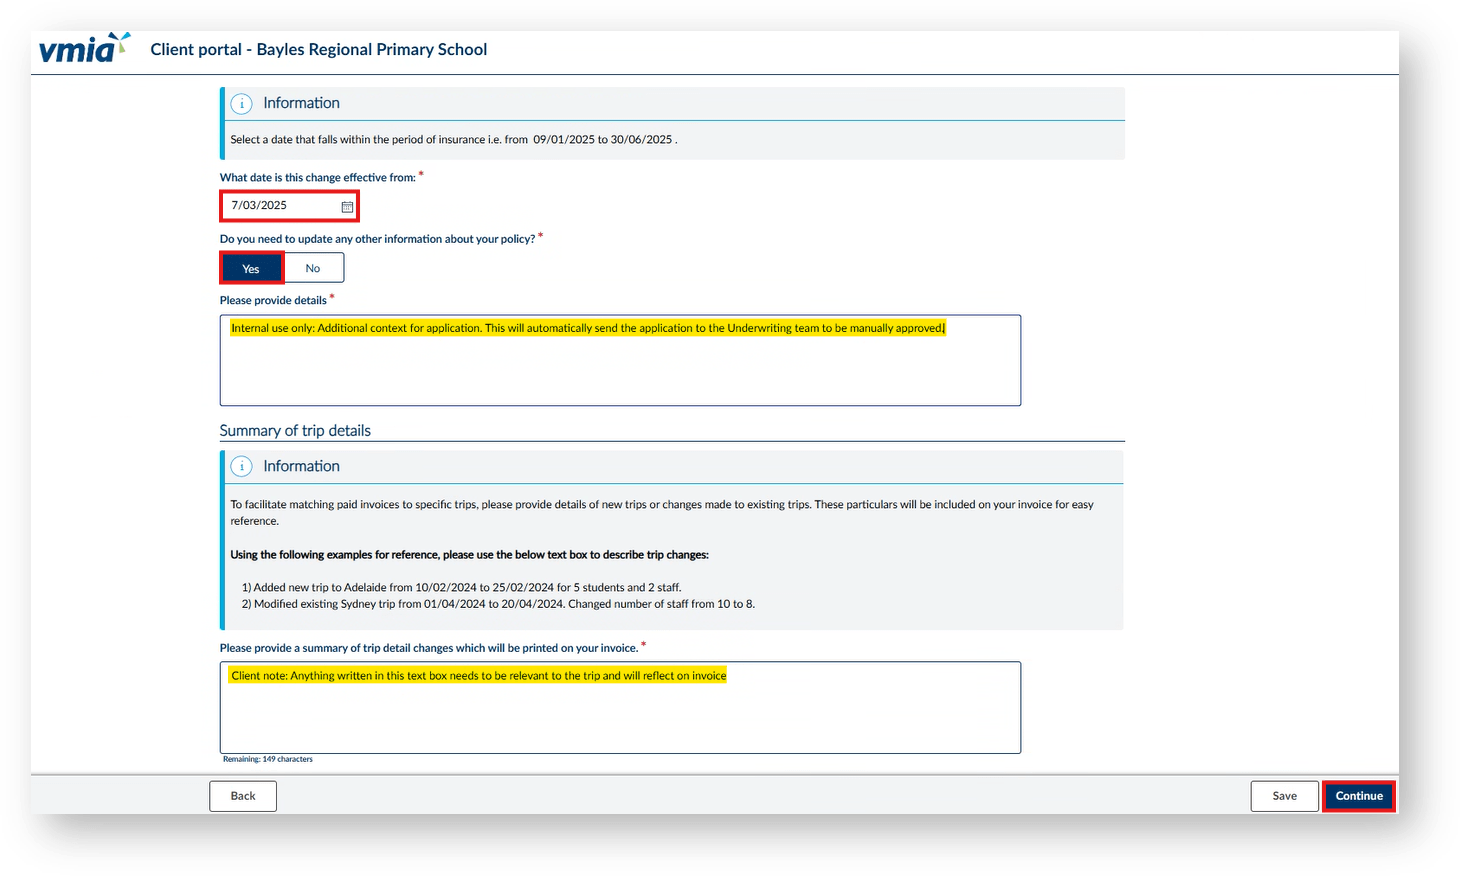
Step 7. Enter the effective date you submit the trip (current date not the first day of the trip)
Step 8. If ‘Yes’ please provide additional context which will send the endorsement to the underwriting team for approval. Alternatively, click ‘No’.
Step 9. Click ‘Continue’.
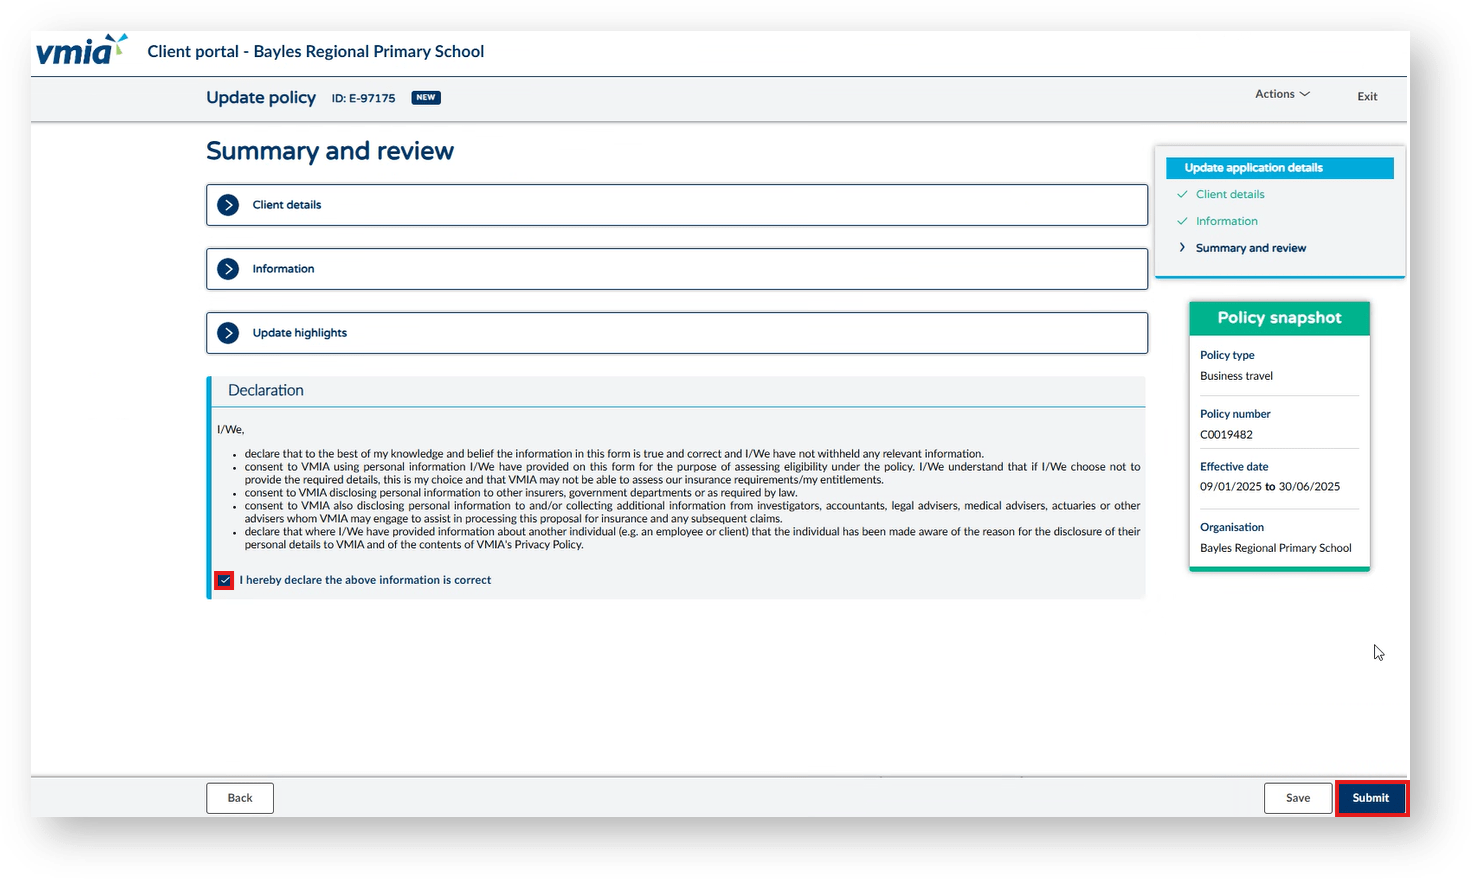
Step 10. Read the declaration to ensure it is understood. Then tick the box before proceeding.
Step 11. Click ‘Submit’.
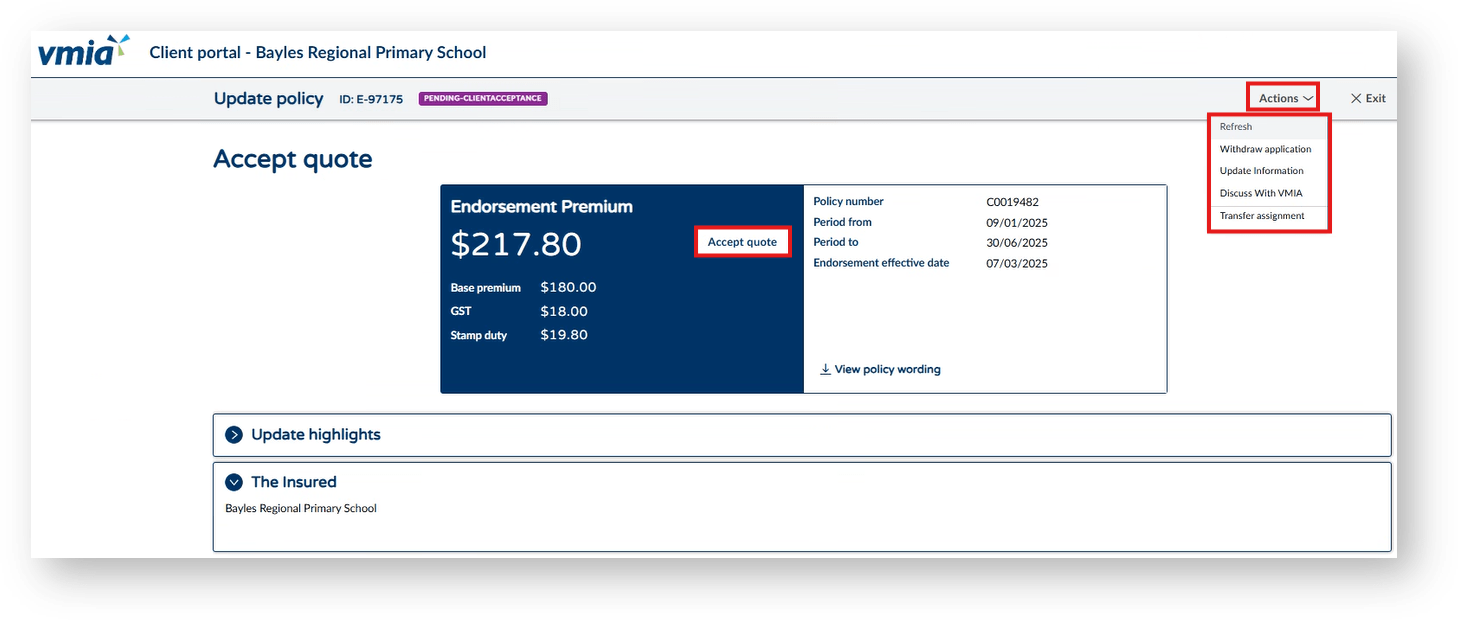
Step 12. A quote will generate for you to accept once reviewed. Once a quote is accepted this will generate an invoice.
NOTE: If you choose to update or withdraw your endorsement, do so from the ‘Action’ drop down. Changes can be made to an endorsement up to the date of travel.
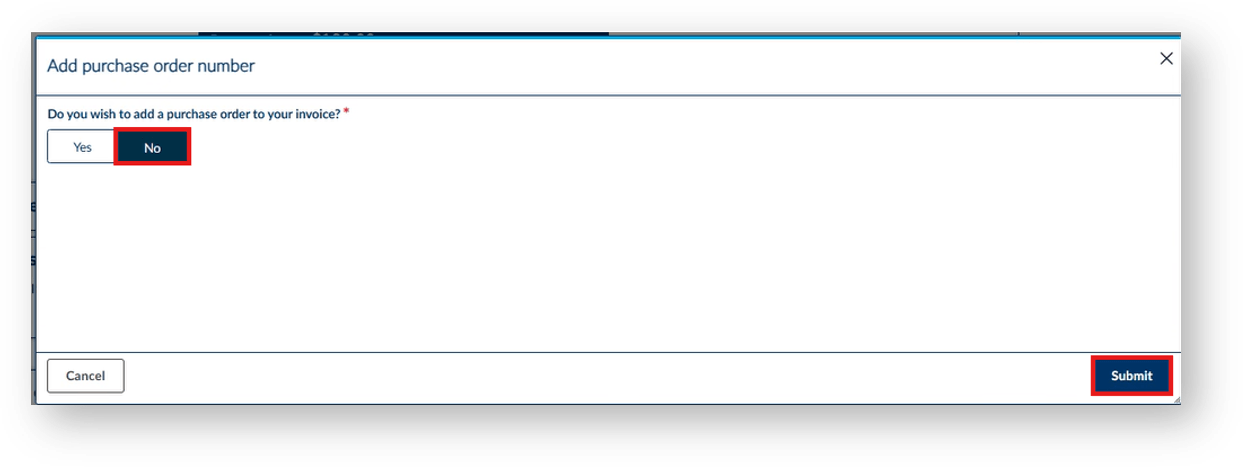
Step 13. Select if you require a purchase order with ‘Yes’ or ‘No’. If you select ‘Yes’ this will appear on the invoice.

Step 14. Under ‘My Invoices’ your recent endorsement will appear. Select ‘Download’ to generate your PDF invoice. Once your invoice is paid the status will change to ‘Paid’ and appear under the ‘Paid’ tab next to ‘Outstanding’.

NOTE: If ‘More actions’ is greyed out and unable to select for travel or any policy, this means you have an incomplete task in ‘My tasks’. You will either need to complete or withdraw the pending task to proceed with entering a new endorsement.
In some instances when you submit your application for a new policy, you will automatically receive a quote for the new policy on the system. Please review all details of the quote, download the policy wording, and review the premium, limits, excess, and any other relevant information. If you are happy to proceed with the quote following your review, you can accept this quote by clicking ‘Accept Quote’.
Once you have accepted the quote, you will receive an email welcome pack. If you are not happy to accept the quote, you may choose to cancel your application, update the information provided, or reach out to VMIA to discuss further.
Other times, VMIA may need to review your policy application before providing you with a quote. See the next section for further details.

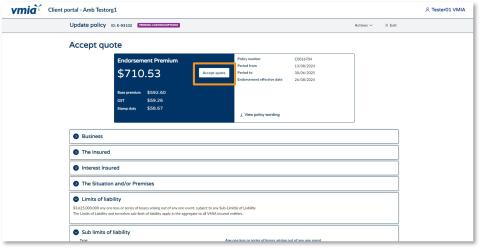
Step1. Once the application questions are complete, you will be shown details of the quote. Download and review the policy wording and review the premium, limits, excess, and any other relevant information.
Step2. If you are happy to proceed, click ‘Accept Quote’ and click ‘Submit’.
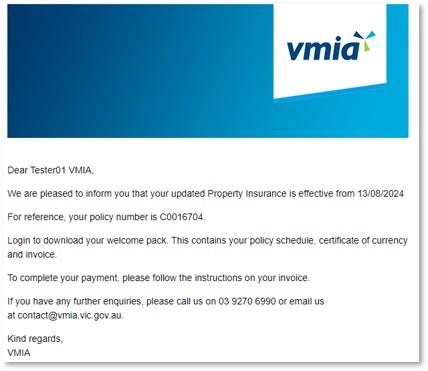
Step 3. You will receive an email welcome pack. You can click the link at any time to come back to the VMIA portal and view/download your policy documents.
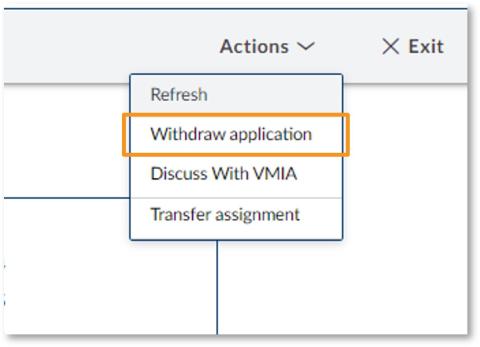
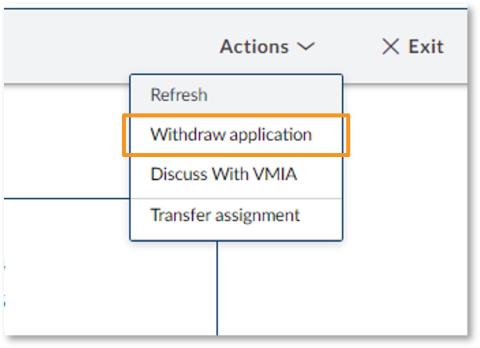
If you don’t want to proceed, click ‘Actions’ and select ‘Withdraw Application’ to withdraw your application.
Note: If you wish to discuss your quote further with VMIA, we recommend calling/emailing VMIA directly rather than selecting the option ‘Discuss with VMIA’. Your query will likely be resolved faster if you contact VMIA directly than if you arrange a time to discuss with VMIA via the portal.
In some instances when you submit your application for a new policy, VMIA may need to review your policy application before providing you with a quote. If this is the case, you will receive an onscreen notification to say that a representative from VMIA is reviewing your application. You will also receive an email confirming the reference ID.
VMIA will contact you when the review of your application is complete and a quote will be available on the portal.
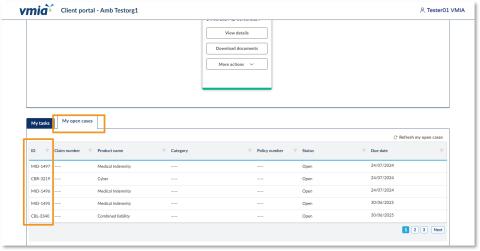
Step1. Once your application has been reviewed by VMIA, you’ll receive an email notification to say that it is ready for your review. Click on the reference ID under the ‘My open cases’ tab. This section can be found at the bottom of the VMIA portal homepage.
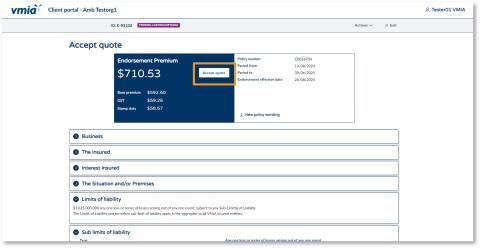
Step 2. If you are happy with the quote, click ‘Accept Quote’ and click ‘Submit’.
If you don’t want to proceed, click ‘Actions’ and select ‘Withdraw Application’ to withdraw your application.
Note: If you wish to discuss your quote further with VMIA, we recommend calling/emailing VMIA directly rather than selecting the option ‘Discuss with VMIA’. Your query will likely be resolved faster if you contact VMIA directly than if you arrange a time to discuss with VMIA via the portal.
You can make updates to an existing policy via the VMIA portal by locating the tile of the policy you wish to update, clicking on ‘More actions’, and clicking ‘Update policy’. If VMIA don’t need to review the update request, you’ll see your updated quote straight away once you submit the policy update request. If VMIA need to review your policy updates, you’ll receive an email from us when your new quote is ready for your review.
Step 1. Locate the tile of the policy you wish to update on the homepage (in the ‘My policies’ tab).
Step 2. Click ‘More actions’ and select ‘Update policy’.
Step3. Make the necessary changes to the policy, clicking ‘Continue’ on the bottom right-hand side to progress through the screens.
Step 4. Before submitting, you will be prompted to review your changes. Select the heading ‘Update highlights’ to view the changes.
Step 5. When you are happy to proceed, read the declaration and select the checkbox to declare you understand.
Step 7. If VMIA don’t need to review the update request, your quote will be available immediately for your review. If VMIA need to review your policy updates, you’ll receive an email from us when your new quote is ready for your review.
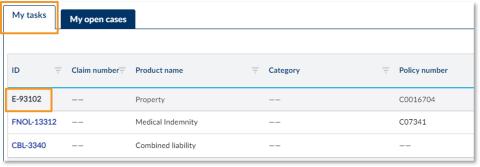
Step 8. From the portal homepage, scroll down to the ‘My tasks’ tab.
Step 9. Click on the relevant Reference ID to access the quote.
Step 10. If you are happy with the quote, click ‘Accept Quote’ and click ‘Submit’.
If you don’t want to proceed, click ‘Actions’ and select ‘Withdraw Application’ to withdraw your application.

Note: If you wish to discuss your quote further with VMIA, we recommend calling/emailing VMIA directly rather than selecting the option ‘Discuss with VMIA’. Your query will likely be resolved faster if you contact VMIA directly than if you arrange a time to discuss with VMIA via the portal.
You can cancel an existing policy via the VMIA portal by locating the tile of the policy you wish to cancel, clicking on ‘More actions’, and clicking ‘Cancel policy’. The cancellation request will be sent to VMIA for action. You will be notified when the request has been actioned.
Note: Clients with certain policy bundles cannot cancel them via the portal and must contact VMIA for assistance. This includes the following clients:
- Community Service Organisation (CSO)
- Community Service Organisaion Education (CSOe)
- Cemetery Trust (Individual Trusts can purchase additional insurance policies for: Construction (contract value over $500,000), Business Travel, Personal Accident (journey), Motor Vehicle.)
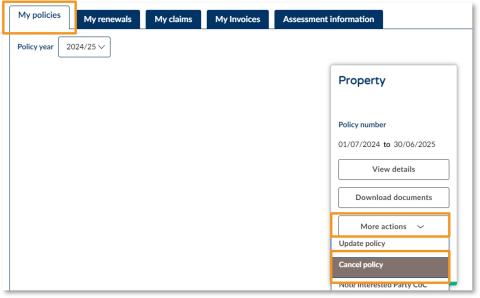
Step 1. Find the tile of the policy you wish to cancel on the ‘My policies’ tab of the portal homepage.
Step 2. Click on ‘More actions’ and select ‘Cancel policy’.
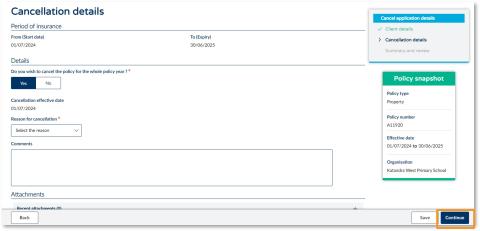
Step 3. Enter the cancellation details.
Step 4. Click ‘Continue’.
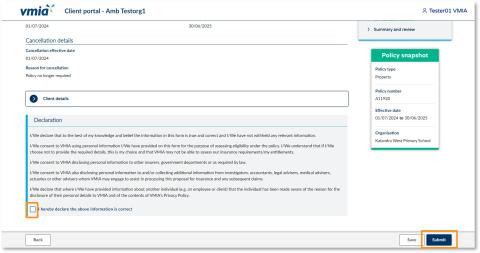
Step 5. Once you have reviewed your policy cancellation request, read the declaration and select the checkbox to declare you understand.
Step 6. Click ‘Submit’. Your request will be sent to VMIA for action.
A Note Interested Party request is a formal process where a third party, such as a financier, contractor, or other stakeholder, is noted on your insurance policy. This ensures that their interests are recognised and protected under the terms of your insurance coverage.
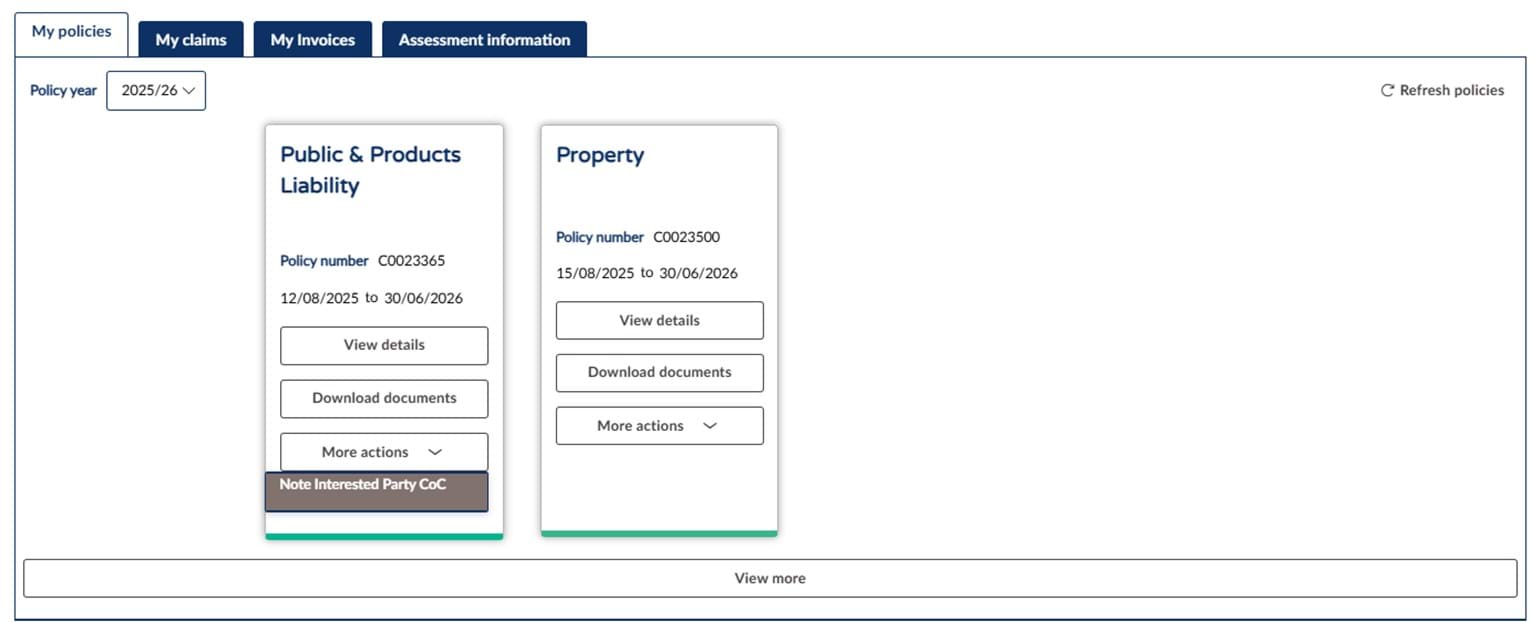
Step 1. Ensure you are in the ‘My policies’ tab.
Step 2. Under the ‘More actions’ tab select ‘Note Interested Party CoC’.
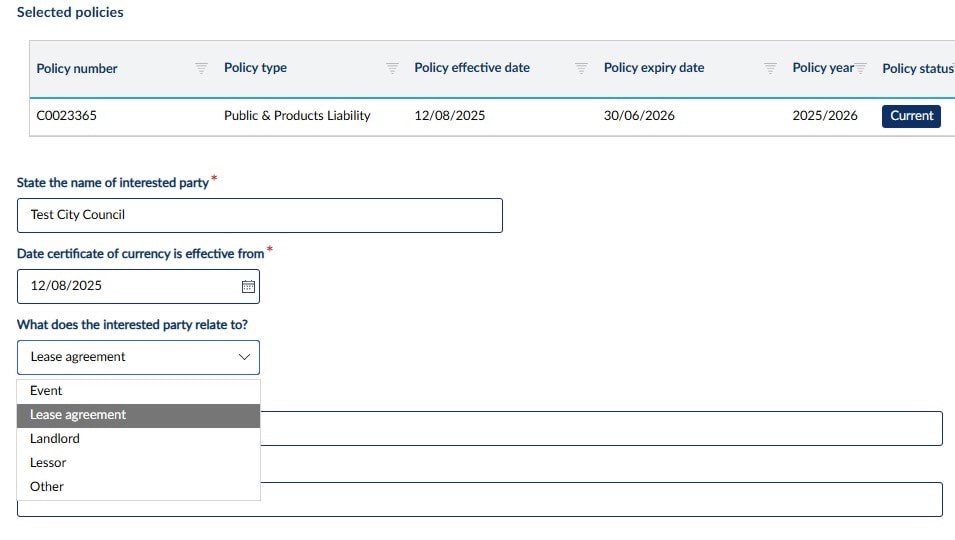

Step 3. Complete all fields before you can continue.
Note: The effective date is the submission date (ie today). "From" and "to" dates are for the event. For cases not related to a Lease Agreement or Event, email VMIA at contact@vmia.vic.gov.au for manual approval.
Step 4. Once all details have been completed select ‘Continue’.
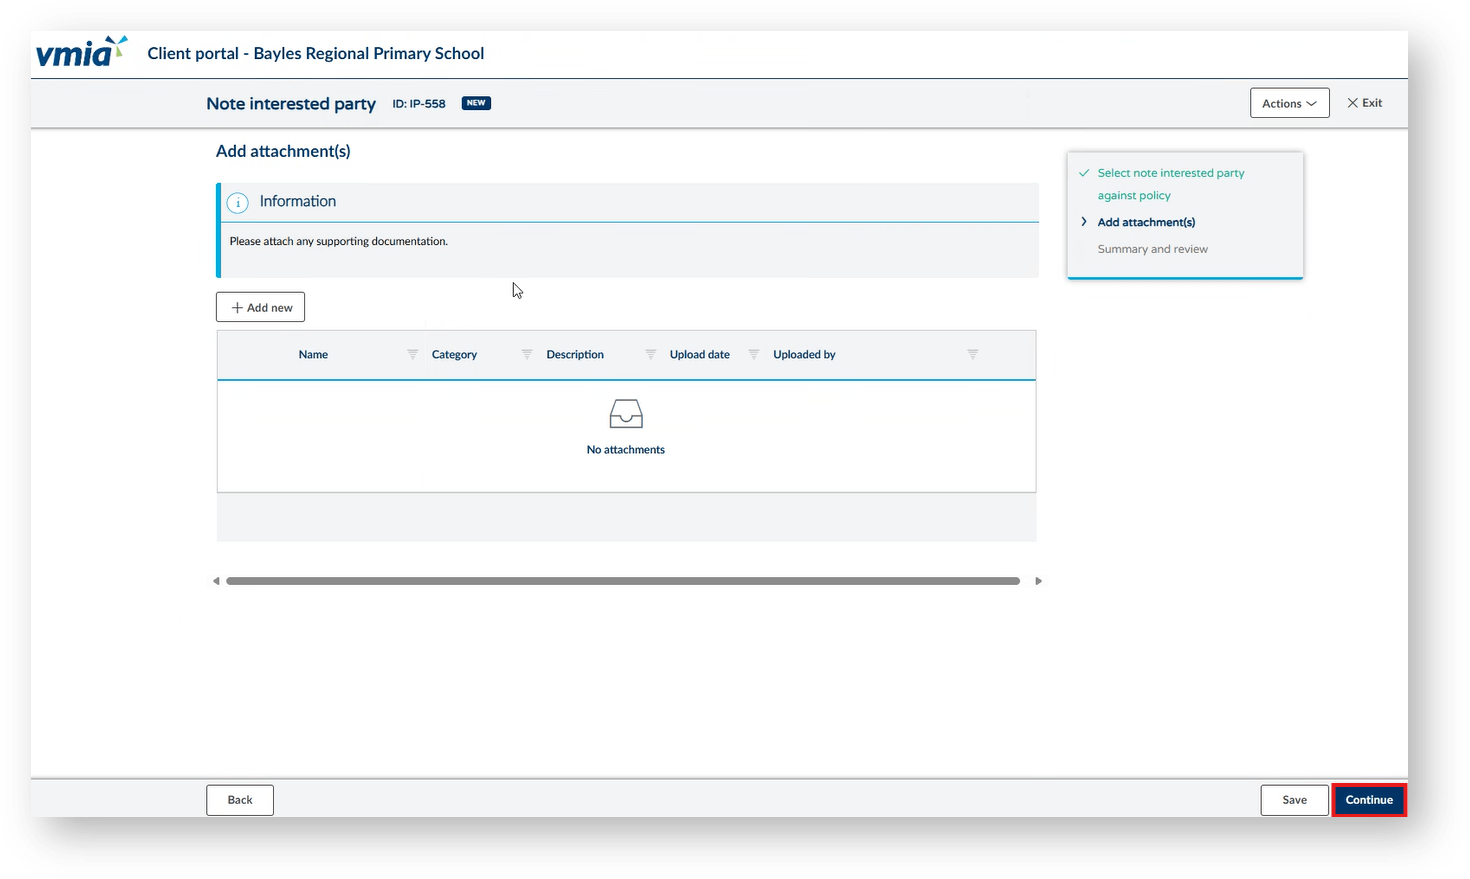
Step 5. To include any supporting documents (lease agreements, contracts, email requests from interested party etc.) include by clicking ‘+Add new’.
Step 6. Click ‘Continue’.
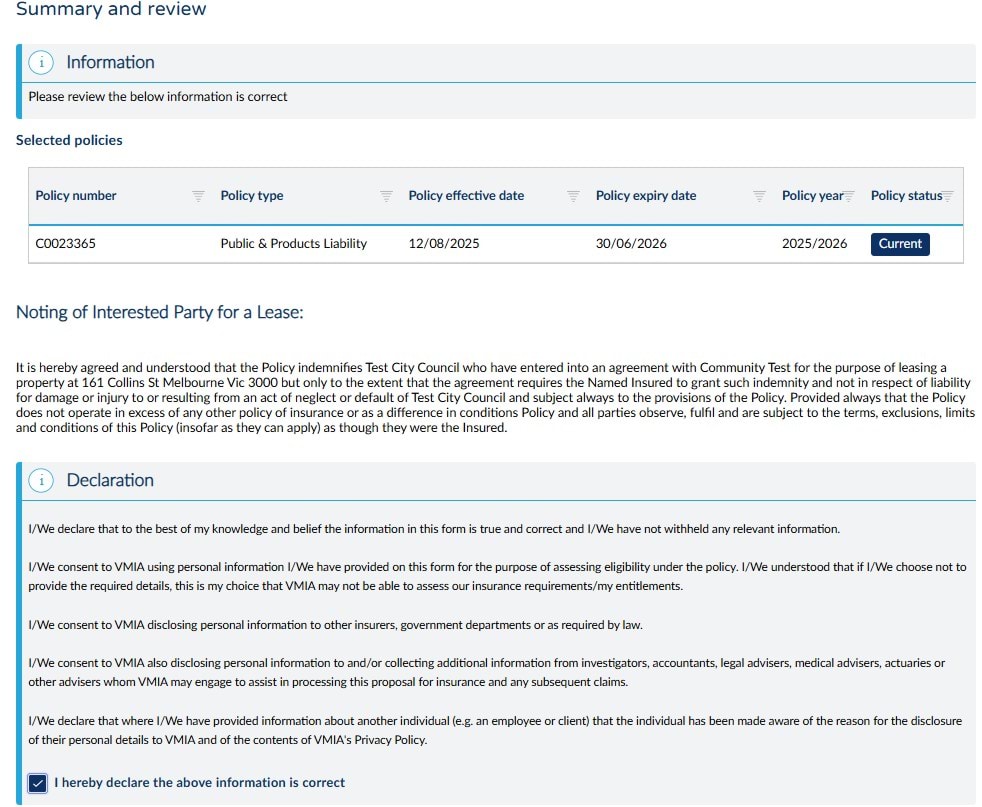
Step 7. Once you have read the declaration, tick the bottom box.
Step 8. Click ‘Finish’.
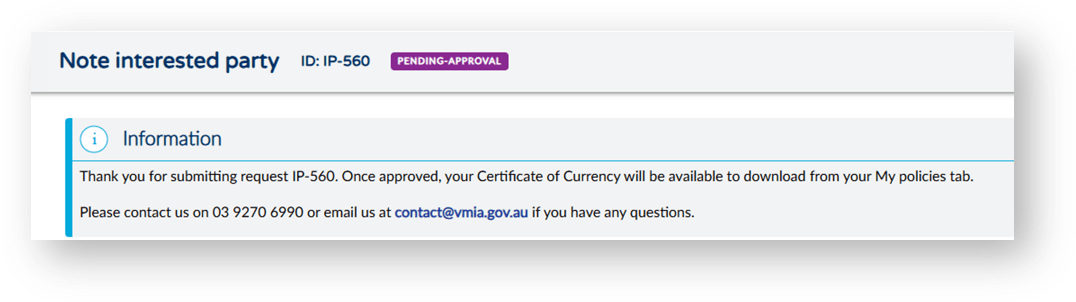
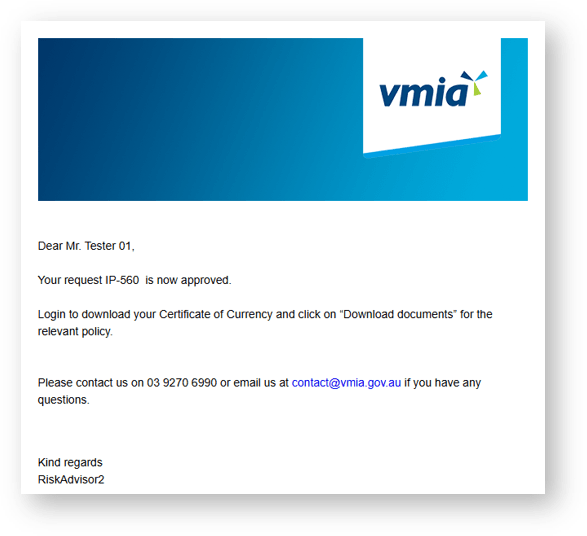
Note: Once submitted, you will see a confirmation submission message and an email will be sent to your inbox. If it is approved, you will be able to obtain the CoC from the VMIA portal.
Note: To obtain your CoC ensure you are on the ‘My policies’ tab, in ‘Current’ policy state.
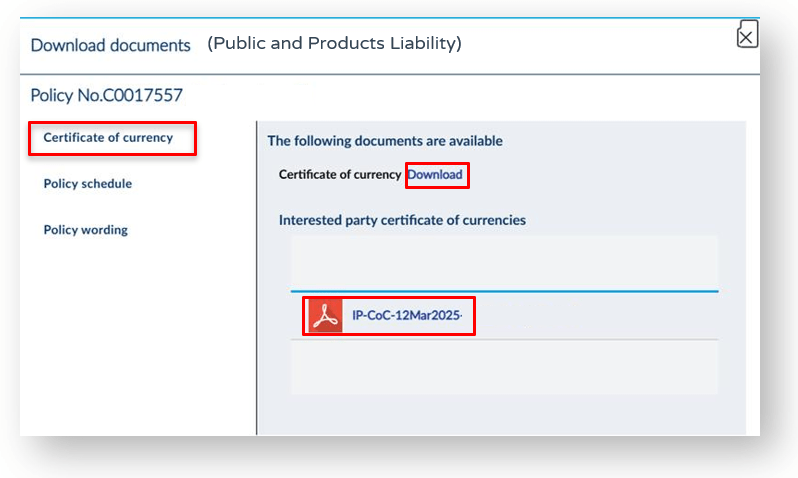
Step 10. Next to Certificate of currency two options to download the document are available. Select one of the two ‘Download’ or the Acrobat PDF link.
See our short video that works through these steps.
Once your new policy application or policy update request has been approved and you have accepted the quote provided, your invoice will be accessible in the ‘My Invoices’ tab on the portal homepage. Click on the ‘My Invoices’ tab from the homepage and select ‘Outstanding’ to view all your invoices that have not yet been paid.
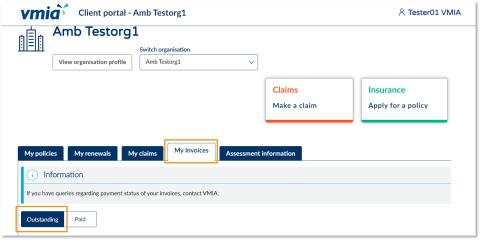
Step 1. From the portal homepage, select the ‘My Invoices’ tab.
Step 2. Select ‘Outstanding’ to view all invoices that have not yet been paid.