
PORTAL LOGIN(opens in a new window)
Not registered for portal? Please contact the portal administrator in your organisation to arrange access.
You can view policy details or download policy documents (e.g., Policy Schedule, Certificate of Currency, Invoice & Policy Wording) via the VMIA portal.
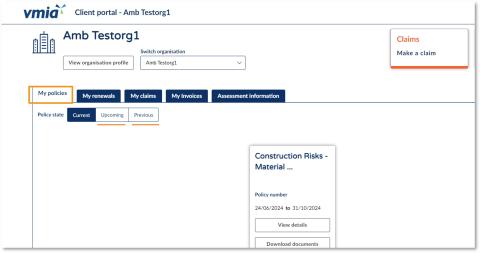
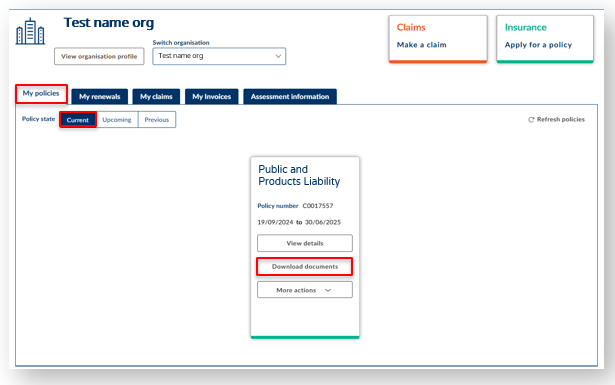
From the ‘My policies’ tab on the portal homepage, locate the tile of the policy for which you wish to view and/or download documents. Click ‘View policy’ to simply view details of your policy online without downloading any documentation. Alternatively, click ‘Download documents’ to download policy documents to your device or browser.
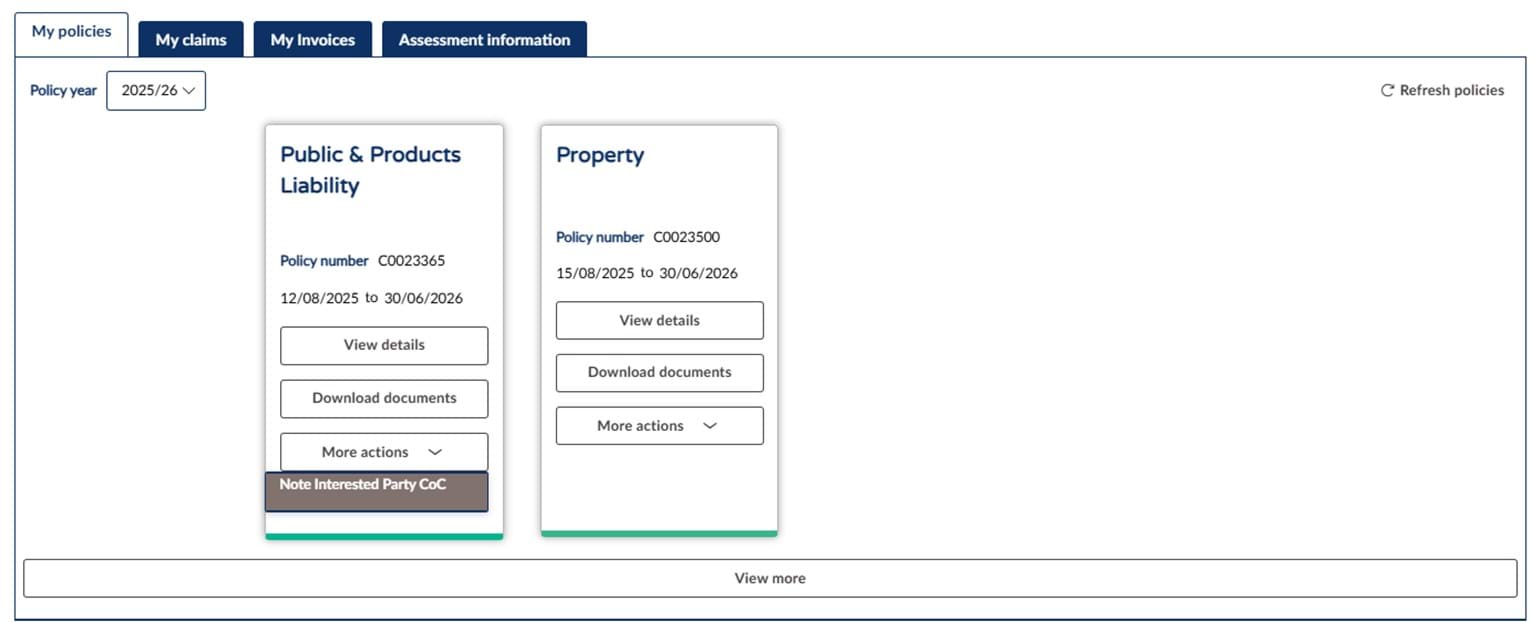
Note: the ‘My policies’ tab will automatically show policies for the current year. If you wish to view past or upcoming policies, ensure you select the ‘Upcoming’ or ‘Previous’ option for Policy state.
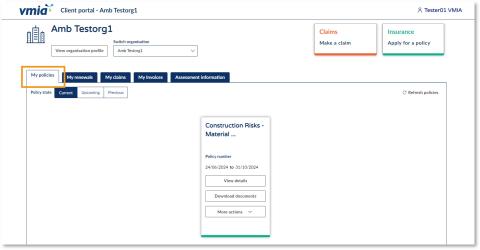
Step1. Under the ‘My policies’ tab on the portal homepage, locate the tile of the policy for which you wish to view and/or download documents.
Option 1: View policy details (without downloading)
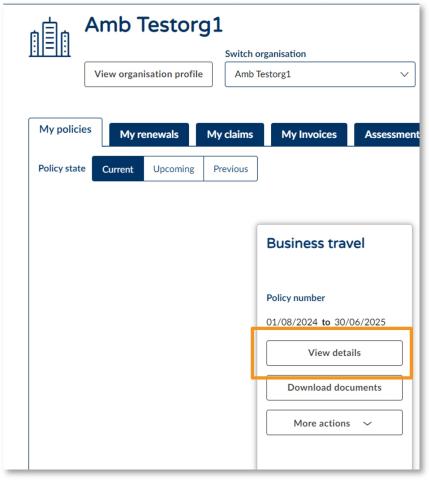
Step 1. Click ‘View details’.
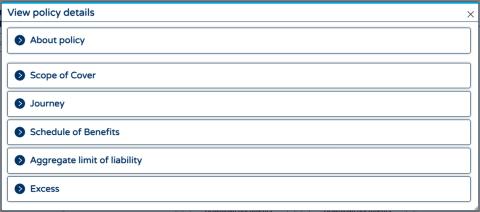
Step 2. Click on the section for which you want to view details. You will see all the policy information without having to download any documentation.
Option 2: Download policy documents
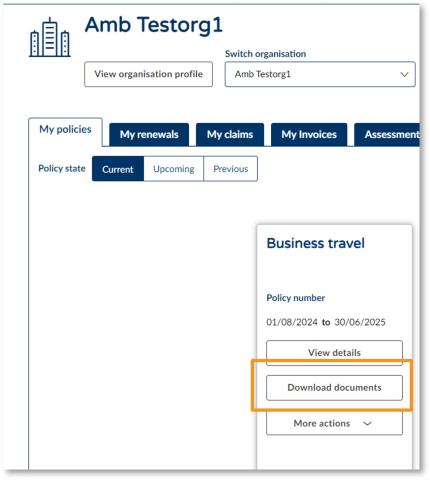
Step 1. Click ‘Download documents’.
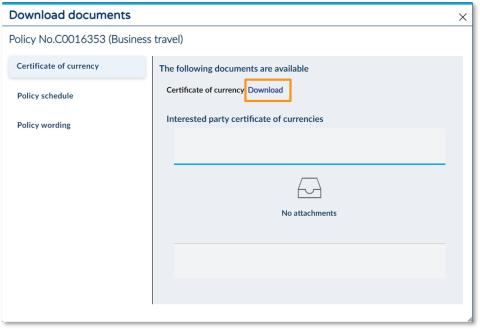
Step 2. Select the document you want to download from the left-hand side.
Step 3. Click ‘Download’. The document will download to your browser where you can then save or print.
How to view details of past or upcoming policies online
Step1. From the ‘My policies’ tab on the portal homepage, click ‘Upcoming’ or ‘Previous’ to show all upcoming or past policies (for the past 7 years).
Step 2. Locate the tile of the policy for which you wish to see details/download documentation and follow the steps outlined above regarding how to view your policy and/or download documents.
You can request a new policy online via the VMIA portal by clicking on the ‘Apply for a policy’ tile in the top right-hand corner of the portal homepage, completing all the required fields, and submitting your application.

Step 1. Click the ‘Apply for a policy’ tile in the top right-hand corner of the homepage.
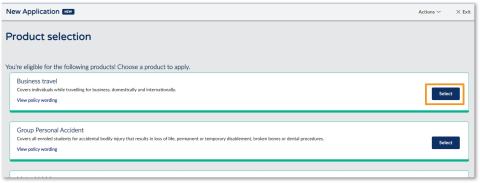
Step 2. Identify the type of policy you want to apply for from the list of eligible products and click 'Select' on the righthand side of this product.
Note: You must choose a start date for the policy. The expiry date will be the end of the current financial year.
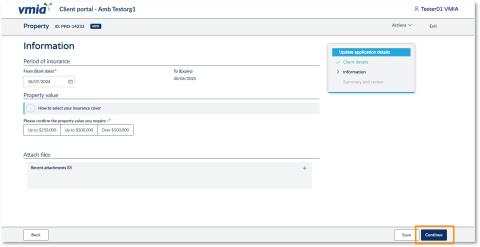
Step3. Complete the application by answering the questions related to the policy you’re applying for, clicking ‘Continue’ on each page to step through.
Note: You can click ‘Save’ to come back to the application later, if needed.
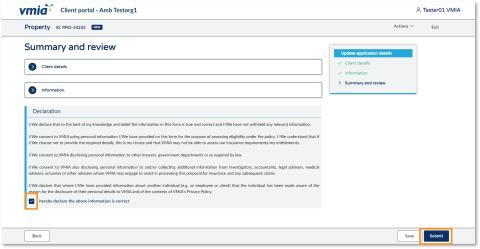
Step4. On the Summary and review page, click the ‘Client details’ and ‘Information’ headings to expand the drop-downs and review the information you have provided.
Step5. Once you have reviewed all the information, read the declaration and select the checkbox to declare you understand.
Step6. Click ‘Submit’ to complete your application. Your application will be reviewed and a quote will be provided, which you can choose to accept or reject.
Schools can easily update their travel policy within the portal to apply for any upcoming trips. To ensure that the travel request is processed smoothly, simply log in to the VMIA portal and navigate under Business travel, where you can update policy and make any necessary adjustments.
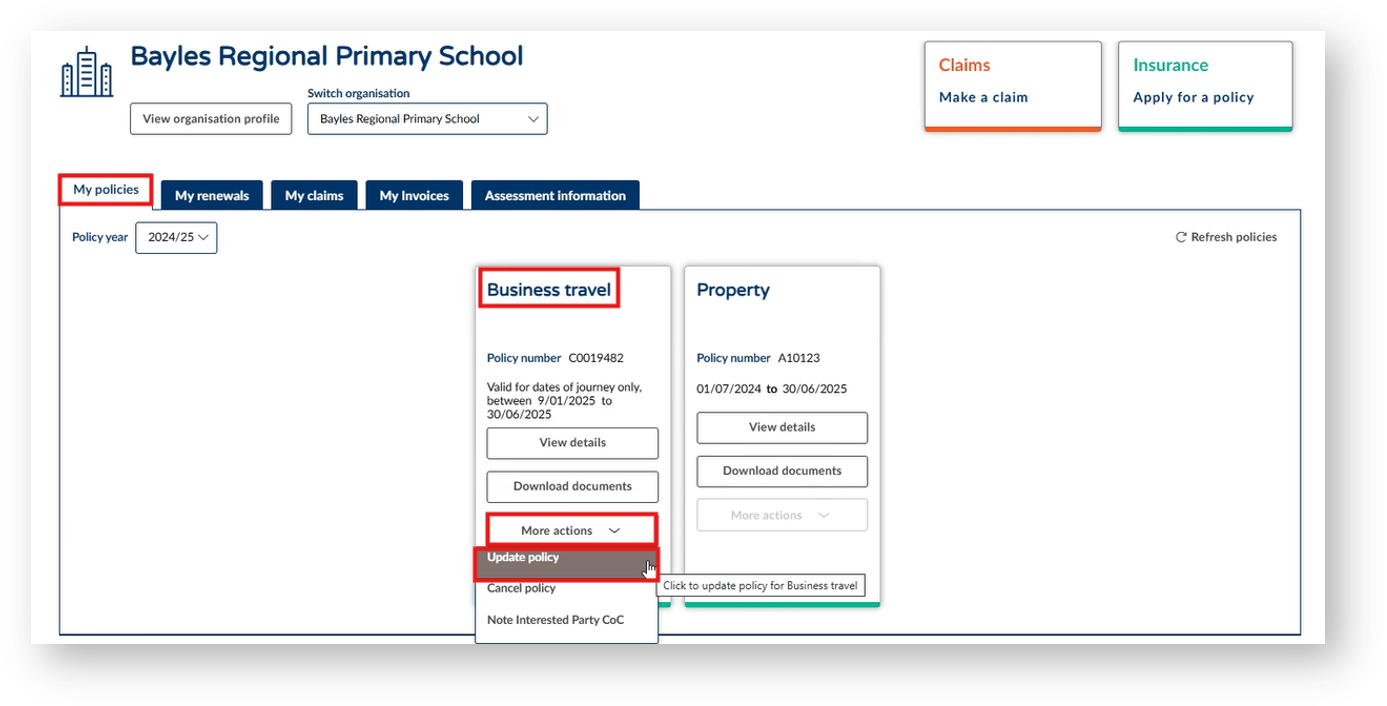
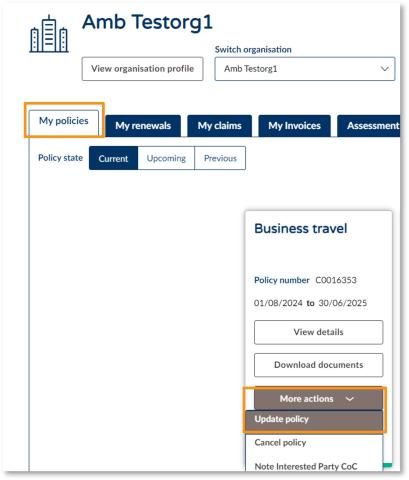
Step 1. Ensure you are in the ‘My policies’ tab.
Step 2. Under the ‘More actions’ tab select ‘Update policy’.
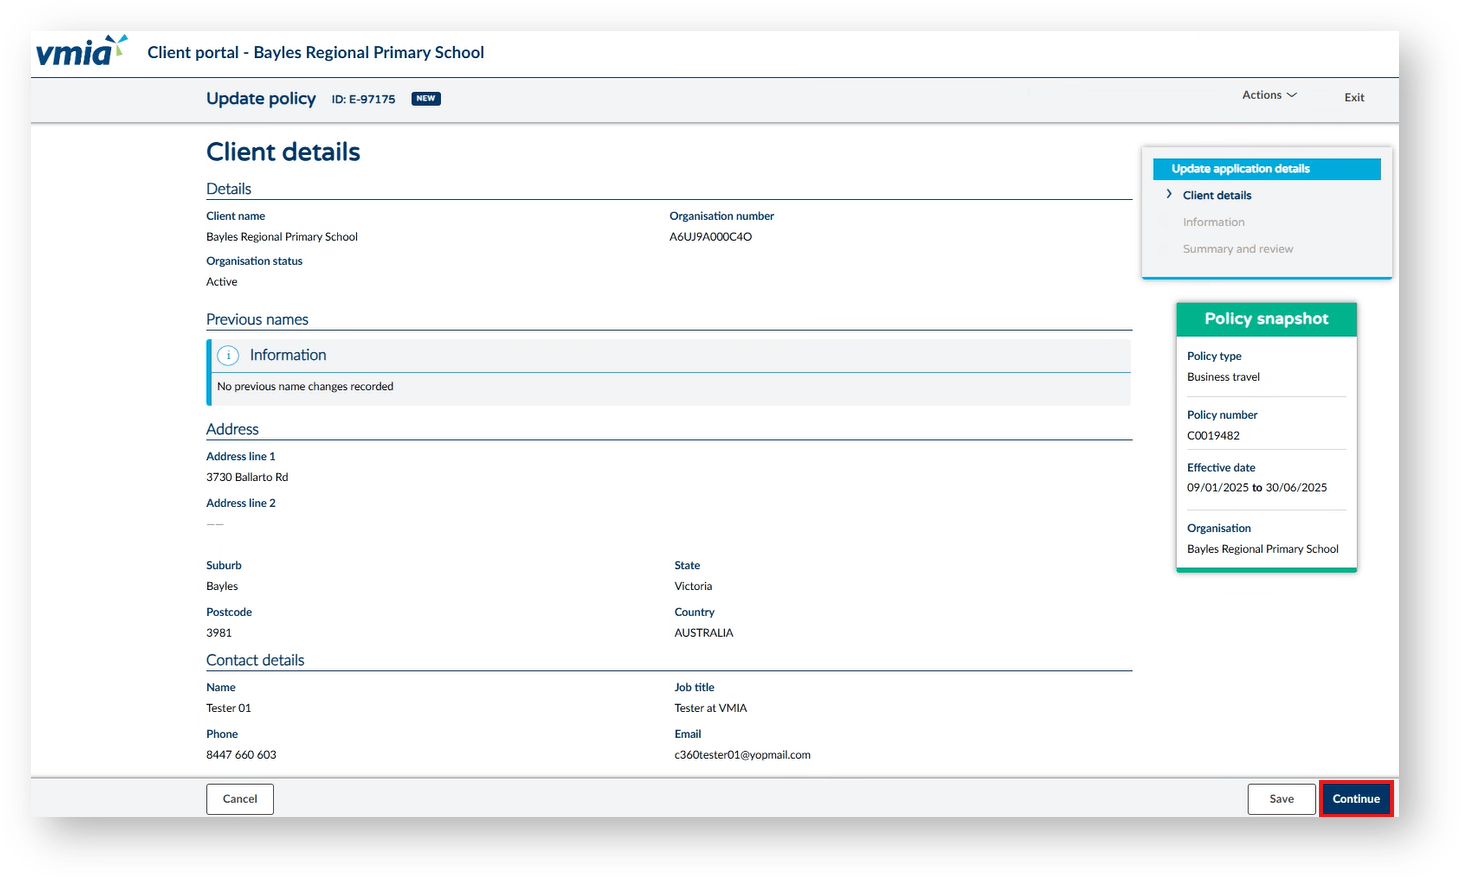
Step 3. If all details are current and correct, select ‘Continue’.
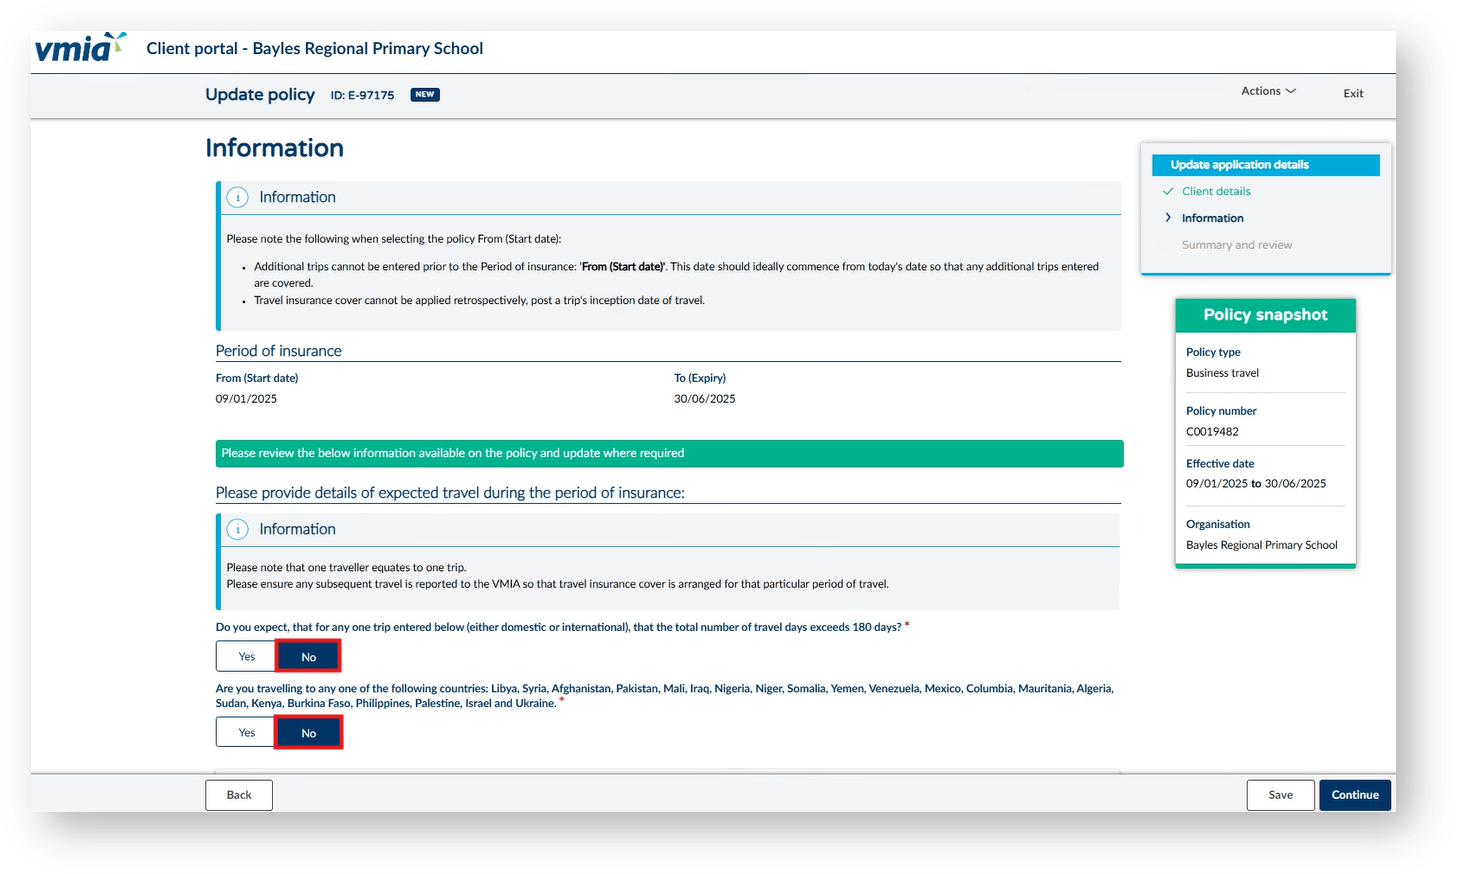
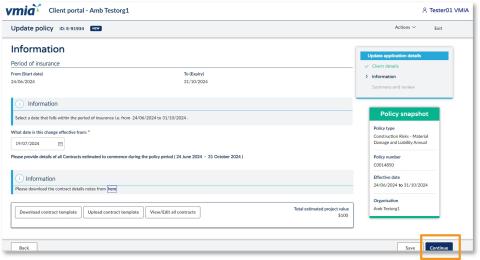
Step 4. Select ‘Yes’ or ‘No’ to Do you expect the travel days to exceed 180 days.
Step 5. Select ‘Yes’ or ‘No’ Are you traveling to any of these countries....
NOTE: If ‘Yes’ is selected for either question, this will send your quote to the underwriting team to review due to traveling to a high-risk location.
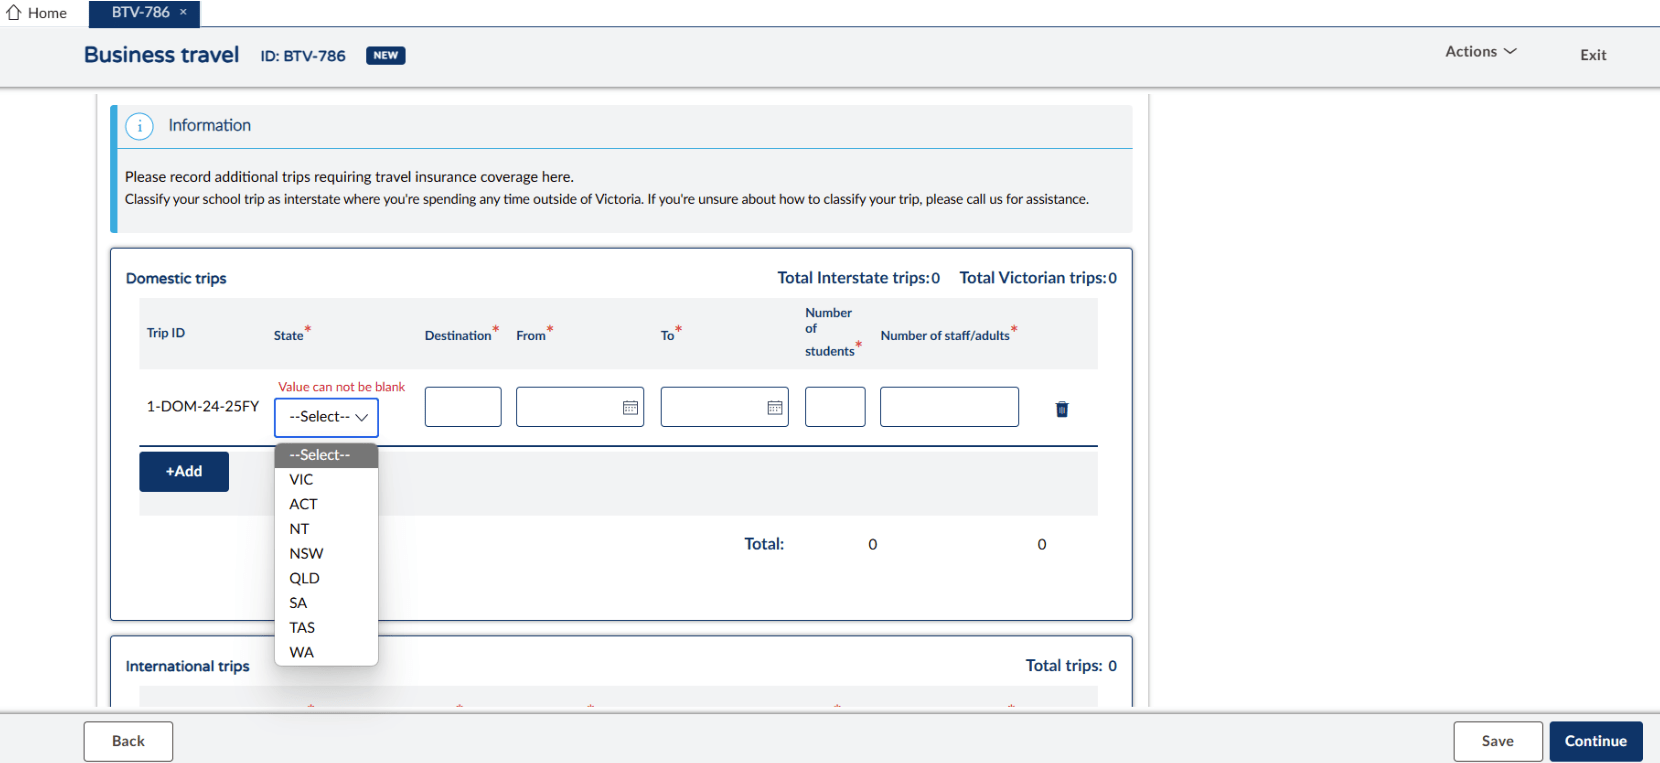
Step 6. Click ‘+Add’ and provide details for the trip destination, dates from and to, number of attending students and staff/adults.
NOTE: Intrastate trips are within Victoria. Interstate trips are NSW, TAS, QLD, WA, NT, SA and ACT. If an existing trip needs to be modified, this is where you can edit dates and number of staff and students. Any changes to an existing trip may require approval from underwriting. Should this be the case you will receive an email once approved to proceed with any necessary steps.
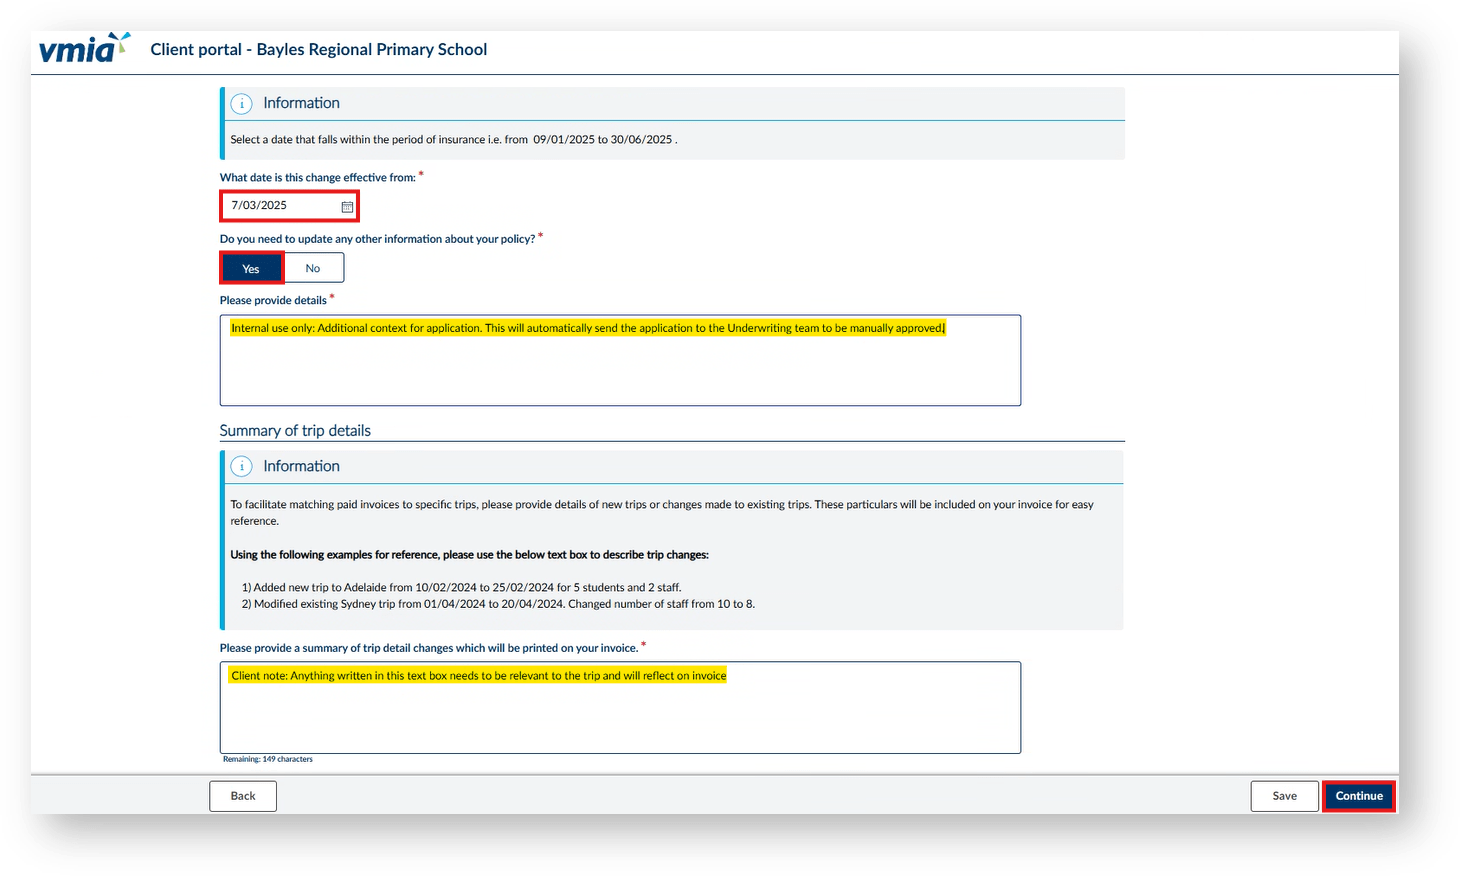
Step 7. Enter the effective date you submit the trip (current date not the first day of the trip)
Step 8. If ‘Yes’ please provide additional context which will send the endorsement to the underwriting team for approval. Alternatively, click ‘No’.
Step 9. Click ‘Continue’.
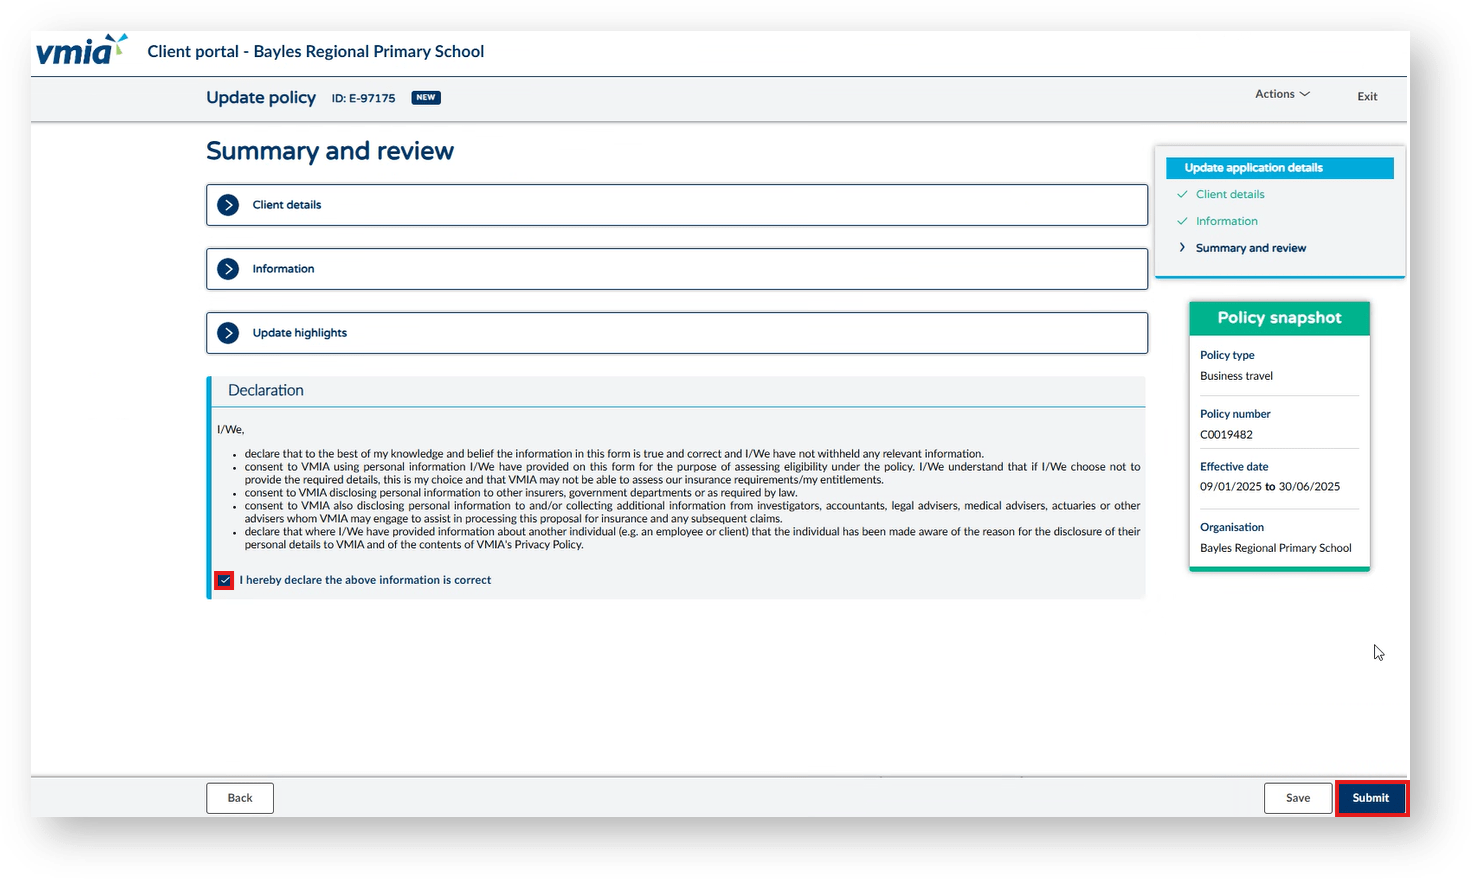
Step 10. Read the declaration to ensure it is understood. Then tick the box before proceeding.
Step 11. Click ‘Submit’.
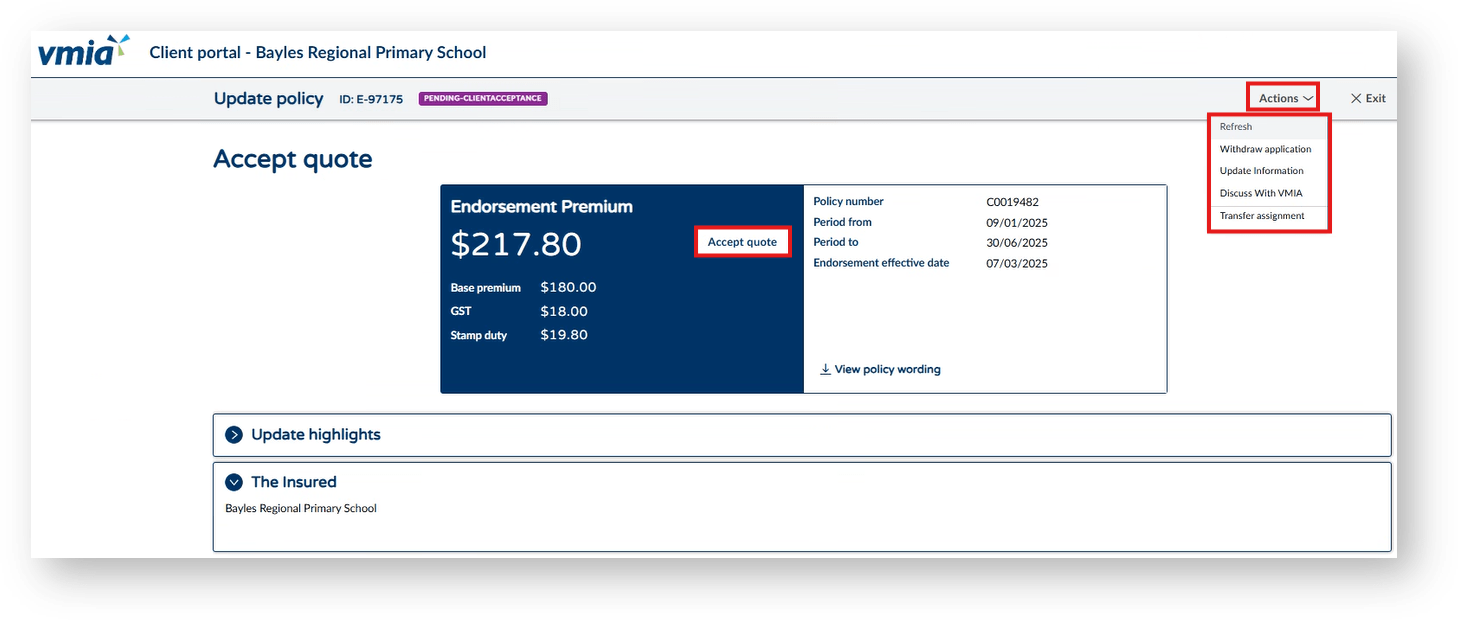
Step 12. A quote will generate for you to accept once reviewed. Once a quote is accepted this will generate an invoice.
NOTE: If you choose to update or withdraw your endorsement, do so from the ‘Action’ drop down. Changes can be made to an endorsement up to the date of travel.
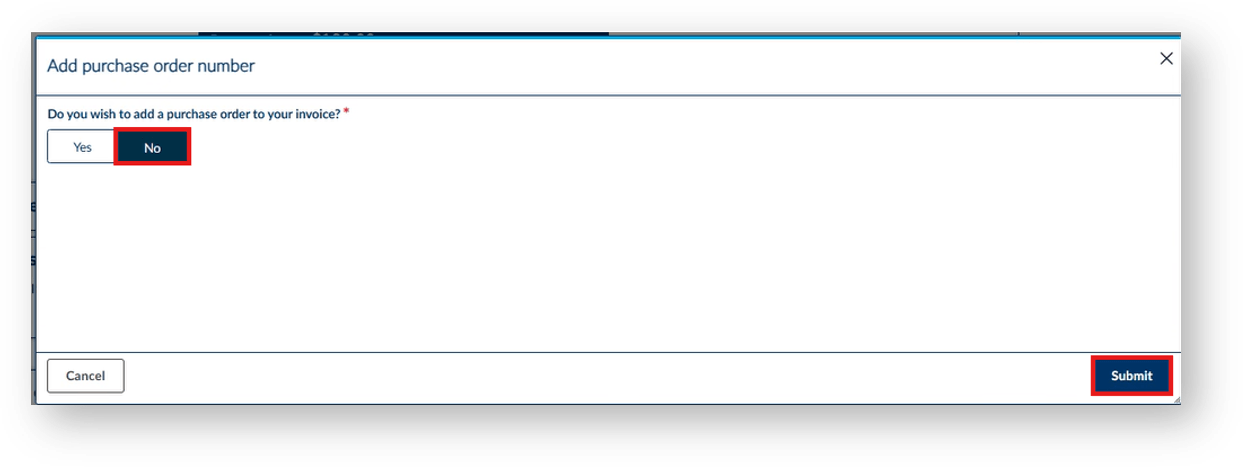
Step 13. Select if you require a purchase order with ‘Yes’ or ‘No’. If you select ‘Yes’ this will appear on the invoice.

Step 14. Under ‘My Invoices’ your recent endorsement will appear. Select ‘Download’ to generate your PDF invoice. Once your invoice is paid the status will change to ‘Paid’ and appear under the ‘Paid’ tab next to ‘Outstanding’.

NOTE: If ‘More actions’ is greyed out and unable to select for travel or any policy, this means you have an incomplete task in ‘My tasks’. You will either need to complete or withdraw the pending task to proceed with entering a new endorsement.
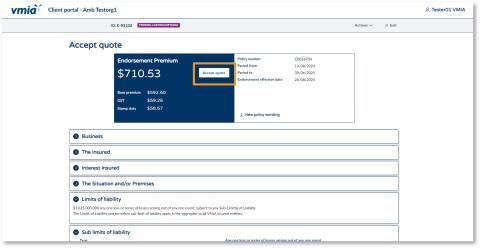
In some instances when you submit your application for a new policy, you will automatically receive a quote for the new policy on the system. Please review all details of the quote, download the policy wording, and review the premium, limits, excess, and any other relevant information. If you are happy to proceed with the quote following your review, you can accept this quote by clicking ‘Accept Quote’.
Once you have accepted the quote, you will receive an email welcome pack. If you are not happy to accept the quote, you may choose to cancel your application, update the information provided, or reach out to VMIA to discuss further.
Other times, VMIA may need to review your policy application before providing you with a quote. See the next section for further details.

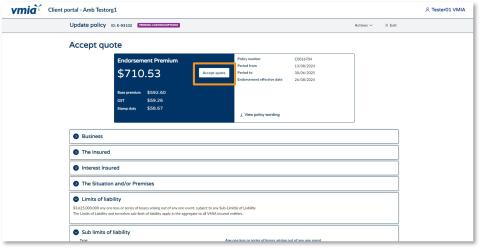
Step1. Once the application questions are complete, you will be shown details of the quote. Download and review the policy wording and review the premium, limits, excess, and any other relevant information.
Step2. If you are happy to proceed, click ‘Accept Quote’ and click ‘Submit’.
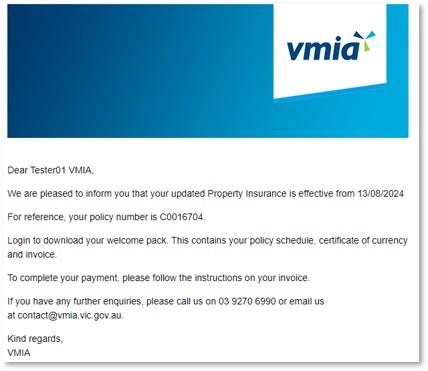
Step 3. You will receive an email welcome pack. You can click the link at any time to come back to the VMIA portal and view/download your policy documents.
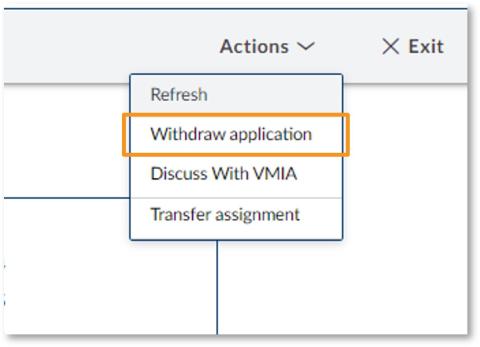
If you don’t want to proceed, click ‘Actions’ and select ‘Withdraw Application’ to withdraw your application.
Note: If you wish to discuss your quote further with VMIA, we recommend calling/emailing VMIA directly rather than selecting the option ‘Discuss with VMIA’. Your query will likely be resolved faster if you contact VMIA directly than if you arrange a time to discuss with VMIA via the portal.
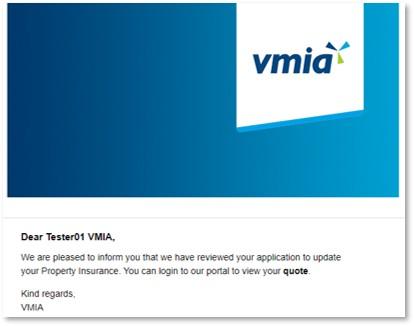
In some instances when you submit your application for a new policy, VMIA may need to review your policy application before providing you with a quote. If this is the case, you will receive an onscreen notification to say that a representative from VMIA is reviewing your application. You will also receive an email confirming the reference ID.
VMIA will contact you when the review of your application is complete and a quote will be available on the portal.
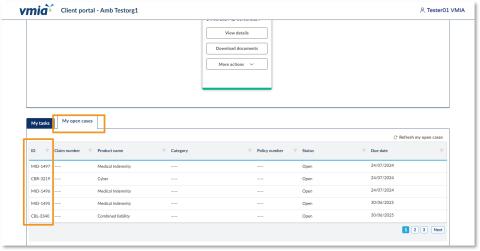
Step1. Once your application has been reviewed by VMIA, you’ll receive an email notification to say that it is ready for your review. Click on the reference ID under the ‘My open cases’ tab. This section can be found at the bottom of the VMIA portal homepage.
Step 2. If you are happy with the quote, click ‘Accept Quote’ and click ‘Submit’.
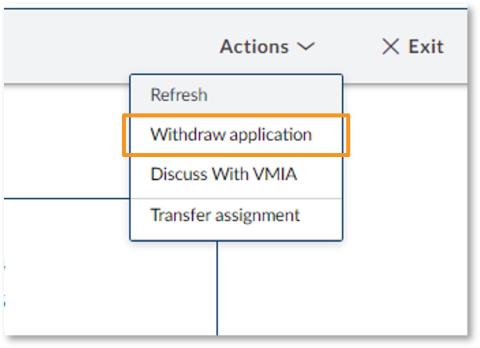
If you don’t want to proceed, click ‘Actions’ and select ‘Withdraw Application’ to withdraw your application.
Note: If you wish to discuss your quote further with VMIA, we recommend calling/emailing VMIA directly rather than selecting the option ‘Discuss with VMIA’. Your query will likely be resolved faster if you contact VMIA directly than if you arrange a time to discuss with VMIA via the portal.
You can make updates to an existing policy via the VMIA portal by locating the tile of the policy you wish to update, clicking on ‘More actions’, and clicking ‘Update policy’. If VMIA don’t need to review the update request, you’ll see your updated quote straight away once you submit the policy update request. If VMIA need to review your policy updates, you’ll receive an email from us when your new quote is ready for your review.
Step 1. Locate the tile of the policy you wish to update on the homepage (in the ‘My policies’ tab).
Step 2. Click ‘More actions’ and select ‘Update policy’.
Step3. Make the necessary changes to the policy, clicking ‘Continue’ on the bottom right-hand side to progress through the screens.
Step 4. Before submitting, you will be prompted to review your changes. Select the heading ‘Update highlights’ to view the changes.
Step 5. When you are happy to proceed, read the declaration and select the checkbox to declare you understand.
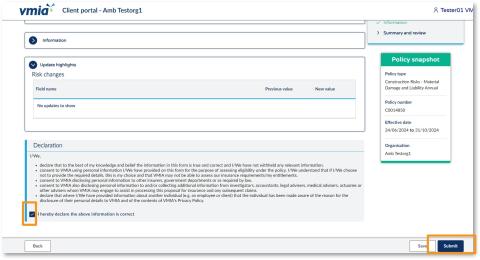
Step 7. If VMIA don’t need to review the update request, your quote will be available immediately for your review. If VMIA need to review your policy updates, you’ll receive an email from us when your new quote is ready for your review.
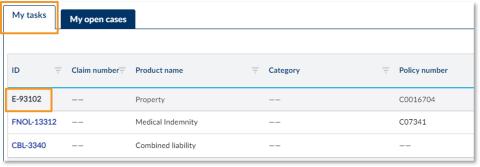
Step 8. From the portal homepage, scroll down to the ‘My tasks’ tab.
Step 9. Click on the relevant Reference ID to access the quote.
Step 10. If you are happy with the quote, click ‘Accept Quote’ and click ‘Submit’.
If you don’t want to proceed, click ‘Actions’ and select ‘Withdraw Application’ to withdraw your application.

Note: If you wish to discuss your quote further with VMIA, we recommend calling/emailing VMIA directly rather than selecting the option ‘Discuss with VMIA’. Your query will likely be resolved faster if you contact VMIA directly than if you arrange a time to discuss with VMIA via the portal.
You can cancel an existing policy via the VMIA portal by locating the tile of the policy you wish to cancel, clicking on ‘More actions’, and clicking ‘Cancel policy’. The cancellation request will be sent to VMIA for action. You will be notified when the request has been actioned.
Note: Clients with certain policy bundles cannot cancel them via the portal and must contact VMIA for assistance. This includes the following clients:
- Community Service Organisation (CSO)
- Community Service Organisaion Education (CSOe)
- Cemetery Trust (Individual Trusts can purchase additional insurance policies for: Construction (contract value over $500,000), Business Travel, Personal Accident (journey), Motor Vehicle.)
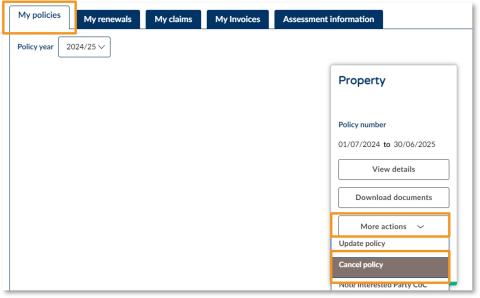
Step 1. Find the tile of the policy you wish to cancel on the ‘My policies’ tab of the portal homepage.
Step 2. Click on ‘More actions’ and select ‘Cancel policy’.
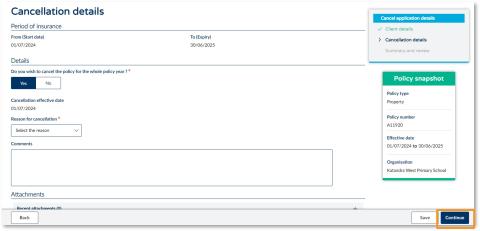
Step 3. Enter the cancellation details.
Step 4. Click ‘Continue’.
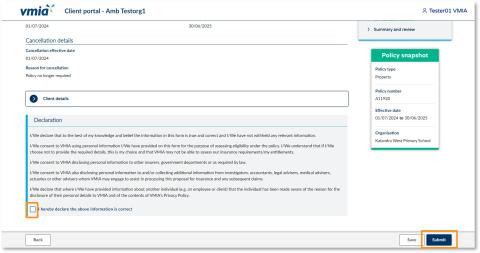
Step 5. Once you have reviewed your policy cancellation request, read the declaration and select the checkbox to declare you understand.
Step 6. Click ‘Submit’. Your request will be sent to VMIA for action.
A Note Interested Party request is a formal process where a third party, such as a financier, contractor, or other stakeholder, is noted on your insurance policy. This ensures that their interests are recognised and protected under the terms of your insurance coverage.
Step 1. Ensure you are in the ‘My policies’ tab.
Step 2. Under the ‘More actions’ tab select ‘Note Interested Party CoC’.
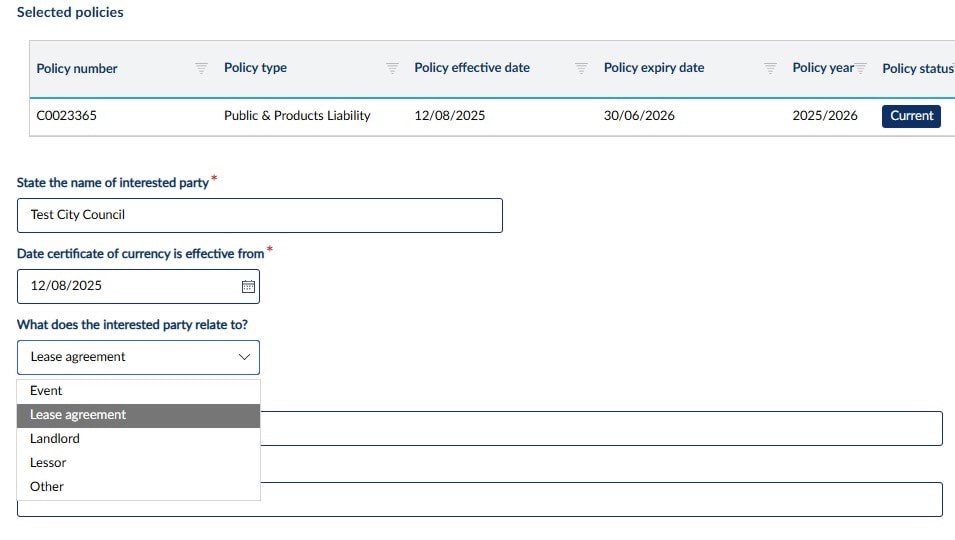

Step 3. Complete all fields before you can continue.
Note: The effective date is the submission date (ie today). "From" and "to" dates are for the event. For cases not related to a Lease Agreement or Event, email VMIA at contact@vmia.vic.gov.au for manual approval.
Step 4. Once all details have been completed select ‘Continue’.
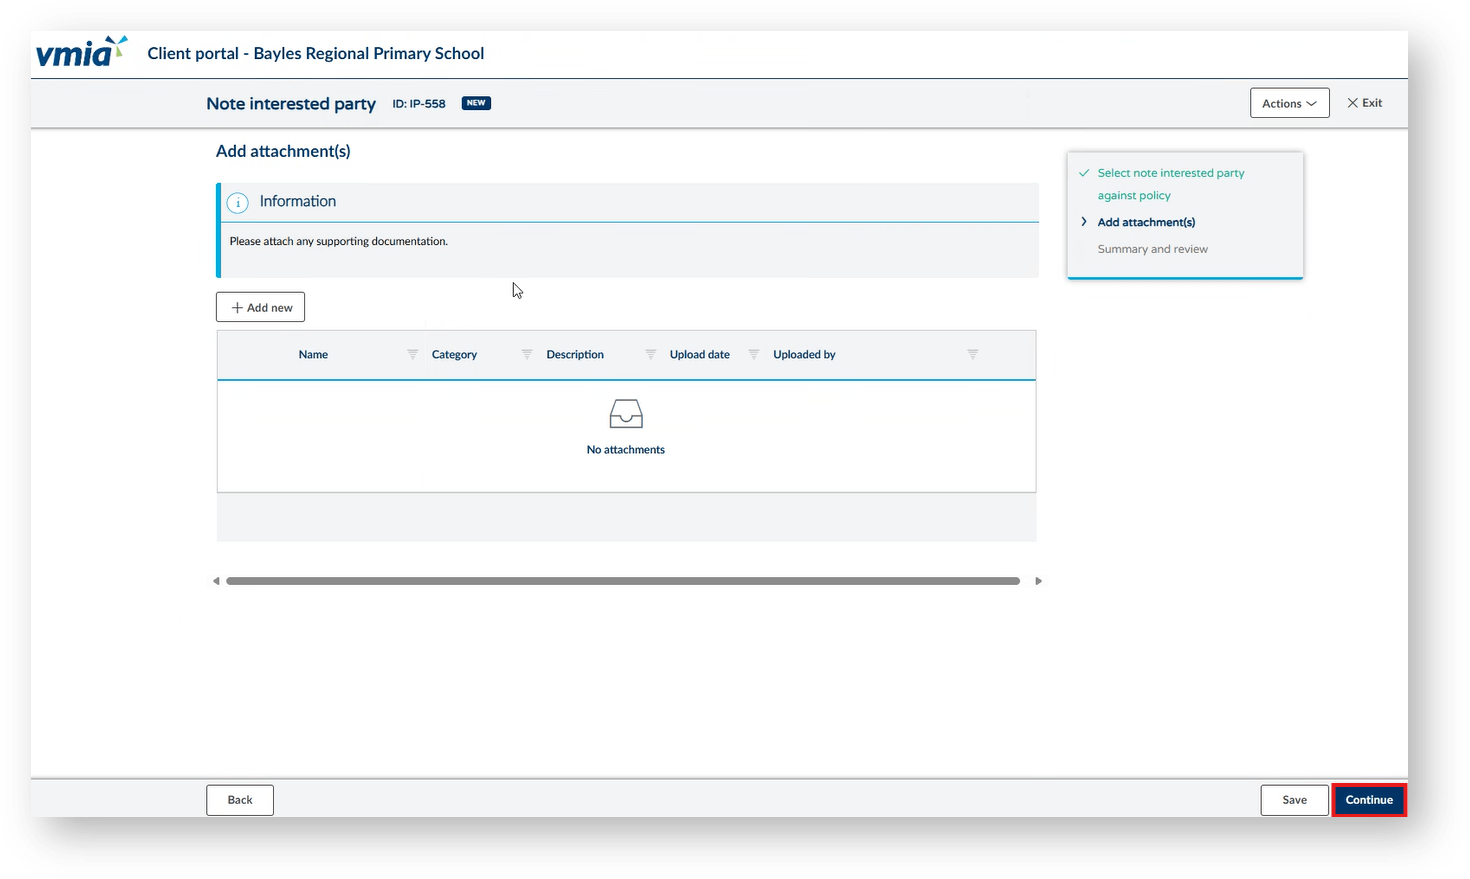
Step 5. To include any supporting documents (lease agreements, contracts, email requests from interested party etc.) include by clicking ‘+Add new’.
Step 6. Click ‘Continue’.
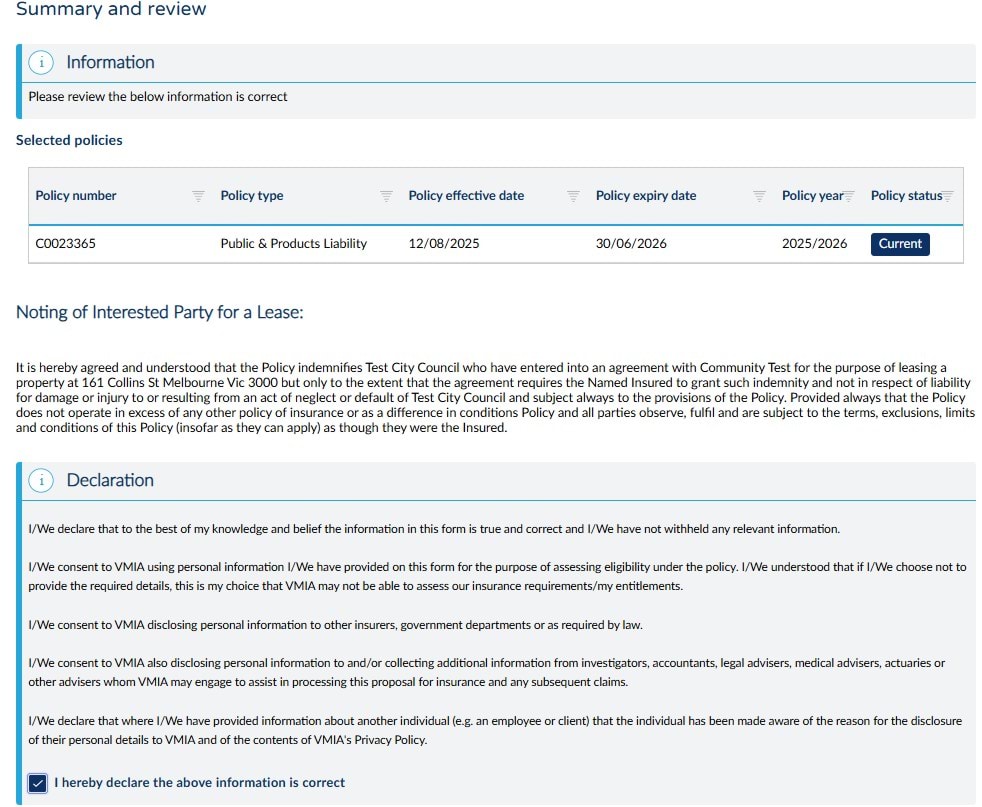
Step 7. Once you have read the declaration, tick the bottom box.
Step 8. Click ‘Finish’.
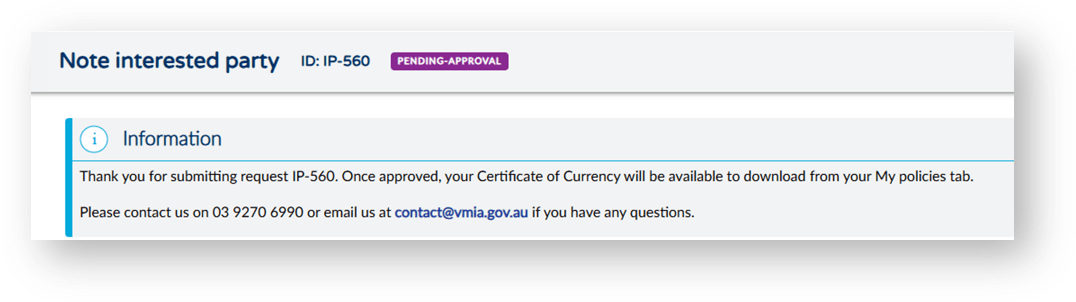
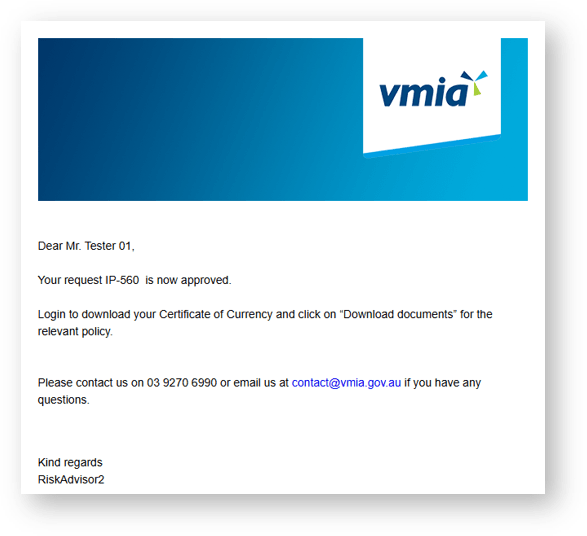
Note: Once submitted, you will see a confirmation submission message and an email will be sent to your inbox. If it is approved, you will be able to obtain the CoC from the VMIA portal.
Note: To obtain your CoC ensure you are on the ‘My policies’ tab, in ‘Current’ policy state.
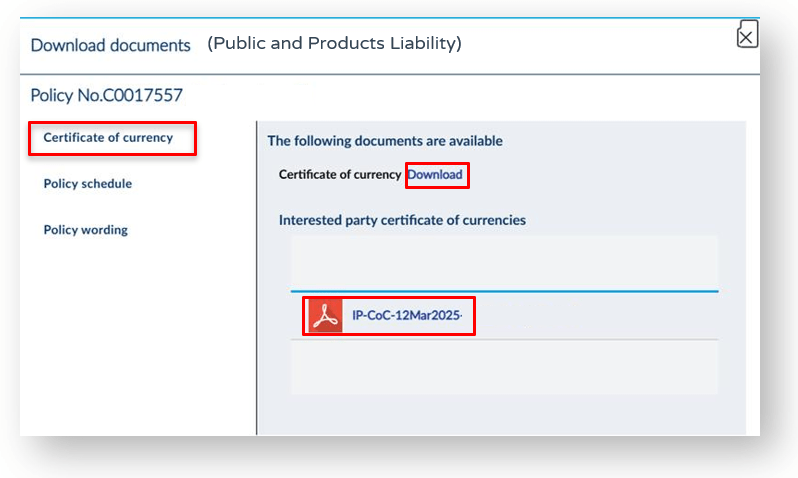
Step 10. Next to Certificate of currency two options to download the document are available. Select one of the two ‘Download’ or the Acrobat PDF link.
See our short video that works through these steps.
Once your new policy application or policy update request has been approved and you have accepted the quote provided, your invoice will be accessible in the ‘My Invoices’ tab on the portal homepage. Click on the ‘My Invoices’ tab from the homepage and select ‘Outstanding’ to view all your invoices that have not yet been paid.
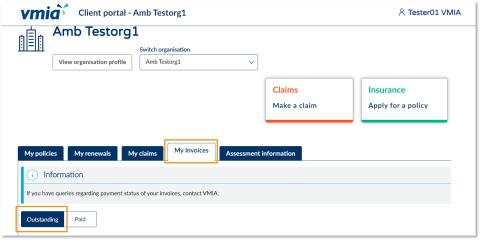
Step 1. From the portal homepage, select the ‘My Invoices’ tab.
Step 2. Select ‘Outstanding’ to view all invoices that have not yet been paid.
Updated